Acrylic Pour Cells: Everything You Need to Know
What is it about cells in acrylic paint pouring that make them so special? Is it the compact layering of colors, the bold 3-d effects they make, or the eye-catching variations they bring to a painting? Whatever the cause, cells in fluid paintings are complex and sometimes enigmatic.
Acrylic pour cells come in many different shapes and sizes. They can form naturally, or they can be artificially coaxed from within a painting by using additives, exposing the paint to small amounts of heat, or by layering paints with different densities and textures. Creating cells can add additional depth and character to your paint pour artwork.
We here at LeftBrainedArtist have done some extensive research into acrylic pour cells and are sharing everything we’ve learned. We hope it provides beneficial and helps you get your cell-making-mojo churning.
What are Cells in Acrylic Pouring?
Acrylic paint pouring is, to define it as concisely as possible, mixing paint in a freeform fluid state to create art. As with many other liquids, when you mix fluid acrylic paints together, you get various effects including color mixing, layering, and cells.
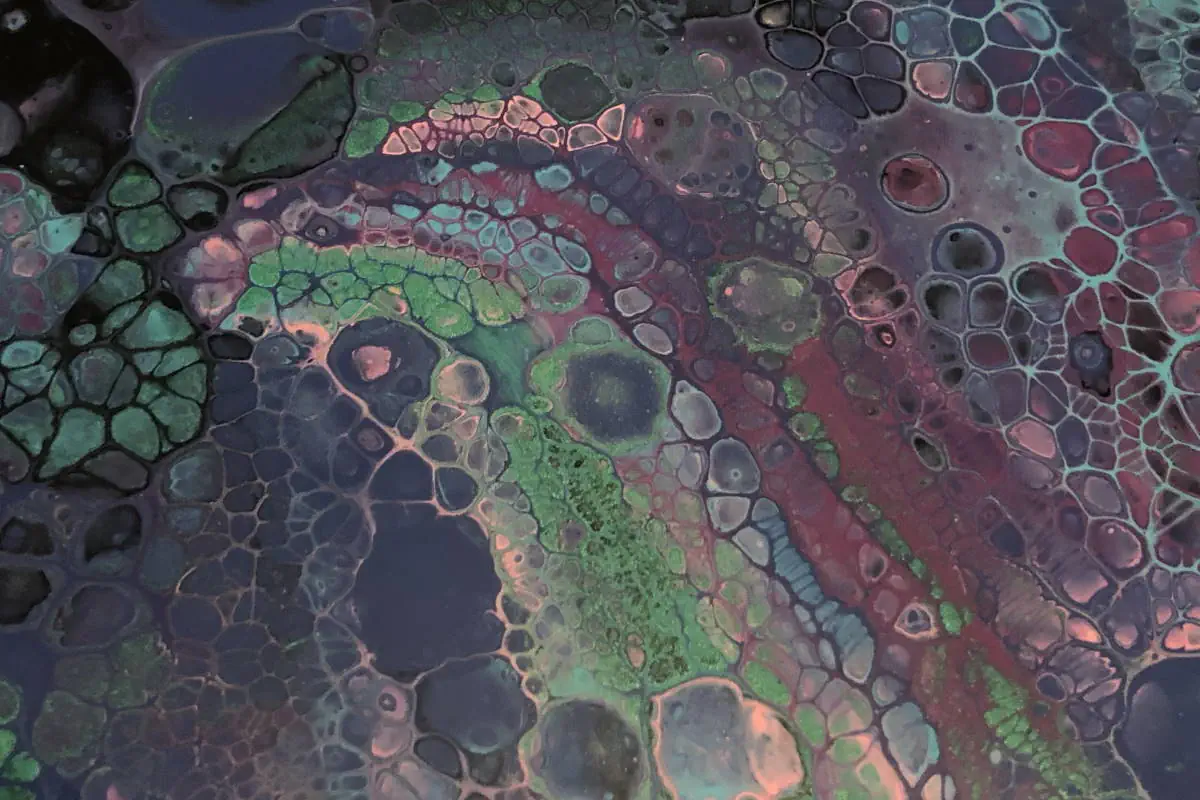
So, what exactly are cells in acrylic pouring? As the name implies, they are effects in acrylic paint pouring that take the shape of cells similar in appearance to those you would see in biology.
To better illustrate the comparison between cells in biology and painting consider this: the nucleus contains the center color, the cytoplasm inner filling usually containing multiple combinations of colors, and the cell membrane is the distinct border.
The cells can take many different shapes and come in various sizes, which we’ll go into more detail later in the article.
Why do Artists Want Cells in Their Pour Paintings?
Many artists have a love-hate relationship with cells in their acrylic pour paintings. Cells can bring amazing eye-catching color combinations and variations to a painting. They can also cause unwanted distractions in a painting.
One of the true beauties of acrylic pouring is a randomness of how fluid paints interact. The nature of the acrylic paints and the mediums make predicting the outcome quite uncertain. Cells are a prime example of this uncertainty. There are ways to coax cells from a painting but some of their creation seems to just be dumb luck.
We believe one of the main reasons that cells are so popular in acrylic pouring is that they are loved by the audience. People that we have shown our art to seem always to be entranced by the arbitrariness and fine intricacies of acrylic pour cells.
Cells also tend to be micro-cosmic representations of the artwork. The underlying principles that direct how cells form inherently pull colors and textures from multiple different layers of paint and smashes them all together creating mini paintings in each cell.
What Causes Cells in Acrylic Pouring?
There are many ways to create cells in a paint pour. The most common ways we have found come from manipulating the density of the various paints, specific pouring mediums, various fluid pour techniques, and special additives.
Cells and Paint Density
Every paint has a different density based on the pigments that are used and the binder that those pigments are suspended in (this is how acrylic paints are made). These differing densities mean that each paint weights more or less than other paints when comparing the same volume of each.
An easy example would be to take a one-inch square of gold and a one-inch square of cardboard and compare the weight of each. The gold would weight more than the cardboard even though the volume (one inch cube) of each is the same.
In physics, the measurement of the difference in densities between two objects, or liquids in the case of acrylic paints, is called the specific gravity. In most cases, this comparison is done between water and another object. This way there is a common benchmark when calculating specific gravity.
Dense objects like a rock will sink when tossed into a body of water. Less dense objects, like a small piece of wood, will float on the water.
This exact same phenomenon happens with acrylic paints. More dense paints like titanium white will “sink” into less dense paints like charcoal black. This happens because the white is denser than the black and has a greater specific gravity. This interaction of materials with different densities is called the Rayleigh-Taylor instability.
To create cells, you can use this physical property of fluid acrylics to manipulate how the paints will rise and sink when combined by stacking more dense paints on top of less dense ones. When paints rise and sink, they gather small bits of the paint they are moving through. When bubbles of lighter paint move up to the top of the painting, they create cells.
Additional information about paint density can be found in our articles about the Origins of Acrylic Pouring and Muddy Paintings.
How to Measure Paint Density
To accurately calculate the density, you will need to measure the mass of the paint (weight in grams) and divide that by the volume (measured in milliliters). A quick explanation of this calculation can be found in this YouTube video.
Measuring the density of paint is a very painstaking process. It is not reasonable for most artists to figure these out for all their paints. However, we can get a general idea of the weight of paints based on this documentation provided by Golden Paints or use our Acrylic Paint Density Chart.
Pouring Mediums and Cells
Using different pouring mediums can also help in the creation of cells. The two main considerations for pouring mediums in cell creation is their densities, as was explained in the previous section, and the chemical properties of each medium.
We have put together a list of a few common pouring mediums that we have experience creating cells with. We have also included a few that other notable acrylic pour artists have had success with.
- Floetrol – This paint conditional works great as a pouring medium. It has a medium consistency and does tend to create cells.
- Water – Paint thinned slightly with water only can help create small cell activity. You can’t use too much as it will cause there to be not enough binders in the paint and it will crack.
- Isopropyl Alcohol – Just like this water, you can only use a little bit of this, or it will cause problems when the paint dries. A little goes a long way. The higher the percentage of alcohol the less you will need. Find 99% Isopropyl Alcohol on Amazon here.
Pouring Techniques that Create Cells
There are multiple different acrylic pour painting techniques that lend themselves well to creating cells. Additional explanations about each of these pour techniques can be found in our articles on 5 Basic Acrylic Pour Techniques and 16 Advanced Acrylic Pour Techniques.
- Dirty Pour – The dirty pour cup is created by pouring multiple paints together. The density of the different paints can organically create cells as the heaver paints fall the bottom of the cup and the lighter ones rise to the top. By pouring the paint into the cup from high up or pouring more paint in at a time you can also force the paint to mix which also creates cells.
- Flip Cup Pour – The flip cup pour starts with a dirty pour cup of paint. The cup is then flipped over all at once on the painting surface instead of poured out. If you want to get even more cells, cover the canvas lightly with a single color of slightly more fluid acrylic pour paint before doing the flip cup.
- Strainer/Colander Pour – Start with a dirty pour cup and pour it through a strainer or colander onto the canvas.
- Bottle Pour – Cut the button 2 inches off a one- or two-liter bottle. Turn this bottle bottom upside down and pour your paint onto the bottle so it separates into multiple streams over the bottle bottom. As the paint flows into each other at the bottom of the bottle it will create cells between layers.
- Swipe Pour – This is one of our favorites. Pour your paint onto your canvas using any of the techniques you have learned. Then pour a single color along one of your edges. Now gently take a spackle knife or a painter’s knife and pull that new paint lightly across the other paint on the canvas. The new paint will flow over the previously poured paint and create an amazing webbing effect.
- Dutch Pour – Cover your canvas lightly with white paint. Now pour a few additional colors into the center of the painting surface. Once this is done around the outside of the paint you just poured, pour a good helping of the white. Now blow the white paint from all directions over on top of the colored paint. Most people use a hairdryer to do this. Once this is done blow from the center of the new pile of paint to the edges of the canvas. Because you are forcing the paint to flow over each other you will get cells to form.
Using Additives to Create Cells
One of the most popular ways to create fluid acrylic cells is by using additives. These additives are generally much lighter than the paint and will rise through the paint layers bringing little bits of each color of paint to the surface and thus creating cells.
Getting Cells from Silicone and Dimethicone
Silicone and Dimethicone are the preferred methods by many artists to create cells. These additives are relatively inexpensive and can be found at most general stores in one form or another. Only a drop or two per 2 to 3 ounces of paint will go a long way in creating cells.
This can be added to the individual cups of paint before mixing or it can be added directly to a dirty pour cup in between any layer of paint.
The more vigorously the paint is stirred after the silicone or Dimethicone is added can affect how small (stirred rapidly and vigorously) or large (barely stirred at all) the cells become.
Our favorite version of silicone and Dimethicone can be purchased online here and here.
NOTE: When using oil additives, if you are getting bare canvas spots on the outside of your paintings we recommend you read our article about 3 Ways to Prevent Bare Canvas Spots on Your Acrylic Paint Pour.
Use Alcohol to Create Cells
We mentioned using alcohol as a medium previously. You can also add alcohol to other paint mixtures and mediums to cajole cells to come out. You can use anywhere from a few drops to 5 to 10% of the total mixture.
Alcohol helps create cells because it “lightens” whatever paint it is added to. In addition, when the alcohol quickly evaporates from the paint it helps pull colors together in small quantities (a.k.a. cells).
Most cells created by isopropyl alcohol tend to be small and numerous.
Create Cells with Rain-X
Using the popular window treatment Rain-X has gained additional popularity of late. This product is a hydrophobic, or water-resistant, repellent. It essentially repels liquid molecules.
You can use this in small quantities while mixing your paints, but we believe it is better used by lightly spraying or sprinkling directly on to already poured paint.
When the Rain-X hits the paint it immediately makes the top layer of paint separate and shows the paint underneath it. This creates cellular formations.
You can find a small bottle of Rain-X at your local automotive store or at any superstore like Walmart of Super Target. You can also find it online.
Create Cells with Coconut and Other Oils
Many different common household oils can be added to your acrylic paint pours to help facilitate the creation of cells. 100 percent coconut oil is one of the others that we would recommend trying.
Keep in mind that ALL additives will need to be completely cleaned off your dried panting surface before you can add any topcoat or varnish. Failing to do so will cause the varnish to either become patchy or to not adhere to the dried acrylic paint.
Using Different Paint Types to Create Cells
There are various paint types that have been known to help create cells in acrylic paint pours. We’ve listed a few of the ones we have experience with or that we know trusted influencers in the pouring community have endorsed.
- DecoArt Satin Enamel – When added in small quantities to some paint it does tease out cells. We don’t recommend using more than about 10-15% as it can cause your paint to crack. The cells that are created from adding this sating enamel general take the form of puffy clouds. Many artists that use it to create cells call the result “cloud pours”. You can find DecoArt Satin Enamel on Amazon here.
- Heavy density paint colors like titanium white and cadmium yellow – These are necessarily specific paint brands but because they are made of heavier organic, non-organic, or synthetic materials they “drop” through lighter paints and help create cells.
- Metallic paints – These paints are generally heavier than other paints and have the same effects mentioned above with the difference in densities.
- Flat paints – This can be things like house paint, or paint brands that don’t have a lot of shine combine with more traditional shiny paints have a good chance of creating cells.
Torching to Coax Out Cells
Another great method of creating cells is to use heat on the surface of your paint. When using heat as a cell creator you need to be very careful to not burn or dry out the paint or it will ruin your artwork.
Many artists use a torch to pop any bubbles that might be lurking in their paints. Besides removing pesky bubbles, torching a painting causes the top surface of the paint to heat up.
Warming up acrylic paint causes it to break the surface tension of the paint. This allows the paint to flow more freely and can allow the underlying layers of paint to rise through the top layer.
You can find more information from our article Why do you Torch Acrylic Pours and see our choice for The 3 Best Torches For Acrylic Pouring.
Change the Shape and Size of Acrylic Pour Cells
Now that we’ve shown you a few ways to manipulate your fluid acrylic pour to create cells, now it is time to make those cells look like you want them to look. This is probably one of the most difficult parts of cell creation and will take a bit of practice to master.
How to get Big or Small Cells
Adjusting the size of cells in an acrylic pour isn’t an exact science. However, with a little planning, a little patience, and a little luck, you stand a good chance of getting the results you expect.
Small Cells
Small cells are the easier of the two to produce. Here are a few ways to get small cells.
- Torching closely but very quickly. If there are layers of paint underneath the top layer it will most likely come out when you do a quick short torching.
- Wait till after you have tilted most or all the paint off the canvas before torching.
- Use small amounts of alcohol in your lightest paints: greens, purples and some blues are usually a good bet to be on the lighter, less dense side.
- Use one of the additives mentioned above but really mix it well into your paint just before you pour it into your dirty pour cup or onto your canvas. Because the oil gets mixed so well you get smaller droplets coming to the surface and therefore smaller cells.
- Tilt and stretch the paint as quickly as possible after putting it on the canvas. Cells the form after the paint is already stretched and thinned are generally smaller.
Large Cells
You stand a good chance of getting larger cells doing one or more of the following:
- When you torch your pour, do so from very high up and only slowly heat up the top layer of paint. That will let the paint below heat up slightly also and help it come up through the top layer more slowly.
- Torch as soon as the paint is on the canvas and before you tilt and stretch. That way small cells at the beginning grow with the tilting and stretching.
- When using silicone or Dimethicone only use small amounts and don’t mix in more than one or two small swipes. The bigger drops of oil in the paint will stay together and move together thus creating bigger cells.
- Let the paint sit for a bit before you start to tilt it. This allows the paint to shift and move under the surface and let cells form naturally before you stretch them out.
How to Change the Cell Shape
Changing the shape of cells is no easy task. Because the nature of cells in acrylic pouring is based on so many different factors you can only create the best environment possible to get the results you are looking for.
Circular
For perfectly round cells you will need to make sure you don’t have too much cell action happening. When there are tons of cells, they are going to run into each other and deform as they do. Having a few cells there and there is a better recipe for circular cells than having a whole ton of them.
Introducing an additive by dripping it or flicking it onto the paint after it has already been stretched will also allow the oil to work in a confined area and produce more regular looking cells.
Square or Rectangle
The only way we know to get squared cell is to use the chameleon technique where you put an additive on top of the canvas in a very uniform way with a comb or by hand. That way each cell grows at the same time and connects with their neighbor cells and create more rectangular forms.
Oblong and Elliptical
These are cells that have been stretched along with the paint underneath them. This can also be achieved by having a cell fall off the side of the painting surface as it will deform slowly as it drips down the side.
Caterpillar Cells
We have seen these randomly across various paintings, but we haven’t had very good luck in recreating them ourselves. The caterpillar cell is one that is almost chopped in sections as it starts to grow and ends up looking like the segmented body of a caterpillar.
We most often see these types of cells on a floating flip cup with silicone where the flip cup is rotated and moved across the canvas as the paint is slowly leaking out of the cup where it creates a gap between the lid and the canvas.
UPDATE: We recreated this with great effect by preparing a dirty pour cup and adding one or two drops of silicone on the top of the paint. Then take a stick or stirring device and “push” the silicone down into the cup. Now quickly do your pour and you will most likely get caterpillar cells. Good Luck! Check out our PVA Glue video where we duplicate this on one of the pours here.
How to Reliably Create Cells in Your Acrylic Pour?
The most reliable way to create cells in your acrylic paint pour is to use silicone or another oil additive. This will almost guarantee that you get cells in your fluid painting.
We recommend that you try each of these different cell making techniques one by one. And then when you are familiar with each, try mixing and matching different cell creation approaches.
We hope that we have answered all the questions that you have about creating cells in your acrylic paint pour. If there are still things you want to know, please let us know in the comments below and we’ll be sure to respond to all those that we get.

Is there any way to avoid the creation of cells almost completely?
I would recommend two things here. Keep your paints slightly on the thicker side and/or use a pouring medium that is less likely to create cells like Glue-All or Liquitex Pouring Medium. I should have another article out shortly on pouring mediums that touches on the effects each one makes, including cells, or lack thereof.
How did you do that I struggle to get cells
What paint and pouring medium did you use? Did you use silicone? I’d be happy to help if you give me a little bit more info.
I’m so new to this kind of paint, but I’m excited to try it!! ❤️ I think I’ve got everything, but I get nervous. I am a lover of art since I could pick up a pencil. Sometimes I have amazed my own self, like OMG, I didn’t know I could draw that. I just haven’t had much experience with paints. I probably need to take a class to build my confidence. IDK,
If I can do it, anyone can. I have a community that might help also – community.leftbrainedartist.com
Why am I getting flower shaped cells when I use Australian floetrol?
Not sure what you mean by flower shaped cells? Are you blowing, swiping, just using Aussie Floetrol? What technique are you using?
What is silicone where do I get it is it a something you add to paint I see all the people say use it but I don’t know what it is
I use treadmill silicone. Called Spot On Treadmill silicone on Amazon.
Do a search for that question on YouTube 😁
Lol. Thanks Shari!
Does room temperature make differences in your paint pours? Winter is coming and I want to keep doing paint pours but the shop is only heated while I’m there. So does it have to be warm is what I essentially need to know?
You definitely do not want your paint getting too cold or it will separate when it dries. I’d say anything lower than about 50′ and you are going to start to have problems.
Oh no, now I’m gonna have to check the garage temp lol
Yeah, that was my problem even in my little pouring room. It gets colder than the rest of the house because I keep the door closed.
Can you tell me at what point do you add the silicone and how much &does it make a big difference on the number of different
Paints you use as to how much silicone should be used
1 small drop per 2 ounces of mixed paint. It doesn’t matter how many colors you use it in but keep in mind the “dense” color are the best to use it in as it will travel the most and pickup the most of the other colors.
ALL THE PRETTY COLORS! ZOMG! is an affliction I have as well. It took lots of fountain pen ink, yarn, make up, and pens (dear lord all the pens) to figure this out. Now that I know about it however, I m much better at telling myself that I don t actually need ALL the colors. ?? ~laura
That is the artist’s downfall. The more we learn, the more we want. We might not NEED them but we sure do WANT them don’t we? 8)
Had to laugh at this as I’ve been a Hairstylist 20+yrs & LOVE the endless # of creative options using techniques/products/tools, etc. And thats def transferred to my recent discoveries of Essential Oils & Paint Pouring lol…Add that to the combo of being literally told to isolate at home + ease of online shopping = the “less is more” thing has gone right out the window!!!😳
What a genius idea! I’ve got to try some essential oils in the pieces I work on today. Thank you for the inspiration!
I have tried Essential oils since they are so much more expensive than silicone oil. Let me know how it turns out Jenn. Probably will smell nice for sure. 8)
great advice thanks. I’ve learned a lot from reading your comments. Very useful. I’ve mastered cells which I’m happy with using my own ‘recipe’ of glue and water and mixing it with paint and adding a few drops of silicone. However my metallic colours, bronze, copper, gold and silver do not show at all. Any advice for me please would be gratefully received.
Metallics are a whole different beast unfortunately. Normally what happens with me is I make the metallic paints too thin. Because they are generally heavier than other paints they sink and get lost under the other colors. Leaving them a bit thicker is one option. Another is to mix in a little of another similar color or a different pouring medium. That way you have a different reaction when the non-metallic and the metallic paints meet. You can try using more metallics than you were original expecting to use. Last but not least, try using more transparent colors with your metallics. The opaque might just be taking over your painting and hiding the metallics.
None of these solutions are silver bullets but it should give you some additional experiments to do to help bring those metallic colors to the forefront. Wait for your paint to dry completely. Sometime the metallics don’t make themselves known until everything is dry. Especially when you use more transparent colors.
wow, thank you so much David! I’ll try this.
I’m new to acrylic pouring and I’m having a struggle with only getting white cells. The white takes over and all my cells are white. I’ve tried thinning the white with more medium, thinning with just more water, making my other colors thicker, adding silicone to the colors, different layering techniques and I still can’t get my cells to be colorful. I know it has to be something with the way I’m mixing or layering. Please help! It is so frustrating
Cells are definitely frustrating. Try using less white and make it slightly thicker. Thin white creates more lacing type cells in my experience. Also, only put your silicone into your colors. 1 drop per 2 ounces or so is plenty. When you torch your painting to do some higher up than you normally do. You just want to heat the paint slightly which will bring the silicone up to the surface. The more paint layers it travels through the more different colors it will pick up.
If you are doing a flip cup, don’t put any white in the bottom and only tiny layers between the other paints. Try that a few times to figure out how active your white is going to be. Then you can start putting white back on the bottom (which ends up being the top after the flip).
Last but not least you can try using less paint to medium ratio on your white than your other paint. That will “lighten” the paint a bit and make it cell a little bit less.
Hi David,
Thanks for this good information.
Are opacity and density the same? Or are they related?
Does density depend on the brand of acrylic-Is it standardized?
Thanks.
Opacity and density are not the same.
Opacity refers to how much you can see through a material. Opaque is something you cannot see through. Transparent you can see through. Translucent you can kind of see through (think bathroom frosted glass).
Density is how heavy the paint is. If a paint is made from titanium (like a lot of whites) then it will be heaver than an orange that is made from pollen from a plant. Does that make sense?
Unfortunately there is no standard of density or opacity between brands of paints. Most of the higher grades of paints do have standards but only for that specific company’s paint (Liquitex, Golden, etc).
Thank you so much for sharing all this info! Something that I have been experiencing when trying to get cells using silicone oil is that the painting, once dried, continues to be oily to the touch. I can’t really find anyone complaining about this online so I imagine it’s normal? Even if so, do you have any recommendations for removing the oily residue once dried? So far I’ve only been pouring with oil on non-porous surfaces.
It will definitely be oily. There are a number of way to fix. Use a sponge and dish soap. Since the dried acrylic is essentially plastic, that won’t hurt it. Just make sure you are using something soft. You will see some paint come up because that is what is still suspended in the oil.
You can also rub a little bit of corn start all over the canvas which will absorb the oil. Then wipe it up with a damp paper towel.
Some varnishes or top coats, like resin, won’t adhere to oil so you’ll definitely want to get rid of it before finishing.
Wow!! Super easy ways to remove the oil! I went with the dish soap and sponge option right in the sink and it is now “squeaky clean!” Thank you so much, David! I really appreciate your help with this. 🙂
How much cell medium should I put in a cup to make cells 🤔
What do you mean by cell medium? Floetrol is a medium that is known to help create cells. It is usually 2 parts medium and 1 part paint. Silicone is an additive you can put in your paint to help cells create. 1 small drop per 1 oz of paint is a good place to start.
Hi David, thank you so much for taking the time to show this! I am new to acrylic pouring and I love it. I’m still working on my titanium white not taking over my other colors, for example in a Dutch pour. So I downloaded Golden’s list that shows their weights, I use all kinds of soft bodied paint brands, but this is the one I found and I’m testing it. For my I use (About), 50% Floetrol, 20% Gac 800 & 30% Apple Barrel pouring (I love this medium it thins my paints and leaves a nice finish). I’m going to try this Chameleon effect.
Any advice on what I’m doing ? All of it helps!😀Thanks Againg
Try different brands of white or adding a little bit of a “heavier” medium body white like Liquitex. That should help it sink more than it is now. White is kind of a conundrum. I’ve also had issues with it and it sometimes it just doesn’t want to do what I want it to.
This is by far the best explanation for beginners on the art and science of acrylic pouring I have read or watched, and I have read and watched dozens from educators and crafters. You explain the science and the aesthetics and I finally grasp the concept now! Experienced and successful crafter completely solo with tutorials and books, but have tried and somehow failed to make anything but muddy puddles with this, now have no doubt I’m going to nail it tomorrow and can’t wait to explore the rest of your site. Thank you!
Thank you very much. That is exactly why I wrote the article. It took me so long to figure it out that I figured I could help short circuit the process for other people.
Is there a way to avoid cells? Especially the big ones!
1. ***Don’t use silicone – This is probably the single biggest thing to avoid big cells.
2. Don’t use floetrol (it creates little cells)
3. Use paints that are relatively the same density (titanium white, yellow and some blacks are heavier than other paints and are the most likely to create cells)
4. Use the same pouring medium for all colors and avoid adding satin enamel (cloud pour ingredient)
Hi David
I am new to acrylic pouring I really love the Dutch pours but I find my colours sink into the white and disappear even once blown out again is this because my base paint is too runny thanks Janey
This could be because the paint is too runny. This could also be because of the white you use. Make sure you use a good quality titanium white because the pigment is heavier than most other pigments. That makes the white sink below the other colors. The best I have heard of is the Amsterdam Titanium White using only a little bit of water to thin the paint. It does take some practice and patience though.
I’m new to pour painting and some of my readings recommend applying two coats of primer paint to the substrate before pouring. Is this really necessary?
Generally, I would say no with some caveats:
Hi David, this blog is so useful. With the chameleon method can you just use silicon oil or it only works with the lubricant you have used. Thanks for all your work!
I have used various kinds of silicone oil (automotive, art, treadmill), coconut serum, personal lubricant, and alcohol. Silicone works the best. You want to get very runny silicone (not super viscous) when you are doing the chameleon cells technique so you don’t leave as much silicone on the painting. The thicker it is the more you leave. Using a needle or a toothpick with a very fine edge can help that too.
As a Newbie, I am continuously exploring online for articles that can benefit me. Thank you
You are welcome.
Hi I was wondering why mr paint turns into a muddy color when I pour sometimes. Also I tried all browms and tans in a pour and it all ran together.
Color selection, in my opinion, is the by far the hardest thing about paint pouring. When you use colors that are very similar together they mix and make even more similar colors. That creates the muddy look (no distinguishing between colors). You can either (1) make your paints thicker so they don’t mix as much and you get cleaner separation between colors, (2) throw in a complementary or tertiary color to make them jump out more, or use a different pouring technique (puddle pour, layered pour, multiple cup pour) to help the colors stand out on their own.
I paid $ for a course and have now stumbled on your site and have learnt so much more, I have learnt where I have had issues and how they could be solved. Thankyou very much you have a long time follower now 🙂
You are very welcome. We should have some new articles up soon about using alcohol and a pouring medium comparison. Don’t forget to check out the YouTube channel also.
Also, if you ever have questions, I am always looking for new ideas for content.
I’m a newbie and just discovered the world of paint pours. As a left-brainer myself, I really appreciate the detailed “whys and what-fors” you’ve provided here. I can’t wait to give this a try. Thanks!
I have feeling you will soon be as addicted as the rest of us.
Hi David, this blog is very useful. Im new to pouring and love it. I’m have some trouble with the silicon oil as it comes up to the surface it makes a crack or deep on the surface where the silicone puddle. I don’t know if you have any idea of how to fix it. Thanks for all your work!
Almost all pouring mediums will create small divots on the surface of the painting. Unfortunately that is the nature of settling liquids where the silicone is the lightest and sits on top. I do show how some mediums are less affected by this in my 11 Pouring Medium Roundup video on YouTube if you are interested.
For the cracks, generally that means you have too much paint in the painting surface. The silicone might contribute slightly to this but in my experience you just need to use less paint or tilt more paint off. Adding a little bit of GAC800 to your pouring medium can also help prevent cracks and crazing. You don’t need a lot. Maybe 5-10% compared to the total amount of pouring medium.
Thank you. I took a test to see if I was left or right-brained or what combination thereof, and I was so left brained the data point was in my ear. Anyway, as far as pouring colors in the cup, wouldn’t a heavy white used as the first color, so in the cup it’s the first layer, once inverted, would now be the top layer? Wouldn’t this white sink to the bottom and push the other colors up? If it doesn’t, why not?
You are a superb teacher. Thank you so much.
You are very welcome. I think doing this blog has taught me so much more than just trying to paint on my own. Win-Win for everyone.
Hi David.
Thank You. You are an excellent teacher-instructor. I really appreciate your explanations. I have made many pouring’s, even with silicone, and I cannot have cells. Besides the densities of the pigments, ¿what ratio do you recommend on medium, paint, Floetrol, to have more cells?
Sorry for the delayed response. This got put in my quarantine file.
If you are using student acrylics then one part paint to two parts floetrol. Craft paint is 1:1 and thicker body paints are 1:3 or 4 depending on how pigmented the heavy body is.
For good cells you want your paint to be a little thicker. if it is too thin you see cells at the beginning but as the paint dries the cells all disappear.
If anyone wants to experiment without too big of a financial commitment to the project (I blew $73 on my start up supplies) I just got a $5 set from five below with 2 canvases, stir sticks, gloves , 7 pre mixed paints and a bottle of cell magic,( which I assume is just silicone oil.) And it worked really well. I wish I had used a larger canvas and mixed some undiluted paint into the cup for better cells, but this was well worth the $5. 5 below is a national chain in the US I’m not sure about international but I’m sure you Dan order it on line. It’s called “Merble” by Original art by U.
I just thought I world pass along the tip to my fellow enthusiasts.
Wow, that is pretty cool. Looks like they are sold out now but I’ll have to watch for those in the future.
Thanks for that info. I am new and on a budget. I don’t want to spend a lot right now while experimenting. David, I found you by mistake but you give excellent advice and I will be trying them and watching you on You Tube! Thabks!
Thanks Carolyn. I appreciate the comment. You can definitely do acrylic pouring on a budget and still get amazing results.
I am having trouble creating any cells! I follow the measurements 3:1 add Floetrol and 100% silicone treadmill oil? Yet no cells? I can’t figure out why I’m not creating cells? I have also tried to torch and use a hair dryer. Any advice?
In most people’s cases the reason is that the paint is too thin. If there isn’t enough thickness the cells don’t properly form and everything just looks mixed. Try 2 parts floetrol to 1 part paint. You can see the consistency in the newest video on my YouTube channel (leftbrainedartist). You want the regular consistency where you get a mount up on a mound. Don’t use more than about one drop of silicone per 2 ounces (60grams) of paint to start out with. You can vary that as you get comfortable getting cells.
Hi, thank you for this very, very informative site! I will need to read it again and make notes to keep!
I am in stage of not getting cells. My recipe includes
– I am using 70 %glue+ 30 % water. 1 tbsp Floetrol and few drops of Silicone. Keep it over night.
Then I take 50% of this pouring medium +50% of paint
I am not getting cells, only sporadic lacing. What am I doing wrong?
Don’t add silicone to the pouring medium. Add it to the paints directly when you are mixing them. I like about one tiny drop per 2 ounces of paint.
Lacing doesn’t come from silicone. It comes from pushing/swiping paint that is more dense (titanium white, etc.) over paint that is the same consistency (maybe slightly thicker) and then letting that denser paint sink below the less dense paint in those lacing like patterns.
My cells are separating so that canvas is exposed. What is the cause? Please help!! Thank you!!
This happens when you use silicone and thinner paints (even with thicker paints on the edges it can happen). You can paint your canvas and let it dry before pouring so that the exposed canvas is painted. You can also try a bit thicker paints or less silicone. You can also put on a base coast and then do your pour so that there is already paint sticking to the canvas. Hopefully one of those tips can help you. If not, come back and let me know how it went.
Hi David, I try to get pearl cells like in DwightPours or Elyse Fournier pourings. I try to follow their recipe using one colour (dark blue or purple), but my pearls don’t show up—any advice.
BTW. Your blog is amazing!
Thanks
Barbara
Make your base coat paint much thinner than your regular paint. The heavier paint rolls over the top of it and then because the density different bubbles up and creates the pear cells. I find that if I do you pour in the center and then before I tilt, I layer another small bit of the base paint around the main pour then a little more gets trapped underneath and a little more comes up on the outside edges.
They use artists loft paint for their base coat
Many do use artist loft high flow white and black for the base coat. It just depends on what your application is. The SheleeArt blooms uses house paint, so does Sarah Mack (a mix of house paint and others). All of them work as long as they are decent quality so they don’t crack and they are relatively the same consistency as the main paint.
Thank you so much for this article. I have been pouring for a year and produced some good stuff and some atrocious stuff, but it was all a matter of luck. Now I feel that I can have more control of what I achieve.
By the way, I have found that one reason that I never get amazing cells like many painters on YouTube is because I have to use English (owatrol) floetrol. They also say they use floetrol, but they don’t say what kind of floetrol it is. You get very different effects from English, American and Australian floetrol (worst to best in order of cell production, I find).
Aussie Floetrol definitely has something in it that helps create cells and lacing much better than American. That is for sure. Thanks for letting the comment Sue.
In the UK you can get Aussie Floetrol from Acrylic Pouring Supplies, the only supplier of it here, apparently.
I found your video ‘Easy open cup acrylic pouring’ tutorial the best information I have seen anywhere. However, I was confused, as I mixed my paints exactly to the recipe you gave in your written description below the video but I was having to add lots more water than the 1 part required in the recipe. But it was when I had watched the video about 10 times, to follow your method, that I heard you give the paint recipe. In the description it’s 2 parts paint 1 part Floetrol 1 part water. In the video you gave out the amounts as 2 parts Floetrol 1 part paint and 1 part water! I got a good pour eventually though, the best I’ve had for cells so far. Thanks David. There is so much conflicting advice and recipes out there but I’ll stick with you and yours because I get the method as well, so it’s more likely to work. I’m hoping for great art work, thanks to you!
I am so sorry but thank you so much for letting me know. I am fixing it now. That would definitely thicken up your paint a ton.
The cells in an open cup are amazing aren’t they? I do love that technique for sure.
Fair play to you David. Always good to be generous. You’ll be a great reference to me for the foreseeable. I love pure colour and experiment with favourites. I also love white light paintings so it’s all pretty good. Much gratitude. Pauline
Thank you so much Pauline. The experimentation with acrylic pours is definitely my favorite part.
Love love how you explain things. Thank you for bringing clarity! I am wondering…if you mix mica powder with paint, does all the the sparkle effect just get coated in paint, and do pigments and mica serve two completely different purposes?
No you do not lose the shimmer. Mica powder actually works really well. Think about how paint dries. When it looses it’s water it looses its volume and become very flat. That’s where the mica powders really start to shine as they have some bulk to them compared to the thin layer of paint at that point. Mica can act as a pigment also for sure is shimmer compared to the matte look of dry pigment.
I love how you explain things. You make all the “blah, blah, blah” I’ve heard make sense. I love to separate some of the clear or slightly transparently colored paint before i shake my paints to blend the rest in. I mix various micas and color shifting micas in this to make beautiful, transparent paints that look really cool layered in black.
Uh, that sounds amazing. Do you have pictures I could see? Instagram? YouTube?
Dear David, first thing thanks for all the cell explanations, I’m also struggling to get some decent ones.
My question is, can you use ordinary acrylic housepaint to pour? I have a lot left around after painting some rooms, and as I use tons of white I wondered if this would work…
Thank you for your time and patience, I learned a LOT reading these posts today 🙂
Yes it works for sure Julieta. That is the most common base for the Sheleeart blooms. You’ll want to make sure you thin it down if necessary. If it is gloss or semi-gloss you’ll most likely get some pear cells around the edges too because the interaction this paint has with other mediums and paints.
Hello, David! My son and I have been able to make awesome cells using glue, water, a drop of silicone oil and then swiping. However, we noticed that some cells seem to collapse while the paint is drying, with the black swiping color taking over. Why does this happen?
Only use about 1 small drop of silicone per 2 ounces of paint. Also, you want your paint to be slightly thicker so the silicone doesn’t keep expanding in to forever which is probably what is happening with your painting.
Hi David,
Thanks for very informative information.
If you use alcohol to get cells do you have to wash it off before you seal your painting seeing it evaporates?
No washing necessary. Although I recommend always doing a light slightly damp cloth wash before varnishing no mater what to get any dust/lint off the painting.
David,
Thank you for the explaining some of the science. I have been struggling with the bloom swipe, and the bloom just blowing on it.
I get really great lacing and cells but they are really small. I can stretch it somewhat but not a lot. I’m using ColorPlace satin bright white/accent base. Nothing added but a few drops of water. My CA is Amsterdam white, US Floetrol, Minwax wood conditioner and a bit of GlueAll .
I got the recipe from YouTube. It worked great in the videos.
Could the pillow paint be the problem? It seems like it keeps the paint from being able to stretch..
Thank you again for explaining the science!
Gina
That could be the problem but my first reaction is that your color paints aren’t quite thick enough and your bloom activator (white) isn’t just slightly thinner than the color paints. You want the bloom to slide over the rest of the paint and then have enough fluidity to move back to itself and then drop through the rest of the paint. Less is more with the wood conditioner also.
Thanks ! I will mix accordingly and let you know if it that helps. I’m thinking you are right though. My CA was thinner than my colors but I think too thin. And I’m not gonna lie…I am pretty sure I used waaaayyy too much wood conditioner.
2 questions
Is there any other Titanium white for CA than Amsterdam?
I have quite a few I would like to use up .
Liquitex basics
Artists Loft
Blick
Golden
Any product like GAC 800 I can use in my pillow paint?
Thank you so much!
I think its really cool that you answer everyone’s questions and share your knowledge..
Thanks again Gina
As long as they are actually Titanium White the others should work as well. I’ve used the Liquitex Basics Titanium White and it works 95% as well as the Amsterdam. I’ve got a love/hate relationship between staying with one manufacturer and mixing them up. You can predict what will happen more when you work all in one line, but the unexpected beauty often comes from a mix. That’s just trial and error to see what works for you in your specific methods and mixes.
You can often experiment cheaply using 5×7 canvas panels. Doesn’t use up much paint. I usually coat all my canvases, even if they’re pre-gessoed, with a gloss medium to reduce the canvas texture and make it smoother. It’s fairly cheap and dries fast, I usually do a dozen or so at a time.
A dozen at a time? Wow. I think the most I have done was 6.
Hi David,
Thank you for this fabulous blog! Your answers are so helpful.
I am new to fluid painting and have been struggling with Dutch pours. Admittedly, I have saved some failures because I was able to alter them into something I liked. However, they are a far cry from what I was going for.
When I first blow the paint out it looks beautiful, but within a minute it turns into a cheesecloth type lacing with base coat taking over and the colors almost shrinking.
I have followed recipes scrupulously and it keep happening. I am going to try changing the base coat consistency today and see if that helps. Fingers crossed.
Thanks for all you do!!
Well you are in good company Kerri. Dutch pours are the bane of my existence. One week I just need to do 20 of them to figure it out but I have similar problems. My normal persistent attitude goes out the window when I come up against Dutch pours. Maybe I’ll dedicate next week to that. I need a new kryptonite anyways.
Good Morning David! What a great source of information you provide and truly appreciated. My question is…if I were to poke a large-ish needle through an acrylic painting that would insert on object never to be removed, would that ruin or run a crack in time?
Most likely, no Debby. However, put a little super glue or even varnish on the back so the canvas doesn’t fray at the point of entry and you should be doubly ok.
Good afternoon, David. I am new to acrylic pouring, but I am already an addict. I find myself thinking about a pour technique when I see multiple colors intermixing with each other throughout my days. I have spent countless hours learning from videos from other “experts” in the field. At times I have learned conflicting information or guidance. I sincerely appreciate your article explaining the science behind “why” I am getting the results I am getting. Sometimes I am happy with them; sometimes my results remind me that paint and pouring have their own agendas of what they want to do that day! Cell formation readily happens for me with 1 part paint: 2 parts Floetrol: 1 part water. We recently visited Southern Utah and saw amazing natural “acrylic flow” geology. I tried a cup pour yesterday with titanium white, milky white, flesh, metallic gold, metallic rose gold and metallic silver. Poured, tilted and torched. It was gorgeous the first 10 minutes. Then, the cells appeared and grew. I was/am heartbroken. I want to try again with the same colors. Should I not use Floetrol but maybe Elmer’s Glue All or GAC 800? I am excited to continue to learn from your postings! Thanks from the Southwest, Pam.
They definitely have their own agenda Pam. Like young children. You never know when they are going to do what you ask. 8)
If you don’t want cells the glue or GAC will work better for sure.
I haven’t gotten any cells during blooms. At all.
I realized last night that there are two kinds of wood conditioner. Who knew? Well possibly everyone in the world but me.
Should I be using oil based or water-based? I got the water-based because acrylic paint is water based. Now, I’m not so sure. Not one of the artists I follow has said. A one-word reply – “oil” or “water” is all I need, if you have the answer.
Thanks so much.
Oil
I use oil based. I didn’t like it however so I now only use paint and floetrol or paint and water.
Hi, Thank you for all the information. I am so informed now. This is because of the honest way of sharing information that is relevant!
Well done!
There is one question that is on my mind when you have different CI indexes in one colour for example Hooker’s Green by Pebeo is made up of PG7+PY42+PB15.3+PBk7+PY74.
What specific gravity do you consider? Do you take an average? or..
Thank you
Rehgards
You can take an average. You might want to weight that average by which colors you think it has more off. A darker green you might add more emphasis on the blue and the black, a lighter green on the yellow and the white, etc. An average will get you close. When they are a mix usually they are right in the middle of gravity so you have to test them with your colors.
Thank you David, this was so informative.
You talk about cleaning before finishing, can you expand on how you do a good cleaning and how to finish the artwork. Also do you sign on the back or the side?
Keep up the good work.
If no silicone was used. A barely wet rag (no no standing water gets on the painting) will do the trick. If you used silicone you want to use a rag with some dish soap (still not wet) and go over every nook and crannies multiple times. Don’t press hard. You are just trying to get all the surface silicone off. There are other methods but they are dirtier and don’t work as well. Facewipes also work quite well too.
Hi David.
First, I would like to thank you for sharing your talents and information on acrylic pouring. Much appreciated.
I am fairly new at this art form and no matter how I mix my paint and cell activator, I cannot achieve the ‘lacing’ in a bloom technique. I tried mixing the cell activator 4:1 floetrol/paint, but that’s not working. I’ve tried blowing out from the middle, then spinning … still no lacing. I definitely need help.
This is a tricky one because it could be the cell activator, it could be the color paints, and it could be a pillow that is too thick.
First, you have to use a good quality white paint. You can’t use craft or student level paint. Amsterdam works the best but I have used the artist’s Blick (not blycrilic) to some pretty good results too. The white fluid acrylic from Golden works well too.
Make sure your activator is slightly thinner than the color paints but not a huge about.
Hi David, this article is great, helps understanding a lot! I’m just having one problem. Whenever I add silicone oil to my paint (I only ever add 1 drop to 1 or 2 of my colours) I get some cells which show through the paint/colour underneath which is great, but they’re are always few bits where the paint completely disappears, leaving exposed patches of canvas; these usually change their edges to be kinda choppy and irregular, while normal pretty cells stay nice and roundish. What an i doing wrong /what can be causing this?
Thanks for all the help! 🙂
You either need to pre-paint the outside edges of your canvas or use a base coast that has no silicone. Those are really the only ways to keep the painting surface from showing through. Especially on the edges. I did a video about this a few weeks ago. I can’t post a link but if you search my YouTube channel for “The wrong way to acrylic pour with silicone!” you’ll find it.
Thank you for this resource. You’ve answered a lot of my questions on making cells. I started doing pours about a month ago, and I did find that when I used my Titanium White in a pour, I had better cells. One question–I plan on doing some pours with my granddaughter when she visits, so I am concerned about what paints and additives are safe to use with her. Is it better to use the Glue All as opposed to the Floetrol? Are the metal paints safe enough to use with her or should I just use my acrylics? Thank you!
If you really want to super safe you could use tempera paint. However, acrylic in general are non-toxic and pretty safe you use, even the metallics. Make sure they wear gloves, clean their hands well, and don’t eat anything and I personally don’t see a problem. I paint with my 9 year old quite frequently.
Just wanted to thank you for putting all this info out there. I am very new and very left-brained so the explanations really help. I’ve watched other artists and, while it is fascinating to watch, most don’t give me the info I need. So, thanks again.
You are more than welcome Tina. Glad to be of service!
I have a frustrating problem when I attempt to do a pour that requires thin paint consistency! I follow closely recipes which call for the paint consistency to be thin but always my color paint sinks quickly into the basecoat. I tried thickening the color paint but it still sinks into the basecoat. I tilt quickly and some cells would appear but because there is still a lot of paint on the canvas the cells become wonky. The paint remaining on the canvas is still thick. I use floetrol 2:1 and have tested it with and without liquitex pouring medium and gac800. I can’t seem to progress further due to this problem. Has anyone raised a similar issue? Appreciate your input.
What color and brand are you using for both the base coat and the colors? Can you use the contact us form on the webpage to send me some pictures? Lets figure this out.
I have a couple of different paint “sets” that came with “cell medium” or “cell magic.” Neither lists its ingredients; both say to add “several drops” to a color. Can you tell me more about these (including, if appropriate, “Just throw ’em out”)? (Psst … are you by any chance looking for a proofreader? I’ll volunteer … Looks like your autocorrect is more often auto-INcorrect.)
Hehehe. My Mom was a school teacher, English no less, and she would be mortified but my blog but I do try to fix them as I see them.
You can try those cell mediums or cell magic items. Sometimes they work like with the BOOM! but sometimes they are just crap. It’s a crap shoot. I like to experiment personally so I always try them at least once or twice.
Thanks so much for the detailed explanations!
Two questions:
1) Do I need both a heat gun and a torch?
2) I just tried an all metallic (color shot brand) with a 50/50 floetrol paint and got NO cells. I’m not picky about size or shape at this point (as a newbie) and I actually love the white lacing!
Thanks in advance!
You don’t need both. One or the other will work. I like having both for different applications but that isn’t necessary.
I haven’t use much of the color shift paints. Getting cells really depends on how heavy each of your different paints are. Without knowing what the other colors where and how thick the paint was it would be hard to guess at why you didn’t get cells.
I am so impressed and grateful! I’ve readand watched a lot, but as others said, learned so much more about the “how and why” in your article. Thank you so much. Your joy in helping others is so apparent.!
Thanks so much Maryann. I do love teaching acrylic pouring and investigating why things happen so I can replicate in the future.
Hello David! I’m new to paint pouring. I’ve been binge watching your YouTube channel lol. I’ve learned alot thank you. I do have a question though. I did my first pour and of course I wanted to go all in lol. I tried to make cells ughhh not so lovely. Would you know why my paint made a huge bubble on the top (never popping or separating) when I used my heat gun. I also tried a torch. I just had a big bubble that would rise and when I moved the heat it relaxed back down. I’m just little confused. Oh, I used Daler Rowney acrylic paint, and Sargent Art pouring medium. Probably not what I should use, but I wanted to dip my feet before buying a bunch of unneeded art supplies for a hobby I might not like or be good at lol. Thank you!
Hmm, I honestly have no idea what that could you. You can pop bubbles with a pin or something too. I’d try that first to see if there was a layer underneath that was dry and was bubbling or something on the painting surface (like a plastic coating) that didn’t get removed.
You can send a picture to my contact form on the website and that might help me out also.
Hi. I’d like to start selling my paintings. Not sure where or what to charge. I can’t send pics here but I can if you email me. Thank you
Deona
That is a subject that doesn’t have a good answer unfortunately Deona. I normally tell people to start with about $.50 per square inch of surface area + shipping for smaller paintings. See what works and what doesn’t then adjust your prices from there. Make sure you include shipping. Also, figure out how long in hours/materials each size of painting takes and make sure you are at least making a living wage from your work.
Keep in mind you can change your prices from day to day if you need to as you get comfortable selling your art.
Hi David, WOW I am so very glad that I stumbled upon you and your generosity of sharing your knowledge, talent and passion. You do realize you’re the only artist out there truly helping us. So I have several questions, but I’ll hit you with 2 for now. If I’m going to use a water-based clear coat like varathane or polyurathane that is “GLOSS” to finish the painting, why would I bother with glossy paints, or additives to give shine to the paints I’m using? #2: How come some artists like Olga Soby and Mollysfluidart sometimes just use paint and water ONLY? I’m in Alberta Canada where there is NO floetrol or Almers Glue All to be found. Being on a tight budget, I’m using alternatives available here, but why spend $$ on these products if others don’t?
Hi David, WOW I am so very glad that I stumbled upon you and your generosity of sharing your knowledge, talent and passion. You do realize you’re the only artist out there truly helping us. So I have several questions, but I’ll hit you with 2 for now. If I’m going to use a water-based clear coat like varathane or polyurathane that is “GLOSS” to finish the painting, why would I bother with glossy paints, or additives to give shine to the paints I’m using? #2: How come some artists like Olga Soby and Mollysfluidart sometimes just use paint and water ONLY? I’m in Alberta Canada where there is NO floetrol or Almers Glue All to be found. Being on a tight budget, I’m using alternatives available here, but why spend $$ on these products if others don’t? Thanks so much.
#1 Longevity. A little GAC 800 or Liquitex gives added UV protection and will allow the paint to last even longer than a cheap medium alone.
#2 They have the money to spend on expensive paints. Most people learning acrylic pouring are not at that stage. Paint and water is by far the most expensive way to paint pour. I’ll have a video on this soon on my YouTube channel.
Does different pouring mediums affect the formation of cells? What’s the difference between using Floetrol, Elmer’s Glue All, and Elmers School Glue?
Yes the medium has an affect on cells. Floetrol is know for making small cells. Glue-All doesn’t make cells by itself. School glue does if you swipe with it.
Hello David According to the Golden Pigment Density Acrylic Paint Chart the density of Mars Black is 460, and the density of Titanium White is 390. My take on this is when swipeing black over white, the black should sink and the white should float on top. However that isn’t what happens, as shown in your video Black and White Art for Beginners, it does the opposite. Can you help me understand this?
Sure thing. If you swipe a layer of a paint that is close the the same density you get a thin layer of the top paint over a thick layer of the bottom paint. The top paint will attract to itself. Kind of like water on a table it consolidates in to drips and leaves open spaces instead of a sheen across everything. Those “consolidation” points turn in to the lacing. The lacing will be thicker because as you mention it doesn’t sink as much because of the density of paints.
Now it makes sense, and now the difference between cells and lacing makes more sense. You’re such a brain David, and always give me answers I can understand. Back to Utube, see you there.
mR
Thanks for the great read. Im all in on this craft…used my previous woodworking times to build a small pouring table I can stow away easily, built up a 4′ shelf in my garage just for acrylic supplies…might need more room..lol
Got some good cell info here tonight…next session Im trying one other method, then doing a cell project…something totally wild if it comes out like I’m thinking…
Coolest part…you’re seemingly still reading and replying many months after it first posted….unless I’m last…haha
Totally not last. So far I’ve replied to every constructive comment made on my website and YouTube channel. I assume I won’t be able to forever but I enjoy interacting with my fellow artists. Let me know how your wild project goes Rick.
Have you ever tried differing the amounts of silicone in each color for cell formation ( 1 drop in red, 2 in blue, 1 in white, 3 in silver, etc)
I’m getting great cells and love my paintings using the wet paper towel swipe method. The cells are amazing right after I’m done. Several hours later I loose a lot of definition in the cells and some of the outsides and separations are gone completely. I am using either black or white for my swipe color and making my swipe color thinner than the other paints. The non swipe colors I use no silicone oil and the swipe color either 3 or 4 drops. What causes my beautiful cells to disappear?
Too much silicone and too thin of paint would be my guess. I recommend no more than 1 drop of silicone per 2 ounces of paint. You can vary that one you’ve mastered but that way you are guaranteed not to have too many. Also, you want your paint to be in the medium consistency (mound up on mound) or else the oil just keep expanding and expands in to each other and then it loses its definition.
Thank you for the help! I poured last night using not so thin of cell activator and only 1 drop of silicone oil in 2 oz. of paint. Here it is 12 hours later and my cells have held up and look fantastic. There are so many variables in this way of painting I would have taken forever changing things that wouldn’t have worked without your advice!
I have been using Cell Magic to create cells but I tend to have oily areas on top of the canvas after the paint dries. It doesn’t seem to matter if I use a drop or two or several drops. On top of that, I end up with very few cells.
Any way you can send a picture to the contact us forms so we can figure out how to help you better Florence?
I saw your video on paint density/specific gravity. You commented that if using a different brand of paint other than Golden Artist, there is a number on the bottle that will correspond to the numbers on the density chart. I have not found that to be true. I use DecoArt 2 oz. bottles and Master’s Touch 4 oz bottles and DecoArt Fluid Art Ready-To-Use 4 oz. bottles and none of these small bottles have a number on them….they don’t even show ingredients in the paint. So I don’t know how to compare the colors to the Golden Artist Density chart to figure out the density of the paints I use. Need help!!!
You are correct. Craft paint or dollar store type paints do not have the code for the pigments used. They actually use filler pigments not true pigments which is why I recommend people don’t use them once they start getting in more complex pours or start worrying about densities like you are. That being said, if you put light density for most craft paints you would be right most of the time.
My Master’s touch however does show opacity/vehicle/pigment at the bottom of the tubes. I have the 8 ounce though. I don’t have any 4 ounce ones to check.
If you really want to know, put down a line of each color of paint in one directs and then another line of paint in the other direction over the top of the first lines (like a tik tak toe board) You don’t need to waste a lot of paint if you use your stir stick to make the lines. Then check how the paints react with each other. Fat bars over a color means that top paint is lighter. Thin bars over a color means that top paint is heavier cause it is sinking.
Does that make sense? I actually did that in one of my videos, except with WAY more paint, to test densities. I’ll have to find out what one that was again.
Thank you David!! That is helpful.
David, you are a born teacher, thank you.
Don’t now if this has been mentioned elsewhere but I was thinking that it is possible to get an idea of the relative densities in any range of paints. Those that I use all come in 120ml tubes that are identical, apart from the colour, so if they don’t all weigh the same, any difference must be because of the density.
Here’s what I found with a simple digital kitchen scale; Titanium White 174g, Black 169g, Coeruleum Blue 180g, Naples Yellow 171g, Cadmium Red 164g, etc. So it’s not highly accurate but it does show lightest and heaviest and the order in-between.
Interesting. I have heard the amount of paint inside isn’t always the same and can vary by up to 10% so I’ve never tried that method.
I thought there may be some variation between tubes of same colour but I had two black and two white and each pair weighed the same. Not definite proof, but it got me thinking.
Very interesting. Thanks Mike.
People keep mentioning a cell activator but no one seems to be willing to discuss it like it’s a big secret! What is a cell activator? Does it only go on the top layer? Which layers of paints do I put it in? What’s in a cell activator? Is just using floetrol a cell activator? Is silicone a cell activator? Do I need different ingredients? etc. I’ve watched millions of videos but I still can’t get my head round what it’s all about (and I consider myself on the smarter side!)
That is a term that came about from the Sheleeart Bloom technique. She uses a cell activator (just a mixture that causes cells when you blow/swipe it over other paints). I have a video on my YouTube channel about this.
Search YouTube for “Why is acrylic pour terminology so confusing?” and you’ll find my video with a better explanation.
I was watching tons of acrylic pour videos on YouTube and came across your channel. The way you explain and view the process finally clicked with me, so I did my first pours this weekend and have a couple questions. I use a variety of paint brands and have only been able to find the specific gravity list you have supplied; are these weights universal? Why am I not able to find them for other brands? I would prefer to not use silicone to get cells if I can and I want to make sure that I can rely on this chart to coinside for all my paints.
Weights are not universal. Each paint is going to be different by brand and sometimes by product line in the same brand as the amount of pigment to fillers will be a different ratio.
Thanks so much for such an informative article. I’ve been doing lots of things wrong so with your article, I’m hoping to get it right. Here’s my list of wrong-doings, and a question after that:
1. I used Mont Marte Acrylic Pouring Paint mixed with Pouring Medium that I made as follows: 60% Glue All + 30% water + 10% Australian Floetrol. I didn’t realise that you don’t add pouring medium to Pouring Paint! Or that you don’t add Floetrol to pouring medium!! Ugh
2. I used a squirt of WD40 (to replace silicone oil) which means I had way too much – not just 1 drop per 2oz or almost 60ml!!
3. I didn’t tilt and pour off excess paint and of course the most recent one has cracked EVERYWHERE!
4. If using WD40 how much would you use per 2oz of paint?
I spray my wd-40 in a cup and leave it outside for half a day to let the propellants burn off. Then I use it in the same method as the silicone oil. One drop per 2 ounces of paint. You can adjust based on experience.
I don’t seem to be able to maintain cells. When I pour ( dirty pour) or create a bloom there are generally loads of cells but as I start to tilt the canvas the cells disappear and I get streaks more like marbling. Some times I get a run, where wetter paint runs instead of the whole body of paint moving. So my end pieces don’t look as good as they did when I started.
Sounds like you either have too much silicone (I reocomment about one small drop per 2 ounces of mixed paint) or your paint is too thin. You want this paint to be mount upon a mound so the cells have some body and can maintain their shape.
Hello David,
Thank you so much for your great website.I have read many, watched lots of YouTube videos, and have created many beautiful pours, and not so beautiful. I came to your site as I am having problems bringing up my gold and silver paints. Also could you expound on house paint use. Have enjoyed using this product also.
I will put house paints on my list of things to talk about soon.
Best helpful information on pouring EVER! I thank you so very much.
This may be a stupid question, but I was watching a video on YouTube, they were doing bloom pours. Using semi and opaque metalics, solid and oxide black. They noted the oxide black was for cell activation. Does that mean you don’t add silicone oil? When showing the cups with the paint it looked like there was oil bubbles.
Thanks!
With blooms most likely they are using Australian Fletrol which does have some kind of oil in it that American and the UK Owatrol don’t have in it. No they don’t use any silicone for those pours.
David, I love your videos and credit you with what success I’ve had, as well as re-motivating me when I start to lose confidence. But (you knew there was a but) as a retired medical lab technician, may I bluntly mention that your dropper/pipet technique gives me the heebie-jeebies? As a lab tech, mixing and measuring were significant parts of my job, and, as you can well imagine, accuracy and precision were critical (and they’re not the same thing). When you use a dropper, the way to get the smallest (and most precise) drop is to hold the dropper absolutely vertical. Tipping it at any angle changes the size of the drop and can only make it larger; it also makes it almost impossible to deliver precise volumes. I cringe when I see you suggest holding your dropper at an angle to get a smaller drop. Prove it to yourself: place drops of silicone on newspaper or filter paper, adjusting the angle of the dropper and comparing the size of the resulting drops. If your results don’t correlate with these instructions, I’ll be a monkey’s uncle (and a thoroughly embarrassed lab tech)! And, one more hint: to truly get the smallest possible drop, the dropper tip must be clean and dry.
Keep up the good work, David! Your fans adore you and rely on you to help us keep moving forward.
Question following video on Specific Gravity chart by Golden….Thank you BTW, awesome info that filled many gaps for me!!!
So, I’m trying to assign pigment weights to a Liquitex paint, Hookers Green. The tube has 3 CI codes so do I find all 3 Specific Gravity values and average them or how? They aren’t used equally in mixing the paint so not sure how to best guesstimate the pigment number.
Thank you again, appreciate you!
In my paint pigment density chart I had to guess at quantities of each color. I am still fixing some of those guesses but really we only care about relative density compared to other paints and not exact figures.
I have several recipes from books YouTube for acrylic pouring cells, but I never get cells. I’ve only been doing this two weeks. I have no idea what I’m doing wrong. I have read your answer and question section for a long time I was wondering if you could give me a recipe to try or something thank you in advance. love how you explain things
That really depends on what technique you are using. Can you send me some pictures of your work to date so I can give you some better advice? My website has a contact us page you can get my email from.