16 Advanced Acrylic Pour Techniques: swipe, web, string . . .
It seems like every new acrylic pour artist gets interested in the topic either from a friend or from YouTube or Pinterest. We see these amazing pieces of art and after asking a few questions to the almighty Google we realize that this is actually something we can do.
Most people have the same experience with their first pour. They buy a ton of stuff they don’t really need: they mixed the paint up too quickly and in the wrong proportions, and then they poured it out, expecting perfection, only to get an odd-looking dud. You are not alone.
Like anything worthwhile, fluid acrylic pouring takes practice and patience. I’ve been painting off and on for just over a year and I feel like I am still just scratching the surface of possibilities with acrylic paint pouring. This article will walk you through 16 advanced acrylic pour techniques: their pros, cons, and a few variations of each.
If you haven’t already, we recommend you first review our post 5 Basic Acrylic Pour Techniques to Master before moving on to the more advanced techniques.
We hope this guide for advanced acrylic pour techniques will help jump start your paint pouring experience.
In this post we’ll be introducing some additional props to help create different effects. We’ll also be more systematic about how we pour to create new and interesting pours.
NOTE: During this article we will be referring to canvas as the painting surface for uniformity’s sake. You can use any painting surface you like with each of these methods. Some surfaces may require a priming or gesso coat before painting.
NOTE: Each of these paint pouring technique explanations assumes that you already know how to mix your acrylic paint to the “pouring” consistency used in most fluid acrylic pours. If this consistency needs to be changed it will be noted in the pouring technique explanation.
Strainer or Colander Pour
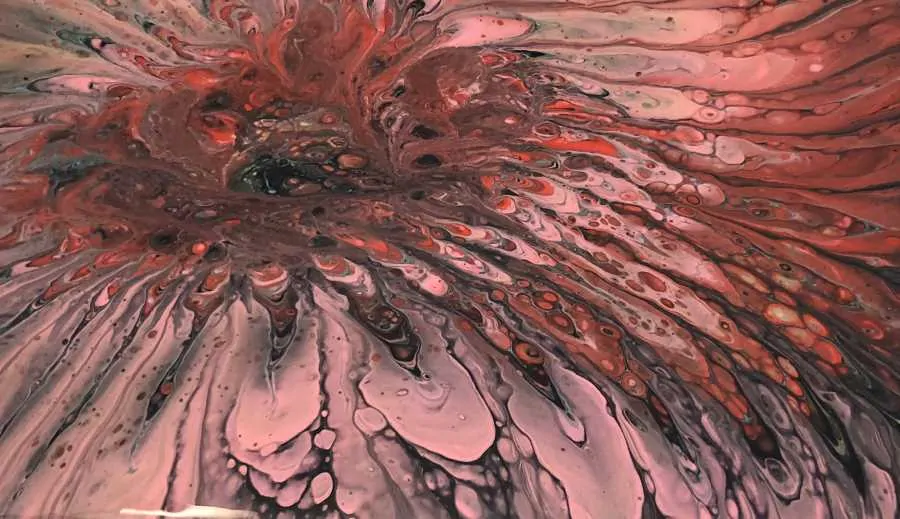
One of the more popular advanced pours is the strainer or colander pour. This technique is created by doing a dirty pour but instead of pouring directly onto the canvas, you pour into a colander or strainer that is sitting on the canvas. The paint flows out of the strainer from all the different holes and creates a kaleidoscope effect.
This technique is best with a colander or strainer that has larger holes. Small holes don’t let semi-thick paint flow through very well and causes the paint to mix more than desired creating muddy colors.
We purchased this pair of strainers from Amazon and have been very happy with the results. We filled the bottom of one with hot glue so that the paint could only come out the sides of the strainer which we think creates a better effect.
Be careful when removing the strainer so that you aren’t dripping paint all over the canvas. We prefer to cup our hand under the strainer as we lift it up to prevent unwanted dripping.
Strainer Pour Pros
- the strainer pour makes a flower petal like effect that is very pretty
- properly layered dirty pour cups can create amazing color transitions
Strainer Pour Cons
- if too little paint is used you lose the flower petal effect from the tilting and stretching
- some paintings can look busy
Strainer Pour Variations
- use a funnel instead of the strainer or colander. You can block the hole with your finger or lay the funnel end down and hold it on the canvas to block it. Use your funnel as the dirty pour cup or pour in an already prepared dirty pour. Try keeping the funnel in one place and moving around to test which method you like better
- use solid colors one by one instead of a dirty pour cup
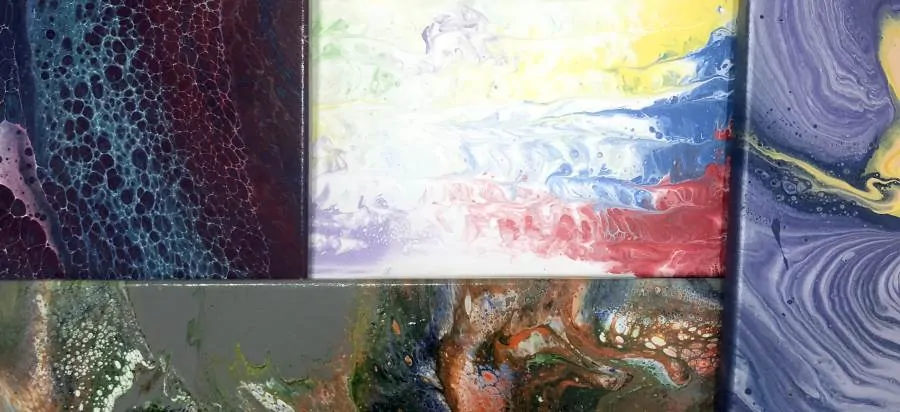
Multi-Canvas Pour
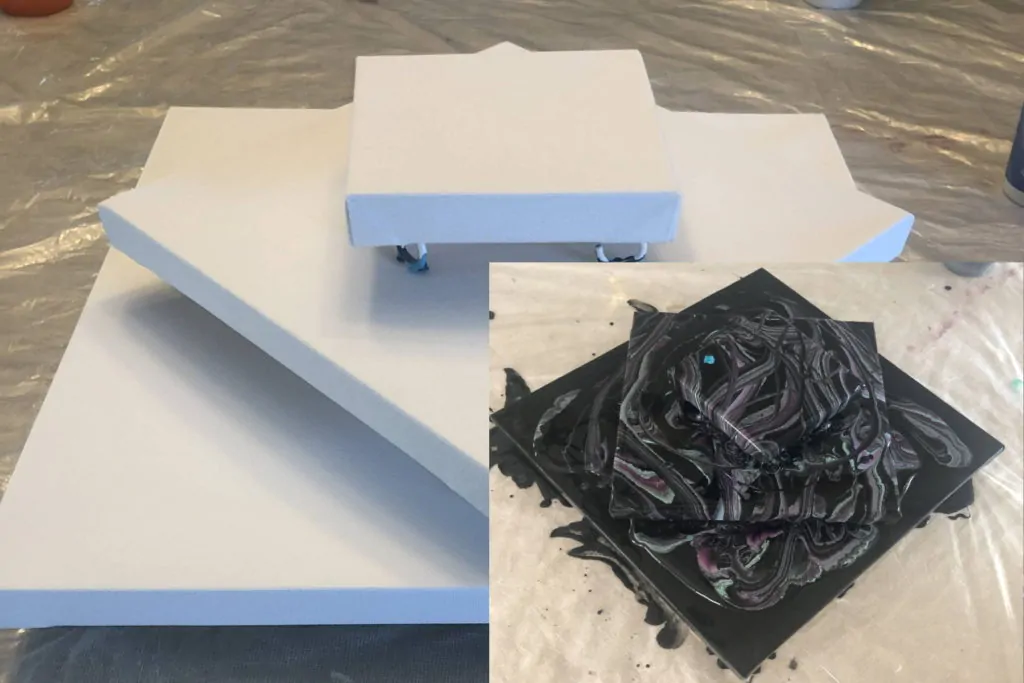
Creating a set of paintings that are related but have their own look is an inevitable progression to a painter’s repertoire. The multi-canvas pour is a unique and interesting technique to create a set of similar pour paintings on different sized painting surfaces.
The multi-canvas pour technique is created by stacking multiple canvases of progressively smaller sizes on top of each other with the largest on the bottom and the smallest on the top.
Use a dirty pour cup of paint and pour it onto the center of the smallest canvas on the top of the pile. The paint will run off onto the next canvas and so on until all the canvases are covered.
Once you have poured your paint and are satisfied that it will cover all the canvases, remove the layered canvases. Each one will need to be moved to its own area and be tilted to spread the paint over the rest of the canvas.
Be sure to include the right amount of paint for all three canvases. You can get a better idea of how much you’ll need by following the fluid pouring paint chart here.
Multi-canvas pour pros
- create a set of similar paintings in different sizes
- watching the pour flow down the canvases like a chocolate fountain is very satisfying
Multi-canvas pour cons
- can be difficult to pull each canvas up once they are all covered in paint
- dripping while extracting the upper tiers of canvases can cause unintended features
- getting the right amount of paint on each canvas takes some trial and error
Multi-canvas pour variations
- Try putting tacks or push pins like these we use from Amazon into the bottom of each canvas so they are elevated off the previous canvas. This lets the paint go underneath providing better paint coverage on the bottom canvas layers. This also allows you to wait till the paint stops dripping before pulling the canvases apart
Bottle Pour

For the bottle pour, you’ll need a plastic bottle from your favorite soft drink. Cut the bottle in half 3” or so from the bottom of the bottle. We recommend you keep the top half of the bottle and experiment with it on a funnel pour.
Make a small cup of paint that will be enough to create a puddle as wide as the bottle bottom that you are using. This will make up the center of the painting. This can be the same color as the rest of the painting or a completely different set of colors. We recommend you experiment with both.
Now that you have your bottle bottom, place it upside down in the middle of your canvas. The cut side should be lying on the canvas and bumpy bottom side should be face up. You can now pour either a traditional pour with individual colors or a dirty pour cup of paint directly in the center of the upside-down bottle bottom.
Try pouring in one steady stream or pouring in a small tight circle. The paint should flow off the bottle via the little rivulets. The number of humps on the bottle will determine how many “petals” the paint makes as it flows down onto the canvas.
Once you are done pouring your paint, leave the bottle for a minute or two before removing it to allow the paint to settle. You can use a popsicle stick or a painter’s knife to slowly lift up an edge so that you can pull it off the canvas. As you pull the bottle bottom off the canvas, try to put your hand or something underneath so that you don’t get drips all over your painting.
Bottle pour pros
- the bottle pour technique makes beautiful flower like paintings
- bottles are easy to come by and you can change it up to make different patterns
Bottle pour cons
- getting the center of a bottle pour to look right can be difficult
- use too little paint and the flower looking effects will distort when you tilt the canvas to move the paint around
Bottle pour variations
- try using 3 different dirty pour cups of paint; one for the center, one for the outer edges of the petals, and one for the inner petal
- after pulling the bottle up and before you tilt your canvas, use a knife or popsicle stick to pull pain from the petal in the center or from the center into the petals. You can do this at the natural joints created by the bottle pour or in the middle of each petal. This helps join to two different paint pours together
- try using a cookie cutter instead of a bottle bottom. Place the cookie cutter on the canvas and slowly pour your paint into the cutter
- use a small ball or sphere in place of the bottle bottom. Place it in the center of the canvas and pour the paint onto the top of the ball/sphere. The paint will cover the ball/sphere and fall onto the canvas. An old magic 8 ball toy or a upside-down light cover work well for this type of pour
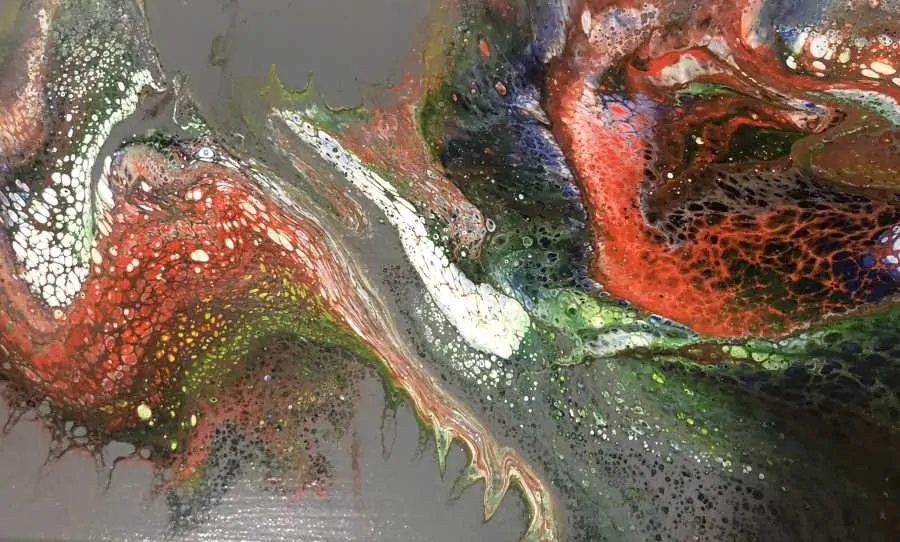
Web Pour
This is the technique we have fallen in love with the last few months. The web pour is created by using a squeeze bottle, or something similar, and squeezing or pushing paint underneath other paint that is already on the canvas. If done properly this creates a webbing effect that is simply amazing.
Some other common names for the web pour are an “infusion pour” or an “injection pour”.
To begin with a wave pour, you need to have a base pour already on your canvas. This can be tilted and spread already, or it can be pre-tilted. You’ll have to experiment to find out which works best for your purposes. Try a flip cup, dirty pour, traditional, or even a puddle pour as your base.
We also recommend putting some filler paint around your main paint base. This filler paint allows your squeezed paint to flow a little more freely underneath the main pour you are trying to get the webbing from.
Now that you have a base pour, take your squeeze bottle, insert the end underneath the paint where you want the webbing to appear. Keep in mind as you squeeze the paint will travel in the direction the nozzle is pointed. Now squeeze the bottle slowly and move the nozzle into the paint or side to side under the existing paint.
The more paint you squeeze in, the bigger the webbing is going to be initially. Tilting and spreading the pour after inserting the additional paint underneath will also help to widen and stretch the webbing.
The key to making this web pour technique work is the consistency of the paint you are squeezing underneath. Too thin and it mixes with the pour on the canvas instead of creating webbing. To thick and you get big sections of paint but not much webbing.
Web Pour pros
- The web pour technique creates some of the most beautiful fluid acrylic pours that we have seen
Web Pour cons
- very difficult to master
- there are so many variables that come in to play to make the web pour technique viable
Wave Pour or Intentional Pour
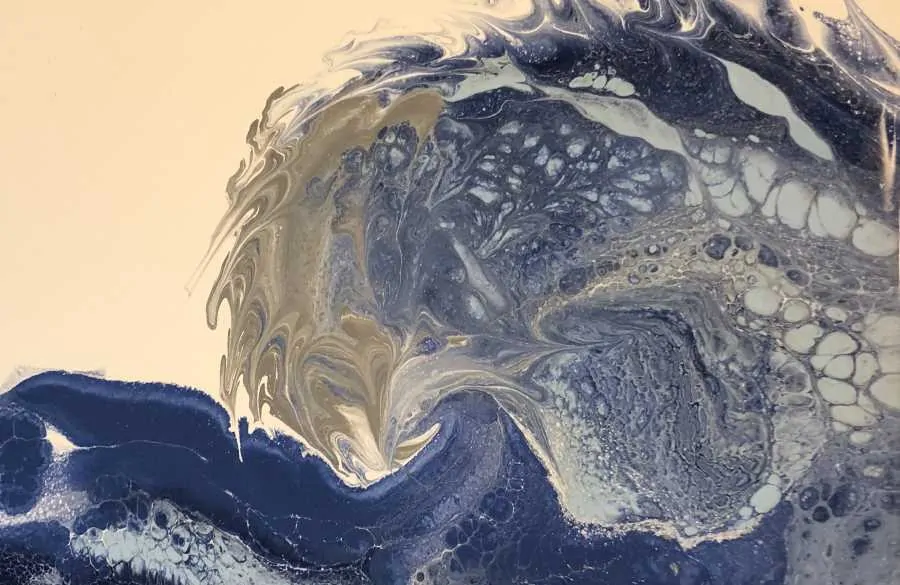
We call the wave pour technique the “intentional pour” because you are intentionally trying to create a specific image with your paint pouring.
In the case of the wave pour, you are using a traditional pour and placing the colors on the canvas in a way that gives the pour the look of a wave.
First, prepare all the colors you want to show up in the painting. We have had great success with white, silver, dark blue, sea green, and a light blue. Make sure to experiment with your own colors.
Once the colors are mixed up pour small ribbons of each of the non-white colors in the shape of the wave you want. You can also think of it as the shape of the NIKE swoosh symbol. The colors can overlap and intermingle.
Now pour your white all around the outside of the “wave-like” pattern that you have created. Make sure the white covers the rest of the canvas.
With a painter’s knife or a small wet paper towel you are going to very carefully spread only a small top layer of paint from the bottom of the wave up to the crest. You don’t want the colors to mix too much. You can repeat as necessary to make sure all the paint is swiped along the wave body.
Try pushing the swoosh part of the wave into the white a little bit. You can even go the opposite directly and pull the white into the wave which will look like bubbles or froth on the wave.
Don’t mix too much as that will cause your painting not to have enough depth of colors.
Wave pour pros
- these pours are very popular and when done correctly sell quite well
- color selection is relatively easy
Wave pour cons
- these pours take practice
- don’t expect to get it right the first time
Wave pour variations
- try creating a jellyfish. Coat the whole canvas white then pour a small half circle of blues at one end of the canvas. Then pour small tendrils on paint from the half circle across the canvas. Use your painter’s knife or a wet paper towel to spread the half circle paint into the body of the jellyfish. Do the same with the tendrils but don’t spread them too much to either side
Layered Pour
The layered pour takes more time than other acrylic pour techniques as it requires that we let the paint dry between coats. The idea is to layer on multiple thin coats to get different effects in each coat. There are two main ways to do a layered pour.
- The first is to just coat your canvas completely using any of the methods in this blog. Allow the paint to completely dry and cure. We recommend reading our blog post about the drying times of acrylic pours here.
Pour a thin layer of a paint medium (with no acrylic paint in it) that dries clear, such as gloss medium or Floetrol, over the painting. Then add more paint over small pieces of the surface. This way the medium will dry see-through and the new paint will cover the base layer of paint in small areas.
This layering give depth to a painting and allows you to use two completely different sets of pours that don’t mix at all because they are dried in separate layers. You can do this process as many times as you want if you let each layer dry and cure properly. - The second method is very similar to the first. Instead of using a layer of see-through medium and then only painting spots, you are going to use non-opaque paints in a very thin layer so that when dried, you can see the base layer through the new layer.
Most student and professional level paints show their opacity on the container. For the second layer you want partial or no opacity. You can also look on the manufacturer’s website. For craft paints, you may need to test the opacity/transparency yourself by using this downloadable Paint Opacity Check PDF.
Layered pour pros
- the stained-glass effect can be stunning
- adds depth to a painting when layered multiple times
Layered pour cons
- color selection is very important
- layers must be very thin for option #2
- takes lots of time to wait for the pours to dry and cure
Two Cup Pour or Shot Glass Pour
The two cup pour or shot glass pour is a derivative of the dirty pour. First get two cups with one cup that is smaller and that can fit 100% inside of the larger cup. A small shot glass is ideal for this technique which is the reason it is sometime referred to as the shot glass pour.
Fill the larger cup up with your dirty pour paints. Do not fill it all the way. Leave enough room to insert the smaller cup inside.
Now fill the small cup up with another dirty pour. Place the small cup inside the larger cup and push it down so that the top of the small cup is at the same level as the larger cup.
Now either flip the larger cup that has the smaller cup onto the canvas or turn the canvas over on top of the cup and flip them both together (aka. flip cup).
Wait a few second for the paint in both cups to settle and then start by removing the larger cup. Once removed, do the same for the smaller cup.
As we’ve mention before, be careful when pulling the cups off the canvas as they will drip onto your painting.
Two cup pour pros
- with the smaller cup inside the large cup on this dirty pour you get some more interesting color combination than just having two separate dirty pours
Two cup pour cons
- you can easily make a mess with the two cups if you guess your paint requirements wrong
- sometimes pulling off the second cup causes paint to get muddied in that area
Dip Pour
The dip pour is an extreme departure from what we’ve looked at so far. With the dip pour technique we are not pouring paint onto the canvas at all.
For this pour, we need a surface to pour our paint on that is relatively hard and flat underneath. A tabletop with a plastic sheeting is perfect.
Pour your paint onto this plastic surface using any of the basic techniques above. Make sure it covers the approximate size of the canvas or surface that you want to paint on.
Next turn your canvas upside down and dip it into the paint. Let it sit for at least a few seconds so the paint can adhere to the canvas surface.
You can continue to dip the painting as many times as you need to cover the canvas. The more you dip the more the paint will mix together. To many dips will cause the paint to muddy.
Dip pour pros
- this is a great way to create an abstract piece
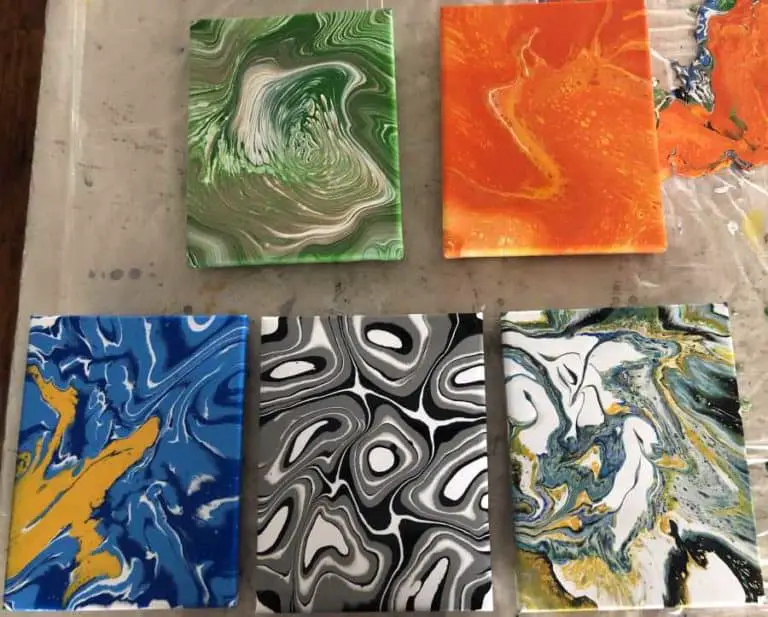
- this method works will with smaller pieces like coasters or 4” X 6” canvases
Dip pour cons
- this method can be very messy
- you need a lot of room and relatively flat surface to make this work. The plastic sheeting must be taped down or be heavy duty or it will pull away with the paint when you remove the canvas from the dip
Negative Space Pour
Negative space refers to surface of the painting around the main part of the pour. In this case of fluid acrylic pouring, we are only putting our pour on a small amount of the painting with the rest being dominated by a uniform color. This color is generally black or white but can be any color you want.
To create the negative space technique, cover your canvas in the chosen negative space color. Then pour only a small amount of paint on your canvas that will not cover the whole canvas.
Alternatively you can pour the paint onto the canvas and then coat the rest of the canvas with the negative space color. This way the two pains only interact at the edges instead of where the pour is being drizzled over the top of the negative space color.
You can still tilt your canvas to spread the paint around, but you want to leave larger sections of the negative space color intact.
Negative space pour pros
- the eye is naturally drawn to the point pour which is only part of the painting
- the negative space provides a contrast to the main pour
Negative space pour cons
- because the negative space is monotone the color selection if very important
- too much negative space be a detraction to the piece
Get additional in depth information on this technique in our blog post on Acrylic Pours with Negative Space.
Hammer Pour
The hammer pour is where you can include a little creative destruction into your paint pouring. This method doesn’t not work well on a canvas or other soft surface as you will be striking it with a hammer or other blunt object.
This method involves putting down paint on the canvas in whatever way you want. The puddle method is the one we would recommend beginning experimentation with. For the hammer pour we recommend you use a hard paint surface instead of a canvas although a canvas can be used if special care is practiced.
Begin by covering your hard painting surface with a thin layer of a single color of paint. Then pour a few small puddles with a few different paint colors or with a dirty pour cup. These puddles should be from the size of an American quarter to a silver dollar. Spread these mini puddles across the canvas surface.
Next, use a hammer or mallet to lightly tap in the center of the paint puddles. The harder the tap the more the paint will splash and splatter so start out slowly. Add more paint and continue to hammer away until you are satisfied with your work.
Hammer pour pros
- this technique is extremely messy
Hammer pour cons
- this technique is extremely messy
Balloon Dip Pour
For the Balloon dip pour you will need a large flat container with small sides. This could be a cake pan, pie pan, plate, paper plate, etc.
Cover your canvas in a thin layer of a single color of paint. Black or white is ideal for those are you trying this technique for the first time.
Now you can either pour your prepared paint directly into the container mentioned above or create a dirty pour cup and then pour it in the container.
Next take an inflated balloon and dip it into the container with your colored paint. Pull your balloon out of the paint and dab it down into your canvas in a few places to transfer the colors.
Repeat the dipping and dabbing of the balloon as many times as you think necessary to finish your painting.
Balloon dip pour pros
- because you are dabbing where you want the paint to go you have a bit of control on how the painting turns out
- this is a great method to create flowers.
Balloon dip pour cons
- can be messy
- dipping and dabbing too many times can cause the paint to muddy
Split Cup Pour
The split cup pour requires that you buy a special cup that is split into two equal sections. 7-11 has a Slurpee cup that works great for this type of project when doing larger canvases. You can also purchase one on Amazon here.
Prepare each side of the split cup with whatever paint method you prefer. We recommend you layer different color paints in each side with only a few shared colors. We like the asymmetrical look this creates in your painting.
Now either pour the paint onto your canvas or use the flip cup method to let it all come crashing out at once.
Split cup pour pros
- you can use two different sets of colors in each side to create pretty contrast
- this technique is very easy and similar to the more common acrylic paint pouring techniques
Split cup pour cons
- you may have to purchase a new container to achieve the best results for this technique
Split cup pour variations
- try pouring the colors so they come out right next to each other. You can do this by making the divider vertical as you are pouring. Using a split cup is another way to do the tree ring kiss pour
- try pouring the colors out one on top of the other. Do this by pouring one side out first and then having the second color spill out on top of the first side that pours out. By the time you finish the pour the divider in the cup will be horizontal
String Pull Pour
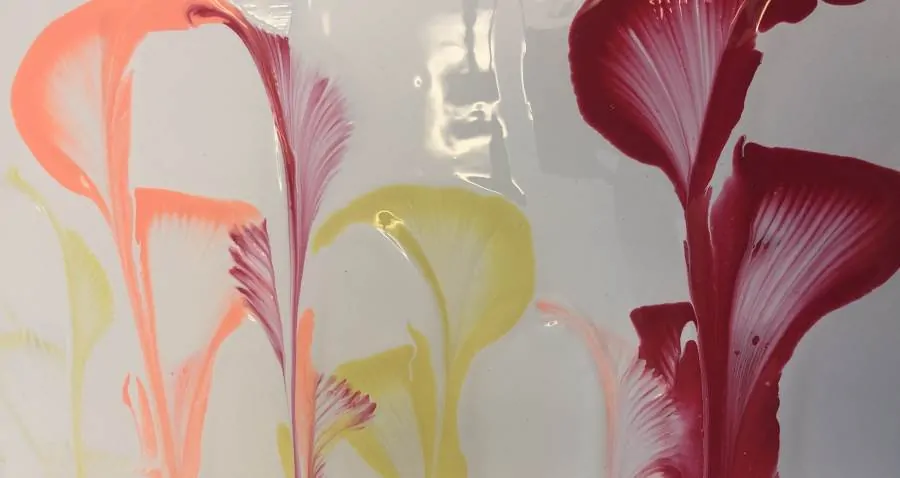
The string pull pour is arguably one of the most difficult pours to get right. This pour involves using string that is covered in paint and then moved around on the canvas in various ways leaving shadows of paint where the string was.
To create the most basic string pour, cover your canvas with a thin layer of a solid color of paint. Experimenting with white or black paint will again be the most effective way to learn this technique.
For the string pour technique, we have had good results with these medium thick yarn or a natural jute twine from Amazon. These strings have a little more texture than a normal string which will allow more paint to stay on the string.
Now prepare a small plate or container of a single color of pour paint. This paint should be slightly thicker than the normal pour paint so that it can stick to the string a little more than thinner paint would.
Cut a length of string equal to the smallest side of your canvas. The string size can vary but we want to make sure the first few times you try the string pour technique that you have a manageable amount of string to work with.
Dip the string into the paint on the plate and make sure it gets coated entirely. Now lift the string up and give a few seconds for the excess paint to drip off.
Place the string in an “S” on the canvas with the top of the “S” being about twice the size of the bottom part. Make sure the end is on the smaller side hanging off the canvas a small amount.
Let the string sit for a few seconds. Now take the string by the end hanging off the canvas and pull slowly directly away from the canvas. When the string gets pulled off the canvas it creates an image like a calla lily.
String pull pour pros
- these pours are classics and are very popular
- there are innumerable variations on the string pull pour technique
String pull pour cons
- so many things can go wrong
- paint consistency must be spot on else when the string gets dragged it leaves to much or not enough paint
String pull pour variations
- try adding multiple small string pull flowers to a single canvas
- experiment with how fast you pull the string and from what directions
- use multiple colors for different sections of the string
- drag the string across the canvas like a snake or a in a circular motion
- try to leave a heavier amount of paint on the string when you transfer it to the canvas
Blown Pour or Dutch Pour
The blown pour is an alternate method for moving the paint on the canvas by using forced air. This forced air can be provided by a compressor and a precision release tip or by using a common straw and the power of your lungs. This technique is also called the Dutch pour.
This pour requires that you have paint on the canvas to work with already. For beginners we recommend that you coat your canvas with a thin layer of white or black fluid acrylic paint and then create some small puddles of paint using 2 or 3 colors in each puddle. These puddles should be the size of an American nickel or dime to begin with.
Now use your forced air method above to slowly move the paint from the center of your puddle to the outside of the puddle and into the base paint. Follow this same procedure multiple times from different sides so that the whole puddle is blown outward from its center.
You can use the blown pour technique with any of the other techniques to help move the paint where you want it to go without using a painter’s knife or other tool.
Blown pour pros
- you have control to move the paint where you want it depending on the power of the forced air and the direction it is blown
- flowers and other visually appealing images are easier to create with this method
Blown pour cons
- too much or to little forced air will not give the intended results
- the paint will flow differently with every “blow” and is difficult to control
Blow pour variations
- drop a small dot of paint on a completed pour painting and then blow it around. This can create some pretty spectacular details on a painting
- try blowing the edges of a negative space pour to move the paint out into the negative space color
- more aggressive blowing will pull the paint that has settled underneath other pain back up to the surface of the pour
Swipe Pour
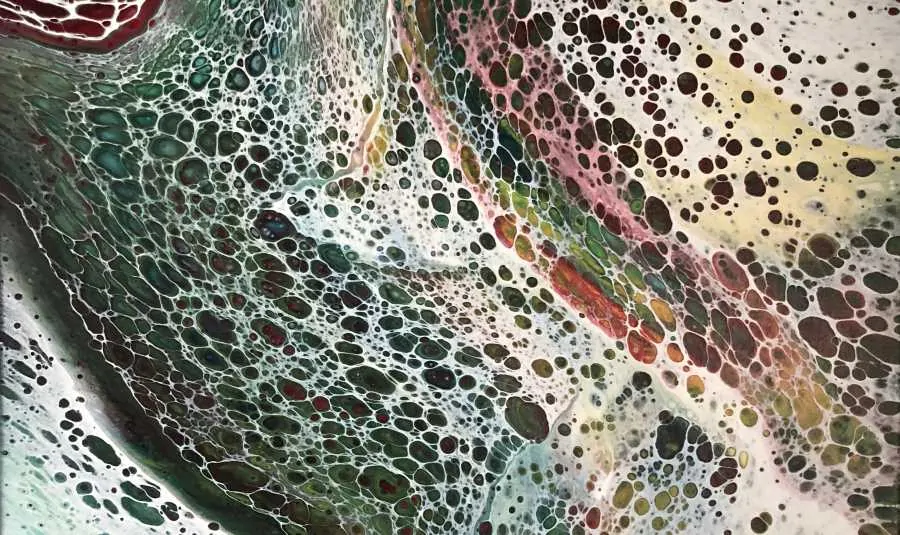
The swipe pour is all about choosing the right colors and a steady hand. This technique allows you to create a “veining” across a pour with the color of your choosing.
For maximum results, whatever color you chose as your swipe color should be a little more runny than the normal fluid acrylic paint. This allows the paint to flow more easily as you swipe it across the canvas.
For beginners, we recommend pouring solid colors across the canvas in stripes parallel to the smaller side of the canvas. Leave an inch of room on one side. Pour your swipe color on that last inch of the canvas. Make sure you have quite a bit to start out with.
For the swipe, we recommend you start out with a damp paper towel that has been wrung out of any dripping water. Hold two adjacent ends of the paper towel over the top of the swipe color without letting the other end of the paper towel touch the canvas.
Move the paper town along the canvas so the bottom half (where you aren’t holding) comes in contact with the swipe paint color. Gradually “swipe” this side of the paper towel along the canvas towards the other side.
This would pull a thin layer of the swipe color of paint over the top of the rest of the canvas. You can repeat as many times as you need for the swipe color to get all across the canvas.
Finish by tipping your canvas to move the paint around as you see fit.
Swipe pour pros
- the swipe pour is one of the easiest ways to create cells
- any color can be used as the swipe color
Swipe pour cons
- getting the swipe color to move across the canvas as desired takes practice and patience
- pulling too hard or too much paint leaves a messy trail instead of the lattice like effect we want
Swipe pour variations
- you don’t have to swipe a specific color. You can swipe literally any painting
- try using a trowel, a ruler or other thin hard straight edges to swipe with. Be careful not to pull too much paint and to stay as level as possible while swiping
- you can only swipe small sections of any painting to give them some additional detail or to cause colors to interact more
- use a painter’s knife to selectively swipe from the painting onto the base color paint to create interesting artifacts on the edge of the painting
Learn more about creating cells in our article Acrylic Pour Cell: Everything You Need to Know. For a more in depth guide on the swipe technique, read our blog post Acrylic Pour Swipe Technique in 6 Easy Steps.
Combining Acrylic Pouring Techniques
One of the beauties of acrylic pouring is that the ways to create are endless. You can mix and match any of the acrylic pour techniques mentioned in this article to crate your own unique style. Here are a few of our favorite combinations.
- negative space dirty pour with blown edges
- layered string pull pour on top of a dried and cured dirty pour. Try creating red/orange/purple/yellow flowers on top of a green/brown pour.
- balloon dip pour in the center of multiple small puddle pours.
- colander/strainer pour with individual colors of the rainbow.
- small flip cup pour in the center of a negative space with the web pour technique squeezed in underneath.
- multiple tree ring pours on a negative space pour.
- two or more completely different flip cup dirty pours in different parts of the same canvas with a ribbon pour throughout.
- colander/strainer pour with multiple different colors of dirty pours.
As you can see, there are many different types of pours that you can experiment with. One of the things we like most about acrylic pouring is that if you don’t like the pour, let it dry and cure and then pour a new painting over the top.


Thank you so much. Your write up has helped me a lot. I am a newbie in painting
We are glad you enjoyed it. Don’t hesitate to ask any additional questions you may have.
Well written! Your descriptions and instructions are some of the most clear and detailed I’ve read – even compared to published books. You clearly state the level of knowledge and/or experience someone needs to effectively understand the main points of your topic. Bonus- you have links to the articles that explain the concepts needed to utilize the information in each article. Bravo! If you’re not a teacher of some sort you should be!!!! Thank you for the easy-to-follow, detailed directions. I will definitely recommend!
Thank you very much. I really appreciate the compliment. There are a lot of good resources out there but they are scattered around many different places. I tried to be as concise as possible and to bring as much of the info together as I could, including my persona experiences, to help mitigate how much searching other pour artists need to do. The kicker is I love to do it so it’s a win-win for everyone.
I would like to see a picture of each technique ..
Your directions are very understandable.
Thanks
I am definitely working on it. Thanks for reading!
It’s a great article! A few questions and two comments…
I’ve been pouring for a while now and I have a few things that have confused and frustrated me from day one. I know that we should know how to mix the consistency of our paints, which I do, but my confusion comes in with the consistency of paint used as the base and the paint consistency on the top of a pour, such as a swipe.
Should these consistencies differ from the actual pouring paint? Here’s an example of one of my issues… I normally use white or black paint to help the pour flow, however, many times large cells pop through that I do not want to see, especially on the edges of the canvas. I’m assuming that the consistency of my base paint is off?
Sort of the same question when it comes to the swipes… Should it be a different consistency than the paint I’m pouring? It doesn’t always come out the same with each painting but I find that some areas don’t allow enough paint to pop through the pull color (too thick or too much pain???). Any suggestions? Also, I try to keep my cells looking big and crisp but as I tilt I tend to lose what I’m trying to achieve. Maybe I’m tilting too quickly? Too much paint?
I’ve experimented quite a bit, which really is my frustration… I should know what to do by now?!?! Any advice you can provide me with I’d greatly appreciate!
Now for the comments…
I think you should let your viewers of this article know that aside from waiting for a painting that you don’t care for to dry so that you can reuse the canvas, the canvas can also be washed off if done before the paint dries. Sometimes our paintings can get too thick, especially if used several times, or they may have unwanted texture. This can render the canvases useless, and no one likes to throw away money, canvases aren’t necessarily cheap. Fortunately for me I live in Southern California and don’t really experience a true winter, so I can take the garden hose to my failed attempts. This could also be done in the sink or the bathtub, as the paint will normally easily wash off these surfaces. If the paint has dried too much or has left a stain from the paint on your tub, sink, or countertop, you could use a little Ajax/Comet, bleach, rubbing alcohol, or fingernail polish remover **depending on the type of surface of your tub or sink**. Just a suggestion.
Referring to the swipe, You recommend a “damn’ paper towel? Were you angry when you were writing this article? Lol! Of course I know what you meant, I thought it sounded pretty funny. But maybe you didn’t notice your typo? Thank you! You’re inside should be most helpful to the new paint pourers . I hope they realize the addiction that they’ve just created for themselves!
Base layers should be the same consistency and use the same medium if you do NOT want the paint to create “pearl” cells. If you do want cells, you can either use thinner paint, or use a different type of pouring medium. Each one is slightly different in how it reacts to other mediums and you’ll most likely need to do a test. I haven’t found that the speed of my tilts affects cells, just the medium used and the consistency.
For swipes, you want the paint you are swiping with to be thinner than the base paint. That is for two reasons. First, a thinner paint will move easier than a thicker paint. Second, the thinner paint will separate, or create webbing, much easier. Sometimes you can get the same effect with a little bit of alcohol and the same consistency of paint (probably other pouring mediums too) but it is safer and easier just to make them thinner.
Thanks for the pointer on my “damn” paper towel. I’ll get that fixed immediately.
I have used your two sets of notes (Beginners’ and Advanced) and I can tell you these are among the most useful source material I have come is across on the ‘net. There are just so, so many, tutorials, it makes your head spin. More annoying is that often I have to listen to the artist’s life story, what their dog is doing, where they went on vacation, what the weather is like, all before we even begin mixing the paint. The way you have pulled the techniques together into a simple, comprehensive format is fantastic for us artists out there. Thank you so, so much
Thank you very much. That was exactly the reason I started this website. There is a lot of good information, it is just scattered around so much that it is hard to sift through the no-so-good stuff. If there are any other things you are looking to learn that we don’t cover, just let us know. We are expanding the website and YouTube videos every week. Thanks again Reina.
I’m enjoying reading all this so much that it’s almost as good as doing it myself… no, not in the least! I had became weary of watching tutorials with so much miscellaneous chatter. Whew! I was weary of the occasional small bite and revelled in your multicourse dinner of information! Thank you. I’ll visit again soon.
I am glad you enjoyed it. I’m not one to pontificate too much (at least I don’t think I am). I hope it helps you in your next pour.
I think you meant to say ‘damp’ paper towel in the swipe technique 😂😂, although, I have definitely called it a damn paper towel as well! Awesome info, thanks!!
Yes, that was a mistake that is 100% accurate also. Thanks for the catch!
I did not know that one of the more popular advanced pours is the strainer or colander pour. My sister likes to spend her spare time doing art. It would be a good idea for her to try using a paint strainer so that she can try a new technique. https://sprayright.com/
I really enjoy this technique. Consistency and color combination are really important for the colander/strainer pour which is why I categorize it in the more advanced section.
WOW! I wish I had seen this website before making all my mistakes! Thank you so much for this great information. You are a very kind person, in sharing your knowledge with us. Kuddos to you my friend.
You are very welcome. Don’t hesitate to ask a question if you can’t find the answer. My YouTube channel also has a bunch of videos where I do experiments to help people from making my same mistakes.
Thanks for this information. I want to pour paint an outdoor fountain so I can get the effect of falling water down the sides. Where should I start?
The three dimensionality of my “canvas” gives a whole new spin to the techniques.
Pouring on a fountain sounds amazing. Look at some of the videos about paint pouring on glass for ideas. You might also consider buying a few small cans of exterior house paint and tinting that with your acrylic paint. It should hold up a little better than normal pouring mediums as it has additional UV protection.
Hi
Just a note to say I really like what you have done as there are not many sites with the detailed written information you provide. Saves me a lot of note taking! Linda
Thank you for the note. I appreciate it and am glad it was helpful.
Hi! David, great videos on you tube. Thank you for sharing. Good for new starters to experienced ones. Cheers!!!!!
I appreciate that and glad I could help.
Hi David, I enjoyed your videos. Thanks for the insight, I use some of the ‘Pour techiques, to paint the bases for wind chimes that I build. I love the outcome of each one, sure beats looking at a ‘wood stained chime.
That sounds amazing. What do you use for the chimes? Bamboo?
Just experimenting with acrylic pour painting. Love It! At this very difficult time dealing in a most unusual time with COVID, all lives turned upside down, Art Museums etc closing and we all went virtual, quite frankly, I have never been fond of computers. Painting old school for so many years, I find acrylic pouring fascinating, always so surprised of the results, some really awesome.
Brigitte Brocato
I see you are as enamored with the artform as I was when I started. I feel like I finally found my inner artist even though I thought they’d been lost forever.
David, it seems like every painter has a different method of getting paint on the strings. Do you have a recommendation?
Sorry, again. Read your article and went over to do a string pour. Well, I had to swipe & wipe that one clean. I forgot what you told us and did not make my string paint a little thicker than the base paint. Duh! Must be my senility creeping (or rushing) in. As always I had copied your article and went to it and highlighted it with bold underlined areas. “This paint should be slightly thicker than the normal pour paint”
Forgive me my Guru. Also what is the easiest sway to clean off a just painted canvas.
I just scrape my canvases with a putty knife and then a paper towel to knock down any high areas. Either paint again immediately or let it dry then paint again.
Very helpful and concise instructions!! Thank you for sharing!💕
Thanks for visiting the website Lynn. Glad to help.
I keep having issues with my pillow paint for blooms. Every white house paint I have used lately leaves white spots. Behr, Sherman Williams, and even the Artist Loft soft body acrylic. I stir it gently and let it sit overnight. I torch it before and after I put on the colors. I have never had this much trouble with pillow paint. I was told that some paints just suck as a pillow and that the Artist Loft soft body especially sucks for a pillow. The part of a bloom that should be a no brainer is making me want to just give it up. I’m using 4×4 tiles, mixing colors with US Floetrol and the pillow is straight out of the can or mixed with *.* (I have tried everything)
Sounds like you’ve done everything I would do for the base. The colors only being mixed with Floetrol will 100% give you bubbles into the layer below. Floetrol has a little bit of some kind of oil that does that. You would have to add some gloss varnish or untinted base 3 house paint to the paints to help make them more “sticky” to keep that from happening.
very informative tips
thankyou ,interesting readin the comments also
Glad you liked it. let me know if you have more questions Margaret.