What Can You Acrylic Pour On? Records, Tables, Pottery & More
One of the beauties of acrylic paint is that it can be used in so many ways. These water-soluble paints are utilized for everything from painting buildings to art projects in elementary school. There are no messy chemicals needed, and they adhere to a lot of different painting surfaces with little or no additional preparation.
Acrylic paint pouring takes advantage of all the best qualities of acrylics. Once you get hooked on fluid acrylic pouring, it’s hard not the think about all the things you can pour on. Outside of the traditional canvases and wood panels, you can pour on vinyl records, glass, pottery, furniture, and many other surfaces.
Join us in reviewing 26 of the most common things we see artists using acrylic paint pouring on to create their works of art.

Acrylic Pour on Canvas
Painting on canvas is the most common surface on which fluid acrylic artists ply their trade. Canvas provides a lightweight painting material and comes in a variety of different sizes. Canvas is also water friendly, has texture for the paint to adhere to, and is durable and eco-friendly.
There are multiple different types of canvas styles. See our list below for additional information on the most common canvas types and styles used in fluid painting.
- Back Stapled Canvas – Student quality canvas used for all types of acrylic painting. Most canvas come pre-stretched and pre-gessoed.
- Gallery Wrapped Canvas – These canvases are usually slightly higher quality than the traditional back staples canvas. They are also pre-stretch and pre-gessoed. The main difference is the back is finished much more elegantly around the wooden frame given them a more refined professional look.
- Canvas Board – Canvas boards are made up of stretched canvas over a thick cardboard like material. They are much less expensive than back stapled or gallery canvases but tend to warp when moderate amounts of fluid acrylic paint are left on the canvas board.
- Canvas Sheets – Individual sheets of canvas which are not attached to a wooden frame. These are more difficult to use in acrylic pouring as they need to be on a hard and flat surface in order to allow the fluid paint to move uniformly when poured or the surface is tilted.
Most canvases today are made of various qualities of cotton duck, although some are still made of linen and other less common materials.
Larger canvases also have tendency to bow inward toward the center when large amounts of heavy paints are added to the canvas. To avoid this, let more paint run off the sides of the canvas or add some additional support under the canvas while pouring and during the drying/curing of the painting.
To tighten the material on a canvas you can also use a spray bottle of water and spray evenly along the bottom side of the canvas. Let the canvas dry completely. This will cause the canvas to tighten up, especially through the center.
Acrylic Pour on Wood
Wood is another favorite material for acrylic pour painters. Wood provides a stable surface to paint on and can be cut and manipulated to provide a cornucopia of different shapes and surfaces.
Any wood can be used although some are more convenient for paint pouring than others.
Precut wood found in your local craft store is probably the most common. These wood planks are usually made of either pine or balsa wood and come in various shapes and sizes.
Larger sheets of plywood, particle board, and pine can also be found at most home improvement stores. Some of these are already cut down to size but you can usually get better deal when you buy larger sheets. Some stores even offer the first few cuts free and additional cuts at fractions of a dollar (at least in our experience).
Cross section slabs cut from trees with a natural bark outer edge are also quite popular. One beautiful option with a live edge cut is to leave a bit of the natural wood showing through giving a contrast to the acrylic pour colors.
With most wood, some sanding will be required to get the desired surface texture. Gesso or a base coat of paint can also be applied to fill in the small natural crevasses common in wood which keeps the fluid acrylic paint from being absorbed as much.
Many artists prefer wood to canvas because wood gives more support. Thicker applications of paint can be applied without bending or warping.
The downside of wood is that larger pieces weigh a lot and are harder to manipulate during the pour. Mounting large wooden painting surfaces is much more difficult than a lighter material like stretched canvas.
Acrylic Pour on Tile
Painting on ceramic tiles seems to be a logical progression for most fluid acrylic painters. Tiles make for beautiful coaters or small decorative art pieces. Some intrepid artists have even poured on enough tiles to create a backsplash in their kitchens.
When pouring on tiles, taking the time to properly prepare the surface is the key. Unfinished tiles are the easiest to use. These tiles have a fine grit sandpaper feel. We recommend applying a layer of gesso or other primer type coat so that the paint has a nice even surface to adhere to. Don’t forget the sides.
Finished tiles, like those purchased at a home improvement store for use in a bathroom or kitchen, have a shinny finish. Acrylic paint does not stick to this finish very well and can peel off the surface when dry. You will need to use a heavy grit sandpaper to rough up the surface and then apply a primer coat before use.
Acrylic Pour on Paper
There are many different types of papers that can be used for acrylic pouring. Watercolor, sketch pad, vellum, pastel, easel, yupo, and mix media papers can all work with fluid acrylics.
When pouring on paper, make sure you have a hard and flat surface underneath unless you are doing a dip pour. Attach the paper to your hard surface with double sided tape or on the edges so that it doesn’t shift or curl when you apply the paint.
See our detailed instruction on pouring on paper here.
Acrylic Pour on Glass
We’ve seen acrylic paint applied to old windows, glass tableware, and individual sheets of cut glass. Pouring on glass is a unique way to create art, especially when you view the pour from the non-painted side of the glass.
Some glass surfaces may require a layer of primer create specifically to adhere to shinny material. Medium created specifically for glass and tile may also be used.
As always, take special care when pouring on glass or displaying art that has been created with glass.
Acrylic Pour on Vinyl Records
You can most definitely do acrylic paint pouring on vinyl records. The texture of the records can lead to some very interesting pouring designs.
One thing to watch out for with vinyl records is the paper stickers in the middle will peel and warp when wet. You can avoid this by sealing with a coat of gesso or other primer or by removing the sticker all together.
Acrylic Pour on a Serving Tray
Serving trays, with their flat bottoms and raised edges, present a perfect surface for acrylic pouring. When finished, these service trays can be used as a decorative pieces, or they can be coated with a food grade resin and then used as they were originally intended.
Acrylic Pour on a Lazy Suzan
A Lazy Suzan is generally made from a round hard material with a swiveling base. As with serving trays, pouring on the top surface can turn a regular kitchen item into a functional work of art.
Be sure to use a food grade finish, like the ArtResin Epoxy Resin.
Acrylic Pour on Picture Frames
Picture frames are an ideal candidate for fluid paint pouring. By pouring on an older or ugly picture frame, you can create something new and unique.
Make sure to lightly sand shiny materials, like finished wood or plastic, and begin with a base gesso or primer coat. This will ensure your paint sticks to the frame.
Frames will take more paint than a normal canvas or wood panel would as it is harder to get the paint flow in the exact direction you want on non-flat nor contiguous surfaces.
Acrylic Pour on Furniture like Tables, Shelves, and Chest of Drawers
One way to revitalize an old table, shelves, or a chest of drawers is the add an acrylic pour design to some or all the furniture faces.
If you only want to paint a single surface, like the top of a drawer face, use painters’ tape and newspaper or butcher paper, to cover everything that you don’t want painted.
Because most furniture gets used and abused, choose a hard finish, like resin, so that you don’t get dents and scrapes in the acrylic pour surface.
Acrylic Pour on Fabric
You can acrylic pour on any fabric that will bond with acrylic paint.
Fabrics that will need to be washed or that will be handled frequently should be painted with acrylic inks and their respective pouring mediums.
Just like with canvas, many fabrics can be stretched and used as art pieces.
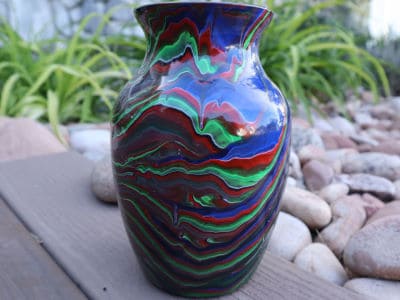
Acrylic Pour on Pottery
Pottery is another surface that you can easily do acrylic pouring on. Acrylic paint will stick to clay and ceramic pottery, but we don’t recommend painting any piece that is going to be baked at high temperature.
Pottery is generally three dimensional so it will take some experimentation to get the paint to coat the whole surface.
You can create a dripping effect by either pouring small amounts of paint so that they don’t cover the whole surface or by keeping the paint a little thicker than normal. The contrast of the paint and the pottery color material can create some amazing pieces.
Acrylic Pour on Ornaments
Covering your ornaments with fluid acrylic pouring is an amazing way to add some uniqueness to your holiday decorations. You can pour on existing ornaments that have surfaces to which acrylic paints will stick, or create your own out of other materials on this list.
Acrylic Pour on Leather
This is probably a surprise to a lot of people, but you can, in fact, acrylic pour on leather products. There are acrylic paints created especially for leather.
Some of the acrylic paints that we’ve heard good things about for leather are the Angelus Leather Paints. They are specially made to soak in to and bond to leather.
As these are acrylic resin paints which are tough and durable when dry, there is no need to put any kind of additional finish once dried. A top coat, like a gloss or matte finish, can be added to enhance the looks of the colors.
Some fun projects to try are leather worked belts and bracelets. Use your favorite pre-made leather products or cut and stamp your own. Make sure they are 100% dry and then pour like you would on canvas. Most traditional pouring mediums will work just fine.
Acrylic Pour on Metal
Painting on metal is one of the more enjoyable home projects we have experimented with. You can pour on metal boxes, plates, decorative pieces, sheet metal, and more.
Acrylic paint will stick to most metal surfaces without any special preparation. We recommend painting a very small piece of the metal first and allowing it to dry. If the paint stays on and doesn’t easily peal, you should be fine painting directly on the surface. If not, you can rough up the surface with fine grit sandpaper or add a coat of gesso before painting.
Acrylic Pour on Masonite or Hardboard
Masonite is a brand name of hardboard. Hardboard is pressure treated composite wood panels. These panels come in tempered and untempered. Tempered hardboards have oil added on the surface and then they are baked making them more resistant to water damage.
These products are perfect materials for fluid acrylic paint pouring. They are hard and durable like wood, but light and easy to work with like canvas. They also cost less than most woods and some canvases. You can find hardboard on Amazon here.
We recommend using a water-resistant undercoat or gesso so that the water in the pour does not seep into the hardboard. You will want to seal all the sides of a Masonite or hardboard surface with whatever finish coat you decide to use to make if you want them to last more than few years.
Acrylic Pour on Plexiglass
Plexiglass is a good alternative to glass for acrylic paint pouring. Plexiglass is also made of plastic resins and is generally smooth to the touch. You may need to gently sand the surface or use an extra sticky primer coat to make sure your paints stick to the surface.
Painting on clear or transparent or semi-opaque plexiglass will allow light to travel through your painting. By manipulating how the light hits your painted surface you can create some amazing effects with your artwork.
A light box is a cool project you could make with acrylic paints on plexiglass.
Acrylic Pour on Phone Case
Your phone case is the new “in” way to display your personality. What better way to show that you’re an artist than creating a custom phone case with acrylic paint pouring.
Almost every phone type has options for clear cases. You can spread a very thin layer of acrylic paint into the bottom of the phone case and let it dry. Insert your phone, and you now have a one of a kind phone case.
Acrylic Pour on Poster Board
Poster board is cheap alternative to the more expensive painting surfaces. Be careful not to use too much paint or the board will bend as the water/alcohol in the paint gets absorbed by the board. Painting directly on your table or using a hard surface under the poster board is a must.
Acrylic Pour on Rock
We love painting on rocks. When the paint dries you get the unique look of a three-dimensional objects and you can see the unique surface of the rock underneath. These can be used as decorations inside or outside your home. They make unique paperweights or book ends also.
Kids seem to love to do acrylic paint pouring on rocks. It’s a great, relatively cheap activity to help them harness their creative side.
Acrylic Pour on Dry Resin
Dried resin makes a perfect surface for acrylic paint pouring. You may need to rough up the surface or apply a sticky primer to ensure the paint adheres to the dried resin.
One thing we want to try but haven’t been able to yet is to layer acrylic pours between resin coats. By painting different sections of a surface and then putting a resin coat in between each layer, you can create a plastic surface with multiple dimensions of paint pours.
A table top created with this layering technique seems like a fantastic idea.
Acrylic Pour on Styrofoam
Painting on Styrofoam is quite straight forward. You will use a little more paint than you would on other surfaces because of all the small air pockets everywhere in the Styrofoam.
Acrylic pouring on Styrofoam is a great way to make a unique and exquisite science project materials. We’ve seen some fascinating volcanoes and planets created from fluid acrylic pouring on Styrofoam figures.
Acrylic Pour on Wax paper
Doing an acrylic pour on wax or parchment paper is something every artist needs to try. When the paint dries, you end up with a double-sided painting. You can peel the whole painting off the paper, and you’ll have a different painting on each side. Choose the one you like best or press the plastic film that it creates between two glass panels and use both sides.
These types are paintings are called acrylic skins. When paint runoff from an acrylic pour dries on a smooth surface, you can peel this paint off like dry dead skin after a sunburn. Hence the name acrylic “skin”.
May artists use this type of skin to create cabochon jewelry.
Acrylic Pour on Plastic
Painting on plastics is a real hit and miss endeavor. There are a lot of factors that determine whether acrylic paint will stick to plastic or not including surface contaminants like grease and dirt, bonding properties of the plastic, and the texture of the surface.
In many cases you’ll have to run your own tests to see if the surface is paintable. There is a great article at Justpaint.org that explains in technical terms a lot of the items you need to consider when doing an acrylic paint pour on plastic.
Conclusion
We hope you have enjoyed exploring the different surfaces you can use for acrylic paint pouring. If you need some additional ideas of why types of pours to do on any of these surfaces, be sure to check out our posts 5 Basic Acrylic Pour Techniques to Master and 16 Advanced Acrylic Pour Techniques
If you have other common surfaces you have had success painting on, let us know in the comments below.


Can you please give me the name of a product to apply to GLASS I want to use for acrylic pouring ?
Most of the professional pouring mediums will adhere to glass. If you don’t mind scuffing the glass surface, a quick once over with heavy grit sandpaper will give it enough tooth to adhere even better.
You can also try using spray glue on the surface, let it dry completely, and then pour over the glass. I personally haven’t tried that but I’ve heard it works.
Thank you so much for broadening my imagination. I am new to POURING and I feel very addicted to it right now. With the information from this article maybe I will have less FAIL projects. Thanks again.
Don’t be afraid of your “fail” projects. They are how you learn. Just make sure you take some notes on why you think you failed and what you actually did so that you can change things up and make the next one more successful.
Hi David,
Thank you so much for so many great ideas, I am brand new to this amazing idea of pouring. What do you recommend as a primer coat for using plexiglass?
For plexiglass almost any gesso will do. The surface is generally slightly porous by default. If it has a glass finish, test straight gesso. If that peals off easy, then you need to scuff the surface with sandpaper first.
Hi David
I am new to pouring. I have some limestone tiles I was going to use for coasters. I will probably start with a dip. Because this is porous do I need to gesso it first or is it ok to just paint? I know if I don’t gesso it that there will be the texture of the limestone shown through the paint. Which on some I don’t think I would mind. But could I resin without using gesso or do u think it would show the texture too much. Is it simpler just to gesso them all before painting? Thanks for your help.
Those could work either way. Personally I would gesso them. I think paint sticks way better to tiles, especially ones with lots of texture, with a thin coat of gesso. Plus you don’t want anything coming out of the tile (oils and things like that) and a coat of gesso will pick that up and either hide it or show it to you so you can fix it before painting.
Hi there,
I’m a milliner and am fascinated by the idea of pouring onto a hat. My hats are either felt or straw.
I can t find anything on the internet specifically on these surfaces – any suggestions? Do you think it would work?
Thank you!
Stacey
There are some paints that can be used for materials like hats. You’d have to look specifically at those brands of paints. I haven’t done a lot of research on those however. You might find them by search for “pouring on shoes” or “pouring on leather”. Both those spaces I know there are people that do acrylic pouring.
My grandkids live in the Pacific Northwest. I’d like them to do a large paint pour on a surface that can be put outside on their fence. What surface would you recommend? Metal, acrylic? It needs to hold up to the rain. Any suggestions ?
That is a tricky one. I would say, wood, plastic, or metal with a strong UV protecting coat (around all sides if wood to seal it too). You probably want to spend more time and money on the sealer than you do the paint and pouring medium to make sure it lasts as long as possible.
Thanks. I was thinking about sheet metal but I did find some sheets of plexiglass in the garage that are about 1/4 inch think. I might give one a try to see how it works. I saw your other post on treating with a gesso so I’ll practice and see what happens.
David, how about cork board? Would you recommend priming, or would cork be like styrofoam and have enough irregularities that I wouldn’t need gesso?
Thanks!
Cork board is a little tricky. It it not a smooth surface and some of those “holes” can suck up a lot of paint. If you want something nice and uniform like a tree ring pour, you probably want to put a thick gesso on to fill in those holes some. If you are doing a flip cup or something that doesn’t need a nice smooth surface than there isn’t as much of a need for a primer or gesso. Paint will stick to cork just fine as long as it doesn’t have a shinny coat on it already.
Thanks! I gave it a try with a flip cup. Had a couple of air bubbles that created tiny tree rings when they popped. It’s not dry yet, but so far so good.
My daughter and I were thinking about making some “lava lamp” shelves. Just a slab of resin with various colors flowing throughout maybe 36: x 18″ or so. I was thinking of using a hardboard form that’s 1″ thick, similar to pouring a concrete countertop. Is there a release agent we could use? Or should it be lined in wax paper?
Thanks!
By releasing agent I assume you mean something to make the resin not stick to the board? Don’t use wax paper unless you plan on cutting off the edge. To much actually adheres to the resin as it heats up and you get a nasty mess instead of a clean edge.
There are some tapes you can buy that you can tape along the outside edge and bottom edges that will peel right off of resin. That is what most of the experts use. I have only used it a few times on small projects and it seemed to work fine.
Hello! I am wanting to do a pour on a wooden egg. The egg is unfinished. Would I prep this with a gesso? Is the dry time time different from a canvas surface? All my research seems to point to a 3-4 week dry time. Thanks!
Is any of the wood going to be bare after the pour? If not, use a sealer of some sort (multiple coats of a water and glue mixture 4:1) does a fantastic job. That way the pour paint won’t get sucked up all into the wood rather than harden as a layer on top. If you want the more rustic look you don’t have to put on a sealer.
Pour paint dries to the touch in 24-72 hours. It does not CURE for 3-4 weeks. Curing means that last little bit of water/liquid finally makes it’s way to the surface and evaporates. You don’t want to put a top coat on until it is fully cured. Otherwise that little bit of escaping liquid can cause crazing or cause a layer of gas/liquid between the paint and the sealer and cause it to chip prematurely.
Thank you so much! Very helpful information! Cheers!
I have leftover laminate flooring panels, could I use them for pours and if yes, should sand and use gesso?
Gesso for sure. Sanding I am not sure is necessary unless they are VERY slick and need some roughing up to let the gesso stick better.
Doing a bunch of different but similar ones and then clicking them together in a patter might be a really cool piece of art.
Can I do an acrylic pour on concrete backer board? Do I need to prep it first?
You can. I would either paint it a solid color or add a layer or two of gesso just so you don’t get any of the backer board showing through anywhere on your painting.
I have a wood circle (sort of like a table top) that my dad painted decades ago I would like to use for pouring. I’m not sure of the type of wood it is. It has a base color along with a painted design in the center. How do I go about preparing it for pouring?
Clean it really well with dish soap or something to get the oil off. I’d gesso if it has a very smooth finish just to give your paint something to stick to. Otherwise you could just paint on it after cleaning it.
Hi I have some A3 sheets of 3mm MDF I want to use, do I need any special primer first? I’ve just started pouring and I’m on a very tight budget so I was hoping just a base coat of acrylic would be OK but I’ve read conflicting views on this.
Yes. You definitely want to prime those. You can actually use a glue/water mixture 50/50 and coat it multiple times to seal the MDF. You don’t want any extra water getting in to that or it will spoil the painting later.
That’s so helpful thank you, I have some PVA knocking about so I will use that
Can you use skins on rocks? How would you go about it? Thanks!
I assume you could glue them on to rocks with rubber cement. Why not just pour on the rocks directly though? I assume you are looking for a way to recycle your skins?
Hi! I love the way you blend science with the art in your videos and on your website. Do you have recommendations on where to purchase tiles, or which types of tiles you prefer? I am having trouble with knowing what kind will work the best, so have been sticking with canvas, but I really want to do some tile pouring too. Thanks for your advice!
I buy the cheapest tiles from Lowes. White shiny tiles. I would buy unfinished ones if I could find them but they don’t ever seem to be in stock.
Thank you! My middle schooler is enjoying your videos and wanted to make tiles together as holiday gifts for people. I appreciate the recommendation.
David, great site here! I wish I’d found you last week. I’m… I had an older drop leaf table. I wanted to make it into a side table with acrylic pour. So i removed the top from the table, removed the drop hinges and replaced with flat stainless plates to hold the table top flat. Then I sanded down to the wood and did my pour. Looked great. In the morning, that table top had warped up at least two inches or more in the middle section.
I’m guessing, after reading around here, that I should have left the poly on it?? I’m guessing the moisture soaked into the wood? I used acrylic with Floetrol, no water. And it was thicker than it should have been. Any thoughts before I ruin another table top?
Hmm, that is an interesting one. The killz primer should have created a moisture barrier between the table and the paint but obviously it didn’t. One thing I do with wood like compressed board or MDF is apply a few layers of glue that is diluted 50/50 with water. That should fill all the gaps with an impenetrable barrier (which the killz should have done).
Could the water have gotten in via the sides or a hole/crack?
Oh, and I did use three coats of kilz primer before the pour.
You’re a godsend! Thank you for all of the valuable information that you’ve shared with the community. You’ve single handedly taught us things we couldn’t learn without so much more trial and error. I especially appreciate your thoroughness and scientific approach.
Thanks so much Amy. That’s how I learn so I figured there would be a ton of people like me out there not getting what they were looking for in videos and blogs about pouring.
Hello, your article is invaluable and answers so many questions that I have not been able to find anywhere on the internet or elsewhere. I rescued a whole bunch of mannequins from our local mall, as stores were going out of business. Some of them are fiberglass, and I feel like I could paint on those fairly well. The ones that worry me are the plastic and polypropylene ones. I will be referring back to your article, in hopes that I can do some creative pour painting and other forms of media my mannequins. Any advise regarding that type of thing would be much appreciated. Again, thank you so so much! 🙂
A good gesso should be sticky enough to prep a mannequin for pouring.