How to Prepare Acrylic Paint for Pouring
When I first started my acrylic pouring journey, I was flabbergasted by how many different ways people prepared their fluid acrylic paints? Some people had a whole system with multiple products and different ratios for each. None of the recommendations were wrong, per se, but they sure didn’t make sense for a beginner.
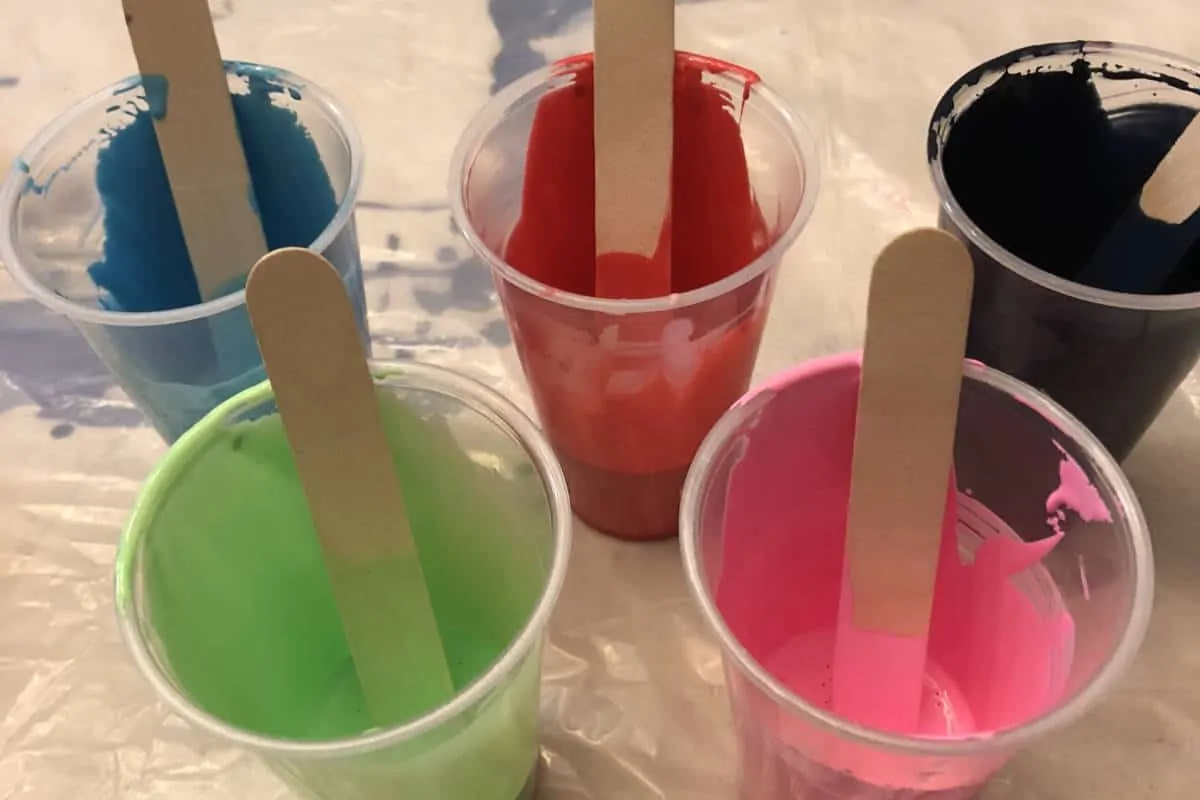
An easy way to prepare paint for an acrylic pour is to use one-part acrylic paint and mix it with two parts of Elmer’s Glue-All or Flood Floetrol. Add water a few drops at a time until you get a consistency where when elevated with a stirring stick to 1” off the surface the paint drips it off and creates a mound and disappears within a second.
As you can see, mixing acrylic pour paint doesn’t have to be complicated. We’ll go over everything you need to know including why we use more fluid paints, what consistencies are used in which techniques, common mistakes to avoid when mixing fluid acrylic paints, and more.
Why does Acrylic Pour Paint Need Preparation?
Acrylic pouring is an art style where non-viscous or runny acrylic paints are combined and manipulated on a painting surface. The consistency of the paints allows for the paints to organically mix and meld creating a form of abstract art.
There are many different techniques to use with acrylic paint pouring including these basic and advanced techniques.
While there are some brands to do sell read-to-pour acrylic paints like Arteza and Artist’s Loft, many paints need to be mixed and prepared with water or other pouring mediums to get a consistency preferred by many artists.
Acrylic Pour Paint Consistency
The consistency of your finished production is arguably the most important part of preparing paint for fluid art. The right consistency has the most impact of how the paint will react and it one of the few things you can really control with acrylic paint pouring.
When you are first starting out, we recommend trying to achieve the same consistency of paint for all your first pours. This will give you a perfect starting point to understanding how changing the consistency affects the outcome of your artwork
How to Measure Consistency
There are a few ways to measure the consistency of your fluid acrylic paint. We’ll go over the two we think are the easiest to follow. After a lot of paint mixing, many artists say they learn to feel the right consistency in addition to using these types of methods.
The Drip Method
The most common one that we have seen is to dip your paint stick into the paint and pull it out about an inch over the top of the rest of the paint in the container. Too high and the paint will sink due to the increased height and too low will cause the paint to make a stalagmite/stalactite directly from the stick.
Let the paint drip back into the container and watch how it interacts with the top layer of paint. We want the paint to drip off the stirring stick and create a slight mount and then immediately disappear. That mound shouldn’t last for more than a second or two.
If the paint is thicker the mount will create multiple mounts on top of itself, kind of like an ice cream cone, and then gradually disappear in 3 or 4 seconds.
If the paint is too thin your paint streaming off the stir stick will look like it sinks under paint or it will immediately integrate into the surface without making a mound.
The Snake or Worm Method
This method is like the drip method in that you want to dip your stirring stick and pull it out of the paint to a height of about one inch also.
With this method, you want to weave a pattern like a work or a snake over the surface of the paint. Be sure to keep your one-inch distance from the paint surface.
The snake/worm pattern should last at least two seconds before you can’t see any noticeably raised sections.
If the paint is too thick it will be 4 or 5 seconds before it disappears. Too thin and it will almost immediately disappear.
Pouring Techniques by Consistency
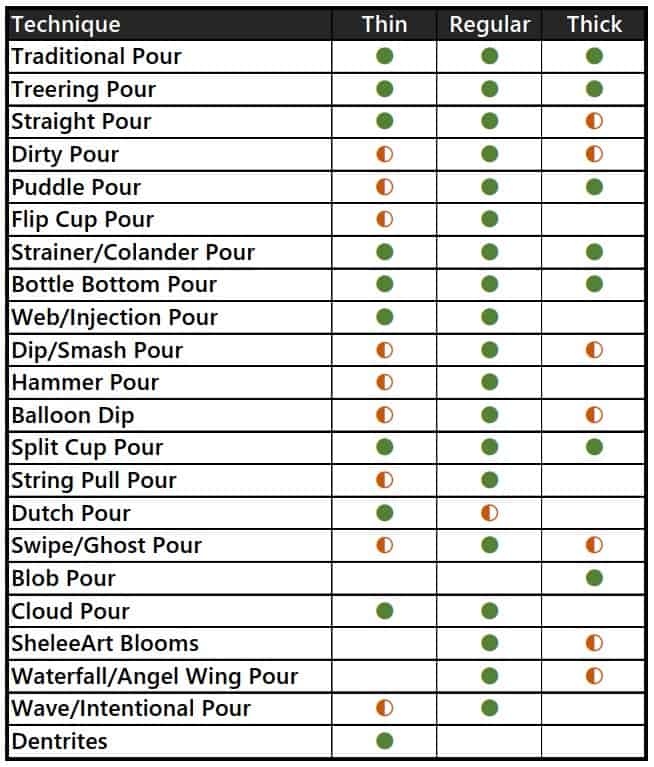
● – Good for this technique
◐ – Can be used for this technique but not ideal
Blank – Not useful for this technique
Common Pouring Mediums
There is a plethora of pouring mediums that can be used with acrylic paint pouring. A pouring medium is simply a liquid additive that you use to extend the paint to help change its consistency without sacrificing its bonding (think dried plastic) qualities.
For the purpose of this article, we are going to focus on three of the cheapest and easiest pouring mediums to acquire: Elmer’s Glue-All, Flood Floetrol, and water.
Elmer’s Glue-All is just that, glue. The glue is white in liquid form but dries clear. It also has the quality of being very sticky and strong when dried. This paired with the fact that relatively easy to buy and it generally inexpensive is exactly the quality of a pouring medium that you should be looking for as a novice paint pourer.
Additional information about using Glue-All in our blog post Can You Use PVA Glue for Acrylic Pouring?
Flood Floetrol can be found in most hardware stores in the paint department. This product is mean to be used with paint to help cut down on brush marks and to thin out the paint slightly for use in a paint sprayer. This also has binders like the emulsions used with acrylic paints and will dry hard and strong.
Finally, water can be used as the medium to help thin the paint the consistency that we are looking for. Do not use more than about 30% water to paint ratio or else you will dilute the paint so much that it loses its strength and it will peel or warp when dried.
Beginner Pour Painting Recipes
Here are a few of the most common pour paint recipes we see with acrylic paint pourers today. Read the next section to find out how these ratios may change based on the “body” or thickness of the acrylic paint used.
- Glue-All
- Mix 60% Glue-All to 40% water. Once
complete mixed, use 2 parts of this pouring medium to one-part soft body paint
(most tube paints are soft body). In
most cases, no extra water is needed. If
it is, only add a few drops at a time, mix, and re-check consistency.
- Mix 60% Glue-All to 40% water. Once
- Floetrol
- Mix two parts Floetrol to one-part paint. Once fully mixed, check the consistency and
then add a few drops at a time and re-mix until you get the desired
consistency.
- Mix two parts Floetrol to one-part paint. Once fully mixed, check the consistency and
- Water
- Slowly add a few drops of water per ounce of
paint and mix. Keep repeating until the
desired consistency is achieved.
- Slowly add a few drops of water per ounce of
Paint Ratios for Different Body Paints (Heavy, Soft, Fluid, Craft)
Acrylic paint comes in four main types: heavy body, soft body, fluid acrylic, and craft paint. Each one of the paint types might require a slight change to the recommended pouring recipes above.
Soft Body Acrylics
Most paints that come in metal or plastic tubes or larger containers are going to be soft body acrylics. Sometimes these are referred to as medium body acrylics. These look like warm honey went squeezing it out of the tube or scooping it out of the container. The paint ratios above will work well with medium body acrylics.
Heavy Body Acrylics
Heavy body paints are more like cold honey or toothpaste. They retain their shape when taken out of the container and don’t flatten out much. These paints usually have a higher pigment load (the amount of pigment per ounce of paint). When using heavy body acrylics, you probably want to up your ratio to more like 3:1, 4:1, or more with Glue-All and Floetrol.
Fluid Acrylics
Fluid acrylics are specially made to be runnier than soft or heavy body acrylics. Unfortunately for us, there are two main types of fluid acrylics. There are those that are highly pigmented from high-quality brands like Liquitex and Golden, and there are those budget fluid acrylics that are soft body paints with more water added to them.
The more expensive fluid acrylics can be mixed with a very high pouring medium to paint ratio, generally, 4:1 or more, while the less expensive fluid acrylics, like Artist’s Loft, should maintain the 2:1 ratio.
Craft Paint
Craft paint is generally a cheaper version of acrylic paint that is not very pigmented at all. We recommend cutting your ratios to 1:1 and with the glue mixture, upping the glue to water ratio to 70% glue to 30% water or ever 75% glue to 25% water.
If you do keep a higher medium to paint ratio your paints will be a lot less vibrant and will seem very dull compared to other colors prepared with the recommended ratios.
Looking for more information about acrylic paint brands? Read about the research we did to find the Best Paint for Acrylic Pouring?
Tips for Mixing Pour Paints
Here are a few tips that we’ve learned over the last two years to get the best acrylic pour mix as you possibly can.
- Strain the Floetrol out of the bottle as it
tends to get little dried pieces as it sites in its container. Pantyhose or a very fine flour sifter work well
for this. - When mixing thicker paints (heavy body and
thicker soft body paints) don’t mix all your paint and pouring medium at
once. Gradually add a little pouring
medium and stir and repeat. This will ensure
the thick paint gets integrated completely with the medium. - Don’t add water until after you’ve fully
integrated the pouring medium. Water
should be the last thing added to get the exact consistency that you want. - Don’t mix too fast or you will create bubbles in
your paint. Bubbles in a paint pour will
create pinholes when they dry which is one reason why we use a torch to remove
as many as we can. - Take your time.
Mixing paint for an acrylic pour can be time-consuming, we know, but
getting your mixture wrong is the single biggest failure point with fluid acrylics.
Don’t forget to review our 24 Acrylic Pouring Tips and Tricks that Actually Work article.
Why Use Distilled or Filtered Water?
You will see that many artists choose to use filtered or distilled water in their acrylic pours. The main reason for this is the cut down the change microbes get introduced to the painting.
Mold and mildew can form if paints dry very slowly or in a place where there is lots of moisture in the air. Any mixed paint that you store for later use will also tend to grow unwanted things more quickly with water from the faucet.
We don’t recommend you store any mixed paint for more than a few weeks, even when kept in airtight containers.
Get more details about things that can make acrylic paint go bad here.
Measure Your Ingredients
The last advice we want to give you when mixing your pourable acrylic paint is to measure your ratios, at least for the first few paintings that you do.
Measuring your paint will ensure that you are always getting the same consistency of paint and will be one less variable you need to worry about when trying to determine why one painting looked so different from another painting.
With experience, you might get to the point where you can mix your paints by feel, but until that time measuring is your friend.
Final Thoughts
Acrylic paint pouring is an amazingly fun art form to learn, even for those of us that are very left-brained and never thought we’d be doing anything remotely artistic like this. However, not getting the results we were hoping for can be one of the most demoralizing parts of acrylic pouring also
Getting the even consistency paint from day one can really limit some of the beginner mistakes that most acrylic pour artists make and help you do more quickly appreciate the artwork that you create.


Do you use silicone? What product do you use?
Spot On Treadmill silicone.
What do you have mixed with your water
A tiny bit of floetrol. Maybe 5 or 10%.
I’ve seen a few sites recommend 10:1 pouring medium:paint. Seems insane to dilute the pigment that much. I’m just starting and can’t figure out if working with thinner viscosity or thicker viscosity paints is better. Does it just matter they are similar viscosity? or does the paint thickness affect the type of blending you get even when they’re all similar?
You can do that with some pouring mediums and some paints. Artist’s Loft recommends that. I’ll have a video out about that early next week. If you have a highly pigmented paint like Arteza you can get away with that. Most of the time I recommend 2:1 to 4:1 unless you want really light colors or a wash type effect.
Paint thickness really doesn’t matter. That only affects how well it potentially mixes. It is pigment load that you care about. On my YouTube channel I have a video about that also. It is the thumbnail with blue paint that appears to be racing down the canvas.
How long can you store your paint once it’s mixed with the medium
If you used water, even super clean water, I wouldn’t recommend leaving it more than 2 weeks. If there is no water and it is in a sealed container, potentially months.
I have seen where the colors have different weights and that effects what colors are added in a pour cup first, second, etc. Is there a way to find out this info from each paint dstributor?
Only one has that information available that I know of. Golden. I link to their website in my article “Acrylic Pour Cells: Everything You Need to Know”.
I don’t always like the fact (as I understand it) that titanium white is usually more heavy than most other colors, and sinks to the bottom. Is there a way to either make white less heavy or make other colors more heavy to even out everything?
Use covering white or zinc white. They are much less heavy and won’t sink nearly as much.
Can I use black matte paint to make my base coat for paint pouring projects
I assume you mean latex wall paint in black matte? You sure can Virginia. Latex and traditional acrylic paints with medium sometimes react a little differently causing cells (pearl cells) and other reactions but it for sure can be used.
1) Golden makes soflat black
2) Stuart Semple’s Black 3.0
There are many more but none as light absorbing as Black 3.0. For best results, prime surface with Black2.0
I haven’t tried mixing them for use as a pillow/base coat. I imagine that that would lighten black 3.0 even with a clear matte medium.
https://www.googleadservices.com/pagead/aclk?sa=L&ai=DChcSEwjN6b6_67L_AhVBEmUKHTmUC-wYABA6GgJ5bQ&ohost=www.google.com&cid=CAESauD2qn9d_zqchwDU97RlZcfdbtuMcFiiAYjKCOhzJSPTb2F3fF4SeQNBAcUeDi0MCoZwsIzehayuRVUz05DEhAVkd68l46GwbUJKd8W2f54oTYM21JIDxz_SF8p2puJk3q56FHshbyNPJoU&sig=AOD64_0XvCcLlPelxGciFy3ZyHhqoV6ijQ&ctype=46&q=&ved=2ahUKEwjA_rW_67L_AhVBlIkEHccBC6MQzzkoAHoFCAQQlAE&adurl=
https://www.culturehustleusa.com/products/black-3-0-the-worlds-blackest-black-acrylic-paint-150ml
Interesting articles.
What is the point of the glue? I’ve seen many videos where folks only use Floetrol and water. I saw something that said glue will not produce any cells. It certainly seems easier to skip the glue.
Glue can give more solid colors than floetrol. I personally think it works with silicone much better also. As with all the pouring mediums (and pseudo pouring mediums) it is really up the user’s preference.
I don’t hear a lot about book binders glue. Just from one artist’s book. It’s more expensive but it won’t yellow over time and allows pours that use glue to be museum quality.
Glue is a cost choice. I would use liquitex or one of the other professional pouring mediums in place of that as I think they give way better results than BBG.
I took this brain test and it was so far on the left it could have been in my ear. I believe I have too much water in my pouring medium. I thought it had to be runny to flow. I need to cut the ratio of glue all and water. I was doing 1:1, but it seems I need to add more paint or increase more glue. Is one choice better than the other? Thank you
I use 70% glue-all and 30% water. if the glue is washable or student grade it is more like 90%/10%. Craft paints are 1:1 paint to the previously mentioned pouring medium. Better quality paint is 1:2 up to 1:5 if you are using a highly pigmented paint like Arteza.
Again David very helpful
Thank you again.
Are there any “ready to pour” paints that you would recommend?
Most of them are actually pretty good. Artist’s loft and Arteza are ones I normally recommend of the ones I have tried.
Since the paint pour paints are made for this type medium, do we need to do any more prep to the paint? Thanks David!
Correct, premixed paint doesn’t need anythign exptra unless you need to change the consistency for the Technique you are doing.
Artists Loft pint ready to pour are fantastic but pricey at 17.00 a bottle. I only buy them on sale at Michaels.
Yeah, I’ve only ever purchased a few and I horde them a bit because they were so expensive.
Thank you so much for the information. I’ve been watching YouTube videos and love acrylic pouring. I don’t have an inch of talent when it comes to art but I think I can pull this off.
I’m grateful that you took the time out to explain the ratios between the paint and medium. I’m going to look for you on YouTube and check out your work.
By the way do you sell your work?
You are very welcome. I do sell my paintings but that is pretty informal right now. I am trying to get a showroom type setup so anyone can see them and purchase if they want.
Hi, I’ve seen videos where artists use house paint. Have you used this? Seems like an affordable option for white and black paint since it’s the most used. And if you do use it, would you add anything? Thanks!!
I have used out paints for the Sheleeart Blooms technique and for pearl cells but that’s about the extent of my usage. Not because it can’t work, just I haven’t delved much in to using those types of paint over my glue and Floetrol which still end up being about the same price.
Hi David, there’s so much info out there it makes my head spin. Thank you for all your help. 😎😎😎
You are more than welcome. Don’t hesitate to ask here or on my YouTube channel if you have questions.
Best explanation of mixing pour paint I’ve ever read. Specific ratios as they apply to different types of paint was particularly helpful.
Bravo David!
Thanks Craig. Just let me know if you have any additional questions.
Hello David. I just purchased Blickcrylics and cannot find pouring medium ratios anywhere. I use floetrol but can use glue/water if you think it’s better. Thanks.
Floetrol works great. For Blick I am usually at 2-3 parts medium to 1 part paint for the thicker paints (most of them) and the thinner ones are 2 and sometimes a little less than 2. Try 1:1 then decide if you should go 2:1 or 1.5 to one. You are better off adding a little at a time than adding too much. Thinning is much easier than thickening.
Two questions: 1)How do I get the best cell activity in my pours? [I’ve tried using silicone but it seems to have no effect] 2)In cup pours, what is the order in which colors should be added to the cup? Or maybe I should be asking which colors sink and which remain on top. I’m not sure how to phrase the question I wish to ask.
Silicone is the best cell maker. If you aren’t seeing them my guess is your paints are too thin and that you are using too much silicone. It’s hard to say without seeing a picture of your painting though that is just based on my experience helping other artists.
You should go to my YouTube channel (same name as website) and search for “weight”. I have a video entitled “Varying paint weights is key to many acrylic pour techniques” that gives you the low down on paint densities and how to manipulate that to create cells.
If you want to use the Contact Us link on the website and send me a picture of the paintings you aren’t getting cells on I could give you a little better feedback Cyn.
THANK YOU!!! This is SO clear and concise! After struggling with paint consistency for the past year, this is extremely helpful!
if this was helpful, you should also check out my YouTube video (leftbrainedartist) also which has some good visuals on the same consistency theme.
Thank you so much for breaking down all of the information. I watched all your videos and it helped a lot.
You are very welcome Patrice. Thanks for watching and reading. I hope it was helpful and that your next pours are even more spectacular.
You make it sound so easy. I suck at measuring Anything that’s why I don’t follow recipes but I do think I can hopefully follow your guidelines and get better pours. I’ve only been at this for a couple of months and already sold quite a few but I’m hoping with your help my work will be more artistic. Thanks.
Excellent work Kym. Where do you sell your paintings?
Being the absolute beginner I read everything about acrylic pouring and yours were the most helpful to me. I am still experimenting with craft paint and it still is not clear to me , if I can use Floetrol with craft paint. I used Glue all, but am wondering about Floetrol.
You absolutely can use Floetrol as a medium. You’ll get a few more tiny cells and swipes and things will give a little better lacing because Floetrol is just better at that than Glue.
You say your paint to Floetrol ratios are usually 1:2. I am using Arteza and have watched your paint brands comparison video, where you appear to be saying to use 1:4. Is this what you would recommend? Thanks.
Than you, thank you for all this info! I’m a beginner and spend hours reading and watching utube posts. Your page here has helped me more than all before! I will continue to pay close attention to all you advise on paint pouring! So great to have found you!
You are more than welcome Barbara. Don’t hesitate to ask more questions with the contact form if you have them.
What would be causing the pinholes in my pours? I’ve been adding Silicone Lubricant that was in the automotive section and thought maybe I have been adding too much or maybe too much water with my medium and paint. I feel like my consistency is great. I never lay down gesso before pouring, but I think I may start doing that. I’m looking to get some really big cells. I do use a torch, would a heat gun be better? My first couple of pours, I had no silicone, so I used some ky lubricant and did not have the pinholes on those canvases. Please help!!!
In my experience, pinholes come from newly mixed paint. If you leave the paint to sit for 4 – 24 hours after mixing those little mini bubbles come to the surface and pop. If not, they wait to come out till after you’ve done your pour. It does seem odd however that the one pour with KY didn’t show them? Did you wait a while after mixing the paint before doing that pour?
No, I mixed it then after I poured the paint, I squirted the KY into in and then started with moving the paint around on the canvas. I’ll definitely try letting the paint set for awhile. Should I add the silicone to the paint when mixing it and let it sit in the paint or do I add the silicone right before pouring?
You can do it both ways. If you leave your paint it is just going to rise to the top anyways and you’ll have to very slowly stir before you use. However, it might help usher those pesky bubbles of air to the top. Either way works.
No, I mixed it then after I poured the paint, I squirted the KY into in and then started with moving the paint around on the canvas. I’ll definitely try letting the paint set for awhile. Should I add the silicone to the paint when mixing it and let it sit in the paint or do I add the silicone right before pouring?
I’ve also noticed a lot of little bumps on a few of my pours. What causes that?
This is paint that doesn’t get mixed well or it is dried medium/paint from the bottle. If you use floetrol ALWAYS strain it. It is notorious for leaving little dried chunks. Try mixing small amounts of medium in to the paint completely then add more and more slowly as you mix completely. Some paint types don’t like to mix well when you start with a ton of medium. Decoart medium is one I have problems with.
if you use light spray the surface with a spray bottle with greater 87% achohol, any bubbles on the surface will pop…..breaking the surface tension.
Interesting. I’ll have to try that. Does it form new cells too?
Reading this helped me to understand what I was doing wrong…While I was chasing consistency, measuring all my ingredients and giving it all al thorough mixing, I had been using the THINNEST paint and medium mixture (all mixed with the exact same ratio) as my “Gauge” and thinning the other paints to match – and they were all too THIN!
You’ve given precise definition to the “warm honey” analogy. Well done!
I can’t wait to whip up some new colors…This time with the correct consistency.
It will make a HUGE difference for sure. Some techniques work better with that thin paint you mention but most use a slightly thicker mix for sure. Good luck Gary.
I do very large pieces, usually 91cmx122cm canvases and larger and use very thin paint always. I don’t use silicone because I don’t want any cells and the thinness of the paint prevents any cells from forming anyway. My mix is 50/50 Floetrol (Australian)/water into which I add acrylic paint or tint until I get the right colour. My paintings dry very quickly and tend to be somewhat transparent where you can see different colours underneath the top colours which is my aim. I do find that I have to first paint the edges of my paintings with a complementary colour and let that dry before I pour because otherwise the paint tends to run off the edges due to the thinness of the paint I use.
That are great tips Anke. I love doing large paintings. The canvas are just so darn expensive lately.
I purchased 3 ft x 4 ft canvas for $25 at local liquidation store.
Holy crap that is a steal Tina!
Hello David. I live in Europe and therefore use metric measurements. I have done quite a few pours and have had successes and misses. However, I have been commissioned to do a huge canvas (1×1,5m) and the look the client would like, is consistent with pouring. However, I have never done anything this huge in pouring. I am an intuitive artist and have done very large pieces. Is it possible? I have watched many pouring videos, however, nothing of this size. Is there any pointers you have for this size?
Thank you for your informative videos and sections. It is invaluable.
Helena
I have a video on my YouTube channel, also LeftBrainedArtist, from a few weeks ago on a 2′ X 3″ canvas. Not quite as big but the principles are the same. It really is very similar to normal pours on a macro scale. Make sure you pre-paint the sides and that you make enough, even much more than enough, paint. The rest is very similar.
Hi David,
Thank you for all the advice on here much appreciated! Can you help with my issue by any chance?
Im struggling with puddle pours (which I keep thinking ‘should’ be easy!😂but they a have been a disaster for me so far) For example I wanted a thin strong black outer ring so poured black first but as it spreads into the white background paint it mixes & gets lost as pale grey. Then as I keep ‘puddling’ the other colours seem to often ‘roll over’ & cover each other or end up mixing rather than staying nicely defined and each pushing the last out. (Hope that makes sense) Any suggestions about where Im going wrong? Im using Arteza with a 70/30 glue/water pouring medium.
Thank you.
Here are a couple of suggestions.
Increate the amount of paint on any of the outer layers. The outdoer circle is WAY bigger than the center and will require much more paint keep it’s presence on the outside.
Add a base layer of paint. The outer layer disappears because the paint gets stuck on the bare canvas and the rest of the paint pushing out from the middle makes it roll over on itself. Having a base layer of paint makes it slide across instead of getting stuck on the outside.
For the issue where the paints are mixing, you need to thicken up your mixture. If you want the colors to stay and not mix you need a thicker set of paints. The more water you add the more likely this will happen (that includes the water in thin mediums).
Hi David and THANK YOU for your detailed instructions for us beginners. I’ve always been a crafty person but APP has me stumped. I’ve watched so many video’s from so many artist my brain hurts. My questions is and it may be the results of BRAIN OVERLOAD but here’s goes, what is the “base” coat white, black or other color made up of ie is it just the pouring medium with a “color” in it or is it something else? If it’s something other than the PM can you please tell me the recipe for it. Signed, Dinah a THANKFUL frustrated beginner that’s suffering from major headaches!
Generally the base coat is the exactly the same thing as other paints. Just made up in big batches. There are some techniques like the SheleeArt blooms or the Pearl Cells that use a house paint base instead.
When you give ratios of glue all/water/paint, how are you measuring them? By weight or volume? I was working with epoxy and mixed them 1:1 by weight instead of volume and all my pieces turned out soft. I don’t want to mess up my paints!
For paints both work but I stick to weight as it is easier to measure in smaller increments.
Sid, some epoxies need to be measured by volume. I tried a different epoxy resin to cover a coaster, and it didn’t dry well…… I had weighed it 1:1 as I had done with previous epoxy. I tried on another coaster measuring by volume and it set rock hard. I suggest trying it on something that doesn’t matter too much to you, so if it ruins it, it’s not such a catastrophe. x
Definitely read the description. Unfortunately I have done this also. Most epoxies go by volume and not weight so you can just look at the measuring cup sides to get you proportions. Thanks Jan for pointing this out.
Hi David, this info is invaluable… as others, I’ve binged on many videos on pour painting and was wondering what those heater items are that some people use.. is it a heat gun of some sort. I’ve also seen hairdryers used to move the paint which looks pretty easy but they still use a type of heat gun too for ‘cells’.
I use a cheap heat gun or a kitchen torch Debby. If you search the website for “best torch” I show the ones that I use.
Hi, loved comments and your replies
What to do really large cells using silicone oil, how do l achieve.
Regards jill
Thicker paint, 1 drop of silicone per 2 ounces (30 grams) of paint. Don’t torch till the you have tilted off at least 1/2 your surface (2 corners for square/rectangle, etc) Then torch from a far so cells come up. If you get to close you get tons of cells that merge into each other and don’t get large. Then finish tilting, and torch again slowly at the end. Then wait.
Hi David,
From another of your posts, I was looking for the article: “How Much Paint to Use for Acrylic Pours….to give you an idea of how much paint normal canvases take” and only saw this. But I have to commend you on the exhaustive content you put in your articles and videos and detailed replies you take the time to give. I’m a left-brained creative and newbie pourer so this is great.
Thank you so much Lynn. Answer questions is how I learn and making these resources is how I cement them in my brain. I am so happy it is helping others.
Hi David,
Thank you for your very informative Website and videos. My daughter wants to do this for her birthday next week so I’m using your site as a crash course in paint pouring. Here is my question:
I was planning on using craft paint (b/c I already have a lot) and floetrol. Your recommended ratio for Glue All (thinned to 75% glue/25% water) and craft paint is 1:1. What about for floetrol? Is it still 1:1? Do you thin the floetrol first, like you do with Glue All?
Thank you so much,
Signed: A Mom Who Wants to Support a Pandemic Birthday and Not Break the Bank with a Bunch of Fails
That sounds like a super mom birthday Jessie.
1:1 and do not thin with water. You might have to add a very slight bit to get the right consistency afterwards but no need to pre-mix the water.
Thank you for all the great information, really helps beginners like me.
1. What should be consistancy(thicker or thinner) of the base white/black paint (paint that is used to help roll other paints) as compared to actual pouring paints that you are using in the art?
2. PM is pouring medium? does that mean the base white coat? or PM is anything that you mix your pigments with?
3. what is benifit of using house paint as base, do you recommend that?
1. Same consistency for most pours. If you are doing a pearl pour or a pour like Sarah Taylor then you want the base be be thicker/thinner respectively.
2. PM is the stuff you are adding to the paint to make it runny. Eg. Glue, Floetrol, Liquitex Pouring Medium, GAC 800 etc.
3. To start out with, no. Learn how the paints work together when they are all the same medium and the same consistency. Then branch out to house paint for things like bloom pours.
I absolutely love all the info you share. Being a newcomer I was just about to give up when I hit upon your website. I learned so many beginner tips and love, love my pours now. Gaining confidence and trying different things. Can’t thank you enough. I so enjoy this.
Thanks Cindy. I love hearing this. Everyone should be able to feel the thrill of making amazing art.
I am so grateful for having crossed your website David. There are tons of information out there. They are all informative but not detailed. I appreciate and thanks so much for your precious time, sharing your journey to this kind of art.
I leave the videomaking stuff to you, that is so time consuming.
I wanna enjoy and improve what I have learned. Your website is very helpful! 👍👌👏
It helps my „left brain“ function well!!! 😀🙃😉
Don’t get tired in answering our inquiries and more power to your fluid Art journey! 🤞👍🙏
My pleasure to help. Also, questions are the best thing for me as they give me more things to talk about on my website and my YouTube channel. 8)
Hi David,
I love your somewhat scientific and analytical approach. You are just what my brain needed!
I only began this endeavor a few weeks ago but have since jumped in with both feet and have learned to watch a chosen few artists on YouTube (at the mo.) and are fascinated by this media.
My question…. My last couple of pours I have noticed that my paint, while drying, is thinning and receding on the horizontal edges of the canvas. The residual effect is colored canvas edges, not painted ones. I do not know if this is normal or…. due to the amount or consistency of my paint, room temperature, hungry gremlins or what? I would value your input, thank you for your time.
Cheers!
It is normal unfortunately. There are two problems.
The first is the canvas has a hard edge on the wood frame and then it disappears meaning the canvas can “dip” everywhere but the very edge of the perimeter. This means the paint can be thicker every where but there. Some mediums handle that better than others.
The second is the paint dripping off the edge pulls the paint off the side and then the top of the canvas. To much paint dripping will pull from the top and thing that outer area. This doesn’t happen as much. Mostly it just makes the sides look painted rather than covered as you say but sometimes that downward force and the stickiness of the medium can pull from the top too.
This will bother you way more than anyone that buys are receives one of your paintings. Pre-painting the sides will help hide most of it. You can also repour along the edges a few minutes after the regular pour but I don’t like to do this as that makes the sides look different than the rest of the painting.
Hi David!
I’m new to acrylic pours and have been practicing but I am struggling with the consistency of my paint. I’m trying not to get any cells as I prefer them without and am using liquitex medium, I’ve heard that GAC 800 is better for this but I am wondering what ratios you would recommend to not achieve cells? Ring pour etc
Liquitex pouring medium should work great for that. Just make sure your mixture is on the thicker side (mound or mount upon a mound). You also want to let your paint sit for a few hours after you mix it so the bubbles can all ride to the top. Liquitex doesn’t usually create cells by itself but if you have bubbles they will form in to little cells or pinholes.
Hi David,
I just returned to painting after a break of many years (don’t ask !). Over the past few weeks I have been “bitten” by the acrylic pouring bug & I love it ! Like many of the other posters, I have watched many videos. I tried my hand at a couple pours & they really bombed. I was thinking about quitting APP until I saw your videos. Your instructions are clear, concise & easy to follow. I especially liked your videos on how to measure paint & consistency. Again, Thank You !!
I have a quick question: I got a set of Mont Marte ready to pour colors & I found they are pretty thick (imo). How would you thin them out ?
Suzanne
Thanks Suzanne. I really appreciate hearing that.
For the ready to pour you definitely want to add some water if they are not the right consistency.
Hi David, I’m just getting started working with acrylic painting. I’ve bought brushes, palette knives, canvasses, a pouring kit with extra accessories, etc. I think I’ve been reading posts on YouTube your links and other artists links, as well, as it’s so easy to procrastinate actually getting started. The math of figuring out the amounts of mixing everything for pouring acrylics, has been a little overwhelming, as math has never been a simple task for me. This calculator will be a big help, along with the input from your other readers/viewers. I feel like I’m in art school. Haha! Thanks for all of the help from you and everyone else! It means a lot to an “old fart” like me! LOL!
I hope being in art school is a good thing now days?
Hi David,. My biggest problem is choosing colors. What colors can go together without getting mixed up or muddied. I’m having a terrible time at this. Thank you.
I have a video about this that I think you would benefit from. I can’t post the link because I have them turned off in comments to reduce spam in comments. However, if you search YouTube for “Choosing an acrylic pour color palette” you should find it. Hope that helps Candy.
Truly valuable info! I have about 30 pours done… various types of pours, depending on which you tube video artist I have watched. I like having negative space on my canvases. I’ve also recently seen a few where people add a stenciled item of some sort after original pour is dry. What’s your opinion of that? I want to be able to sell mine but wonder if they are salable with added items? I just did a 16×20 canvas with a silhouette of a female face traced on, hand painted first, then cut a replica out of contact paper and covered it before doing mostly puddles and scrapes. Totally a different thing…what is your opinion of that kind of art? (By the way, I’m 80 years old and never had art lessons). Thanks for any response.
I love embellishing with stencils or even freehand (even though I am horrible at freehand). All of the things you described here actually sell quite well. Just depends on who you can get in front of your art to see it.
I haven’t even had any art lessons and I never felt artistic but Acrylic Pouring cured me of that incorrect assumption. I truly believe anyone can do acrylic pouring and be successful.
Oh my goodness am I pleased I found your site! The information here is just so helpful. I was wondering though what consistency the pillow should be? Do you use the same consistency for all the same pours or do you use the same consistency as your colours you will be using in the pour (eg thick pillow if doing a ring pour), I am so loving this new hobby of mine but it can be frustrating sometimes lol
The only time I would use the word pillow is for the Sheleeart blooms. And that pillow is a different breed. You want those to be . . . “fluffy” is the only word I can think of. It has to move but not as much as your paints.
Everything else is just a base coat and you want it to be the same consistency as the rest of your paints. If it is too thick the paints will run over it and you’ll get hills in your paint. if it is to think it will move too fast on the outside and the far side will spill over in to your regular paints.
I make the distinction between pillow and base coat to because I think mixing those two things is really doing artists a disservice for understanding the techniques and science behind pouring.
I hope that helps Marie.
Thank you for your brilliant left brain!! I’ve been married to one for 48 years and he amazes me every day. Have done my homework by watching hours and hours of YT (yours has absolutely helped me the most) and making copious notes. The few pours I’ve done have been okay enough to show family only. I would like to make a 2 color pure white and metallic gold pour and embellish it with a really deep purple and gold alcohol ink byzantine cross that turned out surprisingly nice. I would like only some gold and no cells if possible. PM is 70/30 Glue-All/water but I do have Flood Floetrol. Paints will be Folk Art multi surface satin titanium white and Deco Art pure gold extreme sheen (if I have enough) or the same in antique bronze. What type of pour do you recommend and should the consistencies be the same? You’re my go to guy so please keep up the excellent work. Thanks!
Consistencies should definitely be the same. You don’t want to use any floetrol if you don’t want any cells. However, the extreme sheen, and most metallic paints in general, are going to make cells but they are usually more like cloud cells that traditional cells. The paint and medium and mica in those just seems to always interact with paints in that way.
If you want a more uniform but busy look you can do a straight pour or a tree ring pour. Something a little less chaotic would be a simple flip cup. I would layer the paints in very small layers so you get lots of color mixing. If you want a more simple background you could flood the canvas with white and then do a open cup with white and gold alternating but not put much in at all. This way you have lots of white negative space.
Just some thoughts off the top of my head.
Hello brilliant left brained artist! Thank you many times over for your concise instructions and videos. I have watched hours of YouTube, almost all of yours, and taken copious notes. Nonetheless, my few pours have only been good enough to show family. I would like to make a pour of a lot of white negative space with not a lot of gold. It will be embellished with a deep purple and gold alcohol ink byzantine cross on Yupo that actually turned out beautiful (really surprised myself on that one). Your charts on consistency and amount of paint needed are in my ever expanding notebook. PM is 70/30 Glue All and water. Paint is Folk Art satin titanium white and Deco Art extreme sheen gold. Which technique do you feel would work best? Haven’t played around with my idea yet. I’ve been married to a left brain IT guy for 48 years and he amazes me every day as you do with your pretty exacting information. Thank you, David!
Hey Kathleen. I believe I answer the question from a few hours ago. I assume WordPress didn’t email you so I’ll post it here again just in case.
Consistencies should definitely be the same. You don’t want to use any floetrol if you don’t want any cells. However, the extreme sheen, and most metallic paints in general, are going to make cells but they are usually more like cloud cells that traditional cells. The paint and medium and mica in those just seems to always interact with paints in that way.
If you want a more uniform but busy look you can do a straight pour or a tree ring pour. Something a little less chaotic would be a simple flip cup. I would layer the paints in very small layers so you get lots of color mixing. If you want a more simple background you could flood the canvas with white and then do a open cup with white and gold alternating but not put much in at all. This way you have lots of white negative space.
Just some thoughts off the top of my head.
David,
My apologies, but I feel I must point out a typo. In the paragraph on “The Drip Method,” you write, ” … dip your paint stick into the paint and pull it out about over the top of the rest of the paint in the container.” Should there be more information after “about” – a measurement, perhaps? Elsewhere in your post you mention an inch.
PS: Yours are my favorite how-to videos. You think like I do!
Oh TYVM Susan. I read these a bunch but I am sure there are a ton of typos still. Just need some kinds souls like you to help me find them.
I have heard that using silicolne and then trying to seal the painting with resin is a nightmare any tips on that? Also i heard adding isopropyl alcohol to the mix will add good cells, what ratio would you recommend to add the alcohol?
It is more work. I wouldn’t consider it a paint for how awesome the painting finish comes out.
You can use a face wipe or wet wipe. You just need to make sure it isn’t wet wet only slightly damp. Go over everything in multiple directions. let is sit and do it again. You can use just dishsoap and a rag in the same way. I don’t recommend baby powder or baking soda as it gets in the little creases and it hard to get out.
Thank you for your extremely helpful posts and videos. When do you find time to answer all these questions in such detail?? I watched a YT by an artist who uses a clear product that acts like water for thinning but doesn’t create the problems water does for drying time. It could be by Liquitex. Are you familiar with this?
Liquitex Pouring Medium, Golden GAC 800, or Golden gloss medium most likely. They are all very liquidy, pretty clear, and help up the binders in your paint.
Hello David,thank you so much for your instructions,I want to paint my island 5’ x 7’ open tunnel (want to have a lot and big cells) and after cover it with good resin.Can you please give ne some tips how to do it ,how much paints I need to mix(I love blue ,few shades and red,gold,silver.Please if you find time to write to me I will appreciate your effort,thank you.Urszula my email is urszulam@gci.net
For a 5″X7″ you need about 2 ounces of paint. For a 5′ x 7′ painting you’d need about 207 ounces of paint. I’d use more blue shades and less red, gold, silver as they will take over. You’ll get some purple if you use blue and red together also. use about 1 drop of silicone per 2 ounces of paint. I would not use silicone in the gold/silver or any metallic color as they make cells by themselves usually.
Hi David,
I’ve been watching a lot of videos and I think I have ended up confusing myself! Lol
When I originally watched your beginner videos I thought I read that you use a 1 to 1 or 1 to 2 combination of paint to glue all… And then add water for consistency only.
In this blog I read that you use a 70/30 pre-mixed combination of glue all and water, and then do the 1:2 or 1:1 paint to medium… Which one is best?should you always premix your glue all with water or does it depend on which type of paint you are using and the pigmentation, or it simply personal preference? As I am a complete beginner I don’t really have a personal preference yet! I am using the artist loft academic level one paints… In the little tubes.
Does artist loft recommend a different combination of mixing these paints with a flowing medium? How do you know when you have added too much medium to your paint pigment.
Thanks so much!!
It is a personal preference and whichever is easier for you to get the right consistency. I started doing the 70/30 mix to cut down on the time I was taking to mix. I could whip up a gallon of 70/30 mix and use it for months and only have to add a small bit of water. It is much more convenient for me.
You definitely want to do 2 parts medium to one part paint with Artist’s Loft student paints.
You know when you have added too much when you don’t have the color that you want as it gets duller and “lighter” because of the white in the glue the more that you add.
Thank you for your paint consistency chart.!!! What does the half circle symbol mean?
Semi-Opaque. I probably should put that in a key somewhere.
Man oh man! If only I had found you site a few months and probably a few hundred dollars ago. Lol. The best part is reading over articles and watching your videos… almost word for word have I said and done things exactly the same as you. Trying different recipes, documenting them in a book, weighing my paints, taking of pics of my results to keep track of! [I even told someone the other day I was thinking once I got much better and more info collected to start a blog or videos to teach others… 4 days later, I found your site!] I realized after just a few paintings in that consistency was the key. Now if only I could explain it to my right brain when it comes to different techniques… I get real excited while mixing my paints or watching others videos and then I just want pour every which way and on everything!
Keep up the awesome work! And thank you!!
I’d love to see that “pouring every which way and on everything!” That would be a sight. 8)
If I premix my pouring paint and put it into sqeeze bottles, will it tend to thicken over time if not used immediately? How long should it keep the same fluidity?
I have had mine last for months. The water you add is the read determining factor. Tap water – a few weeks, filter water – 2 months or so, distilled water a few more months. Just have to make sure you shake/mix them every week so they don’t settle too much.
Ok, noob to pouring arts. And I am SOOOO confused. This is gonna sound stupid but I honestly do not know if I have to mix READY TO POUR paint with a pour medium before using or do as it says and pour from the bottle. That seems so expensive. And wasteful.
Micheals sells a ready to pour kit for $19. I would buy it BUT after binge watching YouTube and pouring Nobody says if that stuff needs to be mixed with pour medium. Please help me figure this out . I am on a limited income but want to do pour art!
TIA!
If you bought ready to pour paints you do not need to add any more pouring medium. You shouldn’t have to do anything but just start pouring Diane.
Okkkkk. That answers that clearly thank you. You can tell I have been using crayons and pencils for too long cause yanno cheap. I simply didn’t understand what the differences were. I have never used acrylic paints before .. so THESE are a learning experience. Love the YT channel and this Vlog … pour paint artists are like eating chips, one is not enough and 10 + channels are over whelming. Yes I binge watch all . Started with Fiona and she led me to you, and you led me to Molly, and she led me to Rinska and down the rabbit hole I went! Now I THINK I am ready to paint LOL
Well, with those names you got all the good ones for sure. Good luck Diane.
Hi, thank you for your content. I appreciate the details you provide.
I saw somewhere, not sure what artist, a good pouring medium is 10oz glue all, 10oz floetrol, and 1 oz water. What are your thoughts? I’ve used it a few times but being so new I’ve no idea how it stacks up to just using glue or just using floetrol. I feel like it did provide more cells, but I can’t be sure.
I don’t recommend mixing glue and floetrol. They do different things and when you are starting our you want your medium to be as simple as possible. If you want cells naturally use Floetrol. If you don’t want very many cells use Glue-All. If you want to use Silicone to make cells use Glue-All.
The less complicated you can make things the better off you’ll be in my opinion. Also, glue takes about 30-40% water to make a good medium with non-craft paint. 10% water in a 50:50 glue:floetrol mix isn’t nearly enough. The mix isn’t bad per se just overly complicated.
Thank you for your quick response! It was starting to feel too complicated to me for sure. I’m really enjoying painting and didn’t want to bog down on needless details. Your explanation really helps!
I tried posting my comment but don’t see it so maybe it’s lost.
I had an old drop leaf table I wanted to turn into a side table. I took off the table top, removed the drop hinges, and applied flat metal braces to the drop sides. Sanded off all the poly, printed with three coats of Kilz primer and did my pour (acrylic and Floetrol). It was too thick but I worked with it and got the top covered. In the morning, that table top had warped at least two inches in the middle.
THEN I found your site. 🙁 I should have left the poly on, right? But I figured the Primer would have fixed the moisture issue. I’m so disappointed. Before I try again, how should you prep raw wood? I’ve seen gesso or various wood sealers suggested. Any thoughts??
How should you prep raw wood? I’ve seen gesso or various wood sealers suggested. See above comment.
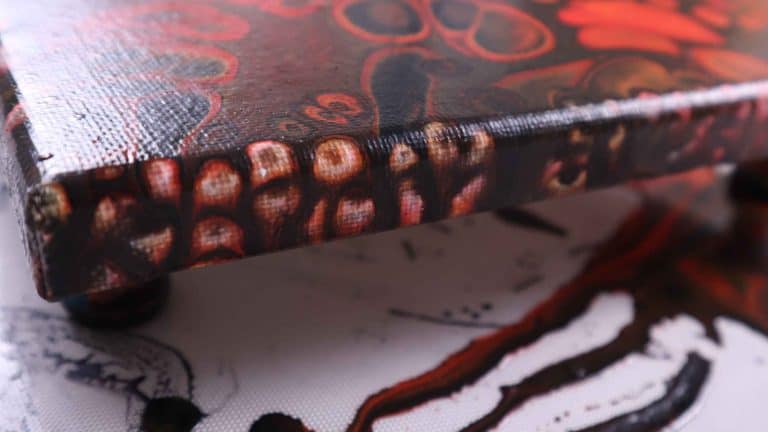
Depends on the look you want. If you want the paint to meld with the wood and to have some of its texture showing through just leave it as is. If you want the paint to be very shiny a bright light on a canvas, you need to seal the wood somehow. Wood sealer, couple coats of watered down glue, satin or matte varnish, all work as a sealer.
David,
I’ve been trying to adjust my viscosity after layering some test paint onto cards and seeing if they sink, float or get along fine as compare to the other colors. All are Artist’s Loft; Turquoise, Titanium white, Copper and Ivory Black.
Seems no matter what I do to the Copper (thicker, thinner), it still sinks in the Black. It seems fine with the Turquoise and White. What am I doing wrong?
I’m using 70% Glue-All, 30% Water, and mixing medium to paint at 2:1.
It just might be high quality copper and that is a dense paint. Try using a dense black like Mars Black. Ivory and Carbon are pretty light compared to other colors.
Hi David,
This is the most interesting information I ever read about paint pouring. I am new to it and I have a lot to learn and I did…
Now, I have to get to the store and buy basic things…. And get down to it. I just love you You tube video.
Thanks for sharing all these information.
Glad you are getting started Alice. Let me know how those first pours go!
First of all thanks for your videos and this forum. I am still learning, but i have been neglecting the one big thing you tell everyone, to write down what you used and colors etc. I have got really awesome pours and then the next one be super wrong. I also know this isnt proper technique but i was using way too much paint at first and so as i would see bunch of it running off i would let it pour on to another canvas and it turns out really cool to me another little trick i learned was if i accidentally touch the painting and its still wet if you lick your finger you can kind of smooth it back down. I have a few questions however when mixing the glue all or school glue, flotrol etc. with water are you to use distilled water in that mix too or does the water? Ps I think this could be the secret to why aus. flotrol is dif is just the different elements in the water or something like that. Second question is it better to mix the medium that you are going to use when using it or is it okay to keep the mixture in a bottle premade and if so how long do you think that it would be good to use? My next question is about mica powders and pigments is there a way to just be able to use just the powder pigments to make a color? Everytime I have tried the pigment just disappears. Lastly do you have a proper shereelee art bloom recipe or mixture that you use somewhere outside of your videos? Like what is used in the pillow, the cell activator and what consistency of paint to use and if you use the satin house paint does it matter?
sorry for all the questions, Im super appreciative of all your help and look forward to any answers thanks!
I always used distilled water just in case I want to store the paint I made up. I don’t want it to go bad too quickly. I have a video on my Youtube about that. Tap water is a week or two, filtered water a month or two, distilled water is months.
The water isn’t the difference between American and Aussie floetrol. If you’ve evern seen them up close there is oiliness and texture difference between the two.
You can use mica powders to make a color but you need really high quality pigmenst (which are generally much more expensive. I add a TINY bit of regular paint to my pigments when I want them to be more noticable. It dulls the sparkly a little but lets the base color shine though.
I have a few videos on the Sheleeart technique on my YouTube. Not something to easily put in to words here plus I recommend everyone take her course for her specific instructions.
Thanks for that info, I guess I haven’t watched enough videos yet. I have constructed a whole folder of with the charts and questions asked by others that I feel relevant to myself to use as future reference and remind myself.
I do have high quality pigments because i like to do things with resin, I was originally looking into how to make geode resin art thats when I stumbled upon the paint pouring and thought it was really cool and haven’t gone back to resin since.
I really am trying to get really nice lacing with big cells, however i keep breaking all my cells I can get pearls to happen and lots of tiny cells, occasionally i will have some lacing but it gets kind of lost once dry.
I have a bunch of blick acrylics i just got recently they were on sale and so I went all in. I have flotrol, which I did see yes it is more oily, guess I was wrong about that. I have glue all and school glue as well as distilled water. I dont have any liquitex pouring medium though. Oh and I have the silicone oil. I also have seargent titanium white as well as artist loft acrylic white.
Where I get kind of confused is the specific gravity. I know you have a video on it and colors ive watched it a few times. I even tried to mix my own colors like you did to color match a scene. That turned out very muddy like though not sure why except for possibly used the wrong density paint together.
Thanks again for the help, and the quick response. I will keep watching more videos and reading to see if I can figure out anything else I’m doing wrong. Happy Pouring!
today i poured again and got so many cells not super tiny but smaller the entire canvas is covered with them. I did 3 8×10 panel canvas boards.
I used 4oz glue all, 2oz of distilled water for the medium
sargent titanium white 1 part 2 1/2 part medium and 1/2 part distilled water.
The paint i used was all blick acrylic cobalt blue, metallic magenta,deep violet and prism violet . 1 part paint 2 1/2 part medium.
I ended up with just enough to fill 3 3oz cups and do flip cup with them all.
then lastly torched after the paint run off. There is almost no space that there is not a cell and the other colors are coming through them as well.
thanks
Hopefully this helps someone else out!
Hello David, I love your work, but I am confused. You weigh the Elmers and water. Do Elmers and water weigh the same ounce per ounce? Best regards and keep making your wonderful videos! Nancy (another Left Brainer!)
Nope. Weighing is so much easier and less cleanup than trying to do it by volume. Plus you can adjust your grams/oz to account for any density differences although it really isn’t needed as long as you get the right consistencies.
Hi David. I was just wondering if you ever got cells with your mica pigment paints? I bought the same set you did and I can’t even get cells with silicone when I use that stuff. My pigment paints might be mixed a little too thin for that, though.
I definitely get cells with pigments and thinner (but not super thing) paints.
I keep going back to previous tutorials and keep learning or realizing something I missed. This time I made bold and underlined ” Don’t add water until after you’ve fully integrated the pouring medium. Water should be the last thing added to get the exact consistency that you want.” I was using water too soon. Duh!! You are still the Guru.
Haha, I don’t know about guru but I’ve fumbled through a lot of mistakes on my way. Just trying to help my friends not make the same ones, or at least not as often as me.
Hi David, I have loved binge-watching your videos and did a few test pours on canvases prior to trying a large 46″ by 27″ oval coffee table-top. I have probably too much paint mixed up and am planning on I am so stressed that I am going to mess this big pour up. Few questions: 1) How many different cups would you use if I do a tree ring pour? Two? Four? 2) Using a laminated paint consistency gauge from “Pour Scrape Repeat”, do you have a feel for how thick the paint should be? I currently have the paints at traveling 4.5 to 5 lines (2.25 to 2.5 cm) in 10 seconds. Does that seem too thick? Thank you so much for your very scientific approach to all of this. My exceedingly left-brained self has “analysis paralysis” in getting this pour done!
So for a treering I like a normal consistency (makes a mound and then goes away, no mound upon a mound). The cups really is all about easy of pouring. Honestly the question on that is comfort. How easily can you pour a 30 oz cup? It would take two 30 oz cups or 4 15oz cups to get the paint you need plus a little extra for insurance. I got that value from my paint pouring calculator (55oz medium consitency).
Thanks for the feedback. Still scared to do this but have to take the leap or it’ll never get done 🙂
You’ve got this. You learn so much more when you are actually doing it.
Hi David.
Thank you for your effort to give us so much information.
I am sorry to be asking this if you have already answered it but I have not found any relative info.
In a swipe when going for lacing and cells, are all colours supposed to be mixed with floetrol or only the swipe colour, mixing the rest with another PM?
In other words, do we rely only on the difference in specific weight of the different paints or does the PM affect their behaviour as well?
Thank you in advance.
All mixed with Floetrol is the best. The relative weights won’t be impacted by the medium because you are adding the same amount to all of the paints. Therefore the weiht of the paint still applies when compared to the other paints.
Thank you so much for all the information that you offer the community!
I’m confused about:
In your videos, do you measure by volume or weight?
Are the ratios the same for volume and weight.
Is the ratio expressed as
– paint : medium (so 1:2 would be 1 part paint : 2 parts medium) or
– medium : paint (so 1:2 would be 1 part medium : 2 parts paint?
Many artists put the empty cup for their pour on their clean canvas and add layers of paint. If you spill paint or knock your cup over, it’s all over your canvas. Why do people do this?
Weight. Volume is too messy to deal with trying to clean you measuring devices. Yes, they aren’t the same but that difference only matters when you are doing huge proportions.
Ratios are almost always medium > paint so if it was 2:1 that woud be 2 medium to 1 paint.
Convenience for video. When I am not filming I sometimes don’t do that but when you are filming especially from the top down it flows way better. Yes, I have spilled once or twice but honestly it doesn’t happen that often.
Hi David. I am so new at this and read your artice. I just want to clarify this: at the first part of this article, it says 1 part acrylic then 2 parts of elmers glue all… then as i go by, the glue solution is like 70% glue and 30%. And on the video, it kinda looked like it was all glue. Please enlighten me. Thank you.
I dilute my glue 70% glue and 30% water first. Then I use that mixture to do 2 parts of that new mix and one part paint. That way 1) I am not overdiluting my paint with 2 full parts of glue and one full part of paint and then ultimately what is going to be about another full part of water and 2) that 70/30 mixture gives me the “thickest” paint i normally work with and I only have to dilute with water a little bit more to get to medium and thin consistency if I want.
Thank you so much!
This whole website is a wonderful resource for someone starting out in acrylic art. Thank you.
Glad to help my friend. Thanks for visiting.
Hi David! I’m a Marine Biologist by trade and have recently retapped into my artistic side and couldn’t be happier! Thank you for all your research, you’ve saved me a lot of headache and money. My questions are,
1) What techniques have you found that don’t require/need a base layer?
2) What ratio of Aussie Flo and paint would you recommend to swipe with for cells? (Palette knife/damp paper towel, etc)
No technique really “needs” a base layer that I can think of. A base puddle and a base coat help you to keep more of the center design of your pour as the sides and initial pour are the ones that get “rolled over” and tilted off.
Flip cup, straight pour, treering pour, etc are all great no base options.
I haven’t used aussie floetrol so I am only giving what I have seen. 2 to 1 with a very dense color (titanium white, mars black etc.) seems be be pretty normal. Make the consistency slightly less than all the other paints.
Thank you for sharing your knowledge in such a clear way, David. After watching lots of videos, my eleven-year-old son and I finally poured our first paintings, and they came out fantastic–in large measure due to your information on consistency, ratio of Floetrol to paint, and the simple but effective use of thumb tacks to level the canvas. Wish I could share the image here! Thank you again, we’ll keep watching and upping our game.
Glad it was a success Peter!
Hi David, hope you’re having a good day.
I always look to your articles for simple, straightforward information. Many thanks.
Here in Spain I can only get Owatrol 965…€25 per litre. I think it works as well as European Fluetrol.
To save costs I do actually mix Owatrol and Glue in equal measure as a pouring medium.
As yet I haven’t encountered any mix problems.
To save money I also tend to use craft paints except for white ( Amsterdam ).
Am I saving money but losing pigment quality once mixed with paint?
That is always the balance you have to make. Yes, craft paint won’t be as vibrant as even student level acrylic. But that doesn’t mean you can’t create amazing art.
I’m new to paint pouring. Used Elmer’s glue for medium. My question is, if I have leftover medium can I cover it and reuse it? How long does it last? Thank you for your videos!
Absolutely you can. How long it lasts depends on what type of water you used to mixed in with it. Tap water you have 2 weeks or so, filtered water more like a month, and bottled or distilled water multiple months assuming it is in an air tight container.
Great tips! I love the idea of using just the right consistency for pouring. I can’t wait to try mixing different colors. Thanks for sharing this detailed guide!
You are very welcome. Thanks for visiting my website.
This was super helpful! I had no idea how important it was to get the paint consistency just right for pouring. I can’t wait to try out the tips you shared, especially the water-to-paint ratio. Thanks for breaking it down so clearly!
So glad to help. Let me know if you have any more questions!
Great tips! I never knew the importance of getting the right consistency for pouring. I’m excited to try these techniques with my next project! Thanks for sharing!
Let me know how it goes!
This was super helpful! I never knew the importance of the pouring medium for achieving the right consistency. Can’t wait to try out these tips on my next project!
So glad to help. Let me know if you have more questions.
Thank you for this detailed guide! I’ve always struggled with getting my acrylic paint ready for pouring, but your tips on the proper ratios and additives made everything so clear. Can’t wait to try it out in my next project!
So glad this was helpful. Let me know if you have any more questions.
Hi David just discovered your site,,,,fabulous. My question is about silicone oil. Do I add a couple drops to each color? I want medium to large cells. Also what happens if added to metallic paint? I understand metallics make cells by themselves.
I like 1 drop per 2 ounces (60 grams) of mixed paint. Leave the paint thicker and give them time to develop in between tilting. I don’t normally put silicone in to the heavy paints (titanium white etc.) or metallic paints.
David do I need to use a heat gun to make cells when using silicone oil?
Heat helps as it breaks the surface tention on the pour and lets the silicone rise up through. You don’t need one but it helps.
Hi David valuable information you provided thanks! I’m new at this starting this week. My question is canvas prep. Do you recommend using Gesso on new boards even if pre-primed? If so, do you let it dry first and then start with my base & color mixes? I want to try an open cup technique first!
I don’t gesso anything that is pre-primed. Sometimes I use a flood or base coat depending on how I want my painting to tilt and you definitely need some of a base coat to make an open cup work in general.