Can You Pour Over an Acrylic Pour?
Acrylic paint pouring is a very arbitrary art form which is why it is considered abstract art. Pour artists rely on the different paints to act in a certain way as they are put on the painting surface, so they get the results they are expecting. Unfortunately, poured acrylic paint rarely does exactly what you want it to. Pair this variability with the expense of painting surfaces like wood or canvases and fluid acrylic pouring can become quite a drain on the pocketbook. There is a way to recoup some of these costs by reusing old pours.
Can you pour over an acrylic pour? You can absolutely pour over an acrylic pour. This can be done while the pour is still wet or after the pour has completely cured (usually 2 – 3 weeks). Some additional cleaning and preparation may need to be done before re-pouring a painting.
We will be deep-diving into all the different variables that need to be taken into consideration before redoing a failed pour painting.
Why Reuse a Painting Surface?
We have found that one of the most expensive pieces of an acrylic paint pour is the painting surface. Canvas, wood panels, tiles, etc. can be a good portion of the costs of a pour painting. Re-using these materials can save quite a bit of time and money in the long run when done responsibly.
There are materials like paper (see our article on pouring on paper) that are not nearly as expensive and are probably not work the effort of waiting till they are dry to repour. Re-pouring over a wet pour would still be a viable way to save a failed pour, even on paper.
Don’t feel bad about redoing your paintings. Keep in mind that even artists of old, like Pablo Picasso, painted multiple different times on their painting surfaces.
Pouring Over a Wet Painting
The easiest way to save a failed pour is to do so before it dries. When the paint is still wet on the painting surface there are a few options that you can take: scrape and repour, pour directly over the previous pour, or add paint to select sections.
Scrape and Repour
Scraping all the paint off the canvas or painting surface is an easy and effective way to salvage a failed pour. This method does waste the paint that was used but allows you to re-use the canvas without needing to wait for the paint to dry.
When scraping, use a palette knife, a cake spatula (offset icing spatula), or a drywall putty knife to pull all the material off the painting surface. Make sure to get all the paint off the sides and the bottom also.
Our paintings are generally on thumbtacks, cups, or ceiling hooks so the paint puddling underneath after it is scraped isn’t a problem. If there is going to be to much paint left underneath the painting, consider moving it to the side or scraping up into a containing and disposing of it before re-pouring.
At this point, there is no need to let the canvas dry. Some people prefer to wait an hour or two so the paint dries, but we don’t think it is necessary.
Pour on the newly “cleaned” painting surface whenever you are ready. You might need to take some extra care to paint make sure the old paint stains are completely covered with the new paint if the color pallet is drastically different on the second pour.
NOTE: If you had oil or silicone in your pouring mixture, you may want to review the Cleaning Off Oil and Silicone section below.
Pour Directly Over the Previous Pour
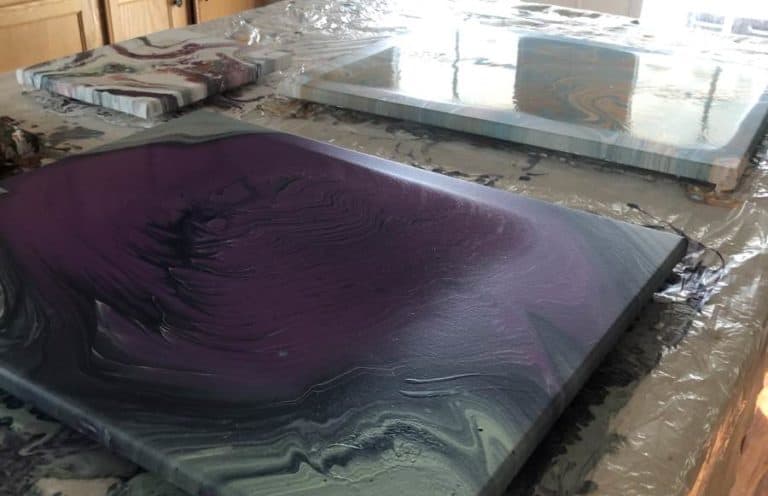
If you’ve finished with your pour and you decide you don’t like it, you can simply prepare more paint and pour over the top of your work. The previous pour will essentially become your “base layer” and can be tilted completely off the canvas or select parts can be kept as a background to the new pour.
When you pour over a wet pour, keep in mind that the new paint will most likely react with the old paint on the edges. If the new colors you have selected are of different densities, you could end up seeing some of the old paintings bubbles up through the new paint.
You can Google “pearl cells” to see some paintings where the effect was done intentionally with some beautiful results. These types of cells are less likely to be seen when using similar paints for both the first and second pours.
Don’t Wait too Long to Re-Pour
If you decide to pour over the top of a previous pour, make sure that you do it in a reasonable amount of time. The sides of a pour painting begin to dry almost immediately. Waiting even an hour after the first pour might result in a dried paint texture showing up on the edges and sides of your new painting.
Make Sure You Tilt Off Excess Paint
When you pour over an existing pour while it is wet, you are going to end up with double the amount of paint. Leaving too much paint on a canvas will most likely cause it to crack and craze. Additional information about cracking and crazing can be found in our post Why is My Acrylic Pour Cracking.
Add Paint to Select Sections
Another way to salvage a bad pour is to add small sections of additional paint rather than re-pouring the whole thing. Pour over the areas you dislike and either tilt, blow, or scrape the new paint to create a new look.
Try using complementary colors in this mini re-pour sections to add contrast and interest to a failed painting.
Pouring Over a Dried and Cured Painting
Sometimes you like the look of your acrylic pour painting right when it is finished but something happens during the drying process that ruins the painting. Or it might be a commission that the customer ended up not liking. Because acrylic paint is essentially plastic, once it is dried it becomes a great surface to paint on again.
When considering pouring over the top of a previously dried pour, the first thing you need to do is to make sure that that the paint has fully cured. Sometimes the top layer of paint may be dried but the underlying painting may still be wet or still be semi-solid.
Pouring over a painting that hasn’t fully cured could cause the painting to peel or bubble as the underlying painting is still outgassing the liquids inside of it. You should wait at least 2 weeks for smaller paintings and a few weeks longer for larger ones before re-pouring.
Our article How Long Do Acrylic Pours Take to Dry gives additional insight into this issue.
Cleaning Off Oils and Silicone
If any kind of oil or silicone is used in the painting, this must first be completely cleaned from the painting surface. If these are not properly cleaned, the new pour will not adhere to the old pour and could cause peeling and flaking.
The steps you use to clean a painting would be the same steps we recommend before finishing a painting. Read more about these steps in Ways to Finish an Acrylic Pour.
Filling in Cracks and Crazes
Any surface imperfection that shows on the original pour will more likely show through on the new pour. This includes crack, crazes, slight bumps from a section where the paint was thicker when drying, and any air holes that developed.
These surface abnormalities can be fixed in a few different ways.
- Add small amounts of paint into any crack, air holes or low areas. Use thicker paint for cracks with some depth and thinner paints for small cervices. Paint with or without pouring medium can be used.
- Modeling paste or thicker painting mediums can also be used. These may require some manipulation to flatten the top surface after they are inserted into the cracks.
If you don’t mind the look of these imperfections or there aren’t any that are substantial enough to require remediations then go ahead and get your pour on again. You will be able to see some of these imperfections through the new painting.
Do You Need to Gesso with a re-pour?
In most cases, gesso is not required for a re-pour. The only exception we would give is for very glossy finishes. These finishes may require a light sanding with very fine-grit sandpaper to give some texture to the surface or you can paint on a coat of gesso. This will ensure that the new pour has something to adhere to.
Do you need to sand if you pour over resin or varnish?
If the painting you are going to pour over has a coating of resin or varnish you may want to scuff the surface of the painting and add a layer of gesso just to make sure the new pour doesn’t peel off of the old pour when it is dry.
You don’t need to stand much, just enough to dull down the shinny top coat, and you can use any grit above 100 or so to scuff the previous work. I think sandpaper between 100 and 200 work best.
Gesso really isn’t required as mentioned above but does give you a better surface for the new pour to stick to.
Don’t add pour layers too many times
That last piece of advice we would like to give on pouring over an acrylic pour is to not do so more than once or twice. The more layers of paint that are added, the more likely there will be a problem with the finished result.
Painting over an acrylic pour is a great way to save some time and money. We recommend that you practice on some junk painting surfaces before doing any re-pours for pieces that are meant to be kept for long periods of time.


Thanks for the info!
You are very welcome.
Thank that was a great help. I just started and I cant stop but not everything is a masterpiece
You are always your worst critic.
All the questions I would have asked have been answered clearly and and simply enough for me to continue with confidence that the outcome will be at least “OK” Thanks so much.
That was my whole goal. Get people to amazing artwork as quickly as possible without making all the same mistakes I made. Also, what you think is “OK” is usually amazing to someone. Make sure you get some trusted opinions before you redo stuff. It is amazing what my wife loves but I hate.
I have a canvas that I tried to do my first reverse flower dip on. It didn’t go well. My issue is the area where the flower is on the canvas is raised. Can I sand down the area where it’s raised from the flower? If I can, would I need to gesso it, or can I get away without doing that (I don’t have gesso)?
If you don’t mind that texture coming through on the next pour you can leave it as is. Otherwise you have to use some sort of paint (gesso or a regular paint, and allow it to dry on the low spots help even it out. You can sand acrylic but it will ruin that piece of sand paper and it is very hard to do on canvas because you don’t have a hard surface to work with and if you push to hard you will stretch the canvas.
I am wondering how I would smooth the old surface of an old painting that had a finger print in it?
I honestly can’t help you with that. For an acrylic pour you could try painting over it with the same colors after washing really well to make sure you aren’t trapping any lint or debris underneath.
What about a repour over a glass vase?
Sure thing Carol. You just want to make sure that the paint underneath is not loose or peeling. if it is you need to remove it first. Make sure to clean the surface really way before re-pouring.
Have you ever tried an acrylic pour over an old acrylic painting? Like something you can find in a thrift store or garage sale? I have a few paintings I bought on a cruise a while back that I would love to redo with an acrylic pour.
I do that a lot. I buy old canvases from the thrift store and clean and then pour over them. Sometimes I gesso if the colors are really dark but usually that isn’t necessary.
Hi David,
I’ve tried doing a Dutch pour over a previous dried pour (months old) but the wet paint reacts with the dried paint and clumps. When scraping the fresh pour the older paint starts coming off too and has becomes thick.
Any idea why this is happening and what I can do to reuse the preprinted canvases?
Put a gesso coat or a finish coat over the top of the reused canvas to give it an isolation layer. Make sure it is very clean also.
I tried my first pour today but lightly touched it too soon so there is a tiny spot on canvas. Am I going to have to repour the whole painting?
That will bother you 100X more than it will bother anyone you sell it too. Especially if you put a good varnish on it. Once it is dry ask some people you trust to give you a no BS answer that you didn’t tell about it to look at the painting and see if they notice it. Then ask them if it bothered them. If it isn’t a massive gouge in the painting I bet they don’t care. If it is a massive gouge that doesn’t detract from the painting that just makes it more unique and a custom piece of art. 8) You are your own worst critic Linda.
Linda, Have you ever taped off (isolate an area) on a pour after it’s cured to add an additional pour layer? Will the tape (blue tape) pull the original paint surface off when removed?
Thank you so much for sharing all your research with us.
Beckie
Blue tape works and it doesn’t pull the previous layer off. However, I would recommend getting some varnish or something to cover the line where the tape is and THEN do the pour over. That creates a barrier at that seam that is clear and the pour paint won’t run under the tape. Otherwise you get a little bit of the liquid paint running under the tape.
This is such a useful article. I just wanted to say thank you.
I created a lovely painting yesterday and when I checked it this morning the colours had all run into each other. I think possibly my white house paint base coat was too thin. I was ready to ditch the painting but you have given me hope!
Definitely don’t waste resources if you don’t have to Mary. Just make sure it is completely dry.
I’m wondering… I just finished 4 wood panels. They look great, however I’d like to add to them… can you paint pour only a section after it has cured?
Absolutely you can. Definitely wait till they are cured. I’ve done a few layers of transparent pours that made some interesting effects.
I have a very large pour that is beautifully done but just a little too simple in composition. When fully cured, I intend to pour a couple of ribbons over the surface to add some interest but wonder if the paint would flow properly over the dried surface?
As long as you don’t have a ton of pitting or other things that might cause problems it should work just fine. I’ve poured over lots of paintings without any issues.
I’m the. Retired guy in NW Florida who was miffed to discover that you had recommended using a “mud” tub with metal rods to use as a kind of pouring tub at the same time that I came up with the same idea. Anyway, it finally got warm enough in our garage to pour and the young teacher from across the road and did our first pourings. Several groupies appeared and slathered me with praise for my brilliant pouring tub. In the interest of fair play I made mention of the fact that you had claimed to have come up with the tub idea at the same time that I did. I even recommended your videos. (I am not a glory hog). I put had put puppy training pads in the bottom of my tub, since they are cheap, absorbent and help control the mess. My audience loved this move. Having had a previous encounter with you, I expect you’ ll claim this idea too. Go ahead, steal another idea from an 83 yr old war veteran who is on his last legs, (Imagine the “Pavane For A Dead Princess”” playing softly in the background.) )Meanwhile, I must credit you for warning us that the first few efforts at pouring may not be selected for a display in the Louvre. You got that right. My first one looked like a stale pizza being used as a Petrie dish in a lab near a place called Wuhan. Meanwhile David (stole my name too – harrrumph). I will continue to humbly develop techniques and gear that you haven’t thought of yet. Yours truly. Dave Dean
Haha love it. Glad to share the glory. I wish you would have come up with this one before I made my completely overbuilt one! Why didn’t you save me before?!? 8)
Great names think alike it appears.
I did a large wave pour. After it dried I don’t see the contrast . Can I add more contrast as I don’t want to re-pour.
Thanks
Rasa
You absolutely can add accents after you our dries. Many artists like Rinske Douna and Olga Soby do this to spice up their pours.
Hi from the Land Down Under! : – )
I stumbled across you on Youtube! I am hooked ( I was looking for different ways to paint my terracotta pots) I am a learner and self teaching. I LOVE paint pouring! I am not perfect and I ABSOLUTELY love, love your tips and ideas! I just have to be patient and pour slowly! How do i know the difference between an air bubble and lump of paint?? (silly question?). Also what is a paint extender? Is that what you put on the canvas b4 you do your pour??
Linda W – Adelaide, Australia!
Pike it with a toothpick or something small. If it pops, bubble. If it moves, glob of paint.
Paint extender is just more of your mixed paint on the poured on the outside edges of your main pour. That way that paint gets “rolled over” as you tilt instead of your main composition.
If you put the paint on your canvas before you pour it’s called a base coat. After it’s call flow extender. Just a convenient set of terms to differentiate the two.
David, I will be doing a large 3′ x 4′ canvas, can I do three separate paint pour, as each section will have a different theme. (And I’m scared of doing one so big lol)
That sounds amazing. I haven’t done one quite that big (2’x3′) but they are super fun and super nerve wracking. Just keep in mind you can pour over it if you don’t like it.
Hiii!
I need some urgent help. I did a pour over a cured pour and the new layer cracked real bad. I’ve been trying to scrape the paint of to re use the canvas but it’s a really large painting and scraping doesn’t seem to be going well. Any tips?
Sorry, I am just getting to this. You can’t really scrape a painting that is half dry (which I assume it was since it cracked). The only thing I could think of doing was using a modeling paste or something to smooth the whole thing down after you let the second painting dry completely.
Can I add some balloons acrylic painting on top of a dry acrylic pouring finished with light glossy varnish?
Absolutely you can. I have commissioned a friend to paint over a few of my pours and they turned out awesome.
Can I do a swipe over a completely dried acrylic pour?
If you put down a wet base and swipe over that yes. Just swiping with the swipe color without a base it won’t have anything to interact with and you’ll only get scrapped paint.
When you say that light sanding &/or gesso is needed if painting over a yucky but fully dry/cured painting, only if a varnish or glossy finish was used… How about a shiny, metallic silver paint that “took over” the entire painting? Did not varnish it at all, but that silver metallic everywhere is pretty shiny stuff! Shall I sand/gesso 1st to reuse the canvas?
Thank you in advance.🌞
No need to sand if it is already as flat as you want the surface. If you want to lightly sand to give texture and then paint over without gesso that is fine too. Sanding nor gesso are required. Just depends on if your new paints are opaque enough to completely cover and so you won’t see the previous painting through the new one.