Why is My Acrylic Pour Cracking?
For an artist, there is almost nothing worse than creating a beautiful painting, setting it aside to dry, and coming back to find cracks in your masterpiece. Unfortunately, almost every artist that uses acrylics, including myself, will experience cracking in their art at one time or another.
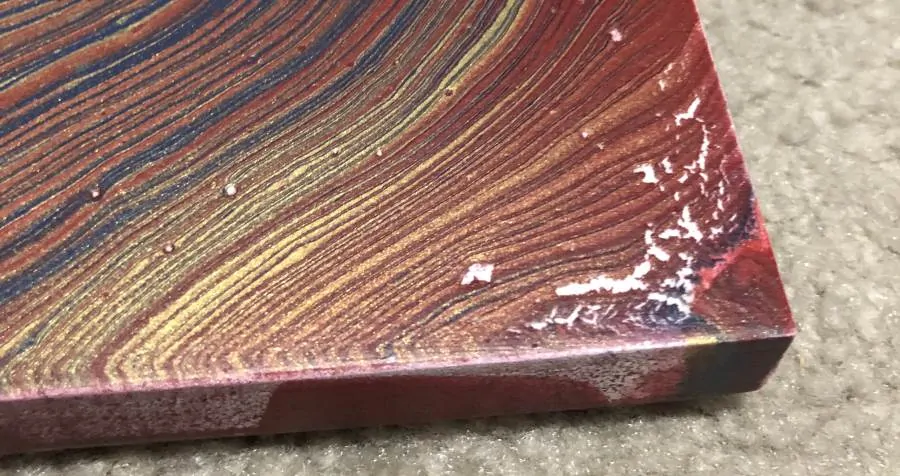
So why is your acrylic pour cracking? Cracking occurs in acrylic paint pours when the top layer of paint dries faster than the underlying layer. As the bottom layer dries, it pulls at the semi-hardened skin on top and when the force is too much, a crack is created. Newly formed cracks will continue to widen until the paint is fully dried.
While cracking is sometimes unavoidable, there are a few things you can do to limit the possibility of cracking. In addition, if a painting does crack, you can potentially salvage the painting by using some of the recommendations below.
In Depth Look at the Causes of Cracking
If you are reading this blog you have, most likely, already had a painting crack. I can definitely feel your pain. Don’t be too discouraged though. As I mentioned before it is bound to happen to all artists. Once you understand why cracking happens, you’ll be better prepared to reduce the change they happen again in the future.
Paint Consistency
The consistency of your paint has a tremendous affect on potential cracking when the pour paints dry.
Paint is Too Thin
Very thin paint mixtures, especially those diluted with excess amounts of water or alcohol, are prone to cracking because there is not enough binder in the paint, and/or paint medium, to hold everything together once dried
Alcohol and water do not contain any binders. Because acrylic paint is water soluble, these additives also tend to break down the binders in the paint. Small amounts will not have enough of an effect on paint and are valuable to control consistency. Too much of either will increase the potential of cracking.
With thin paint, the top coat tends to dry very quickly. The plastic/polymer binders, which hold dried paint together, accumulate on top and form the skin during the first part of the drying process.
With thin paints, there is less binder to hold the paint together when dry. Having less binder reduces the stress that the semi-dried, but uncured, top skin can handle. The stress of the bottom coat volatiles evaporating can cause the top to “buckle” and break, which is why you see cracks. The paint below will then dry and contract sideways, expanding the crack.
Paint is Too Thick
Using acrylic pour paint that is too thick can have a similar effect that thin paint has. Paint that is drying is loosing it’s water and solvents due to evaporation. Water and solvents are what makes acrylic paint “thick” looking compare to when it is dry.
With very thick paint, as with thin paint, the top layer of pain dries the fastest and forms a skin. The paint underneath takes longer to dry. When the paint is too think, there is more contraction happening as the water and solvents evaporate and move out of the paint. This causes stress.
Acrylics were made to handle some stress, which is why they are considered more durable and flexible than other types of paints. However, when a very thick coat of paint dries and the volume of paint begins to shrink due to evaporation, that stress level can exceed what the dried top coat can handle and cause cracks to form.
Paint of any consistency, applied in a very thick layer, will also increase the likelihood of cracks forming during the drying process. Coats of too-thick paint are more common in the center of a stretched canvas painting surface where the canvas sags in the center due the the weight of the paint.
Low Quality White paint
Many low quality white paints are made with a chalky materials that are notorious for cracking. I recommend never using craft paint in any shade of white (off white, tan, eggshell, etc.). Paints from Craftsmart, Apple Barrel, DecoArt, etc. are all considered craft paints.
Environmental Variables
How fast the paint dries can have a significant impact on cracks forming. As was mentioned previously, the top layer of paint drying too rapidly in relation to the drying speed of the bottom layer is a surefire way to increase the potential of cracks.
When a painting dries in a location that is too hot, the layers will tend to dry and different rates. Similarly, if there is not enough humidity in the air, the drying process for the top and bottom layers will happen at much different rates.
Because acrylic paints are made of water and water based solvents, freezing temperatures will most likely cause cracking and other undesirable affects.
The amount of air that circulates when your painting is drying can also increase the drying time of the top layer, while having less influence on the bottom layer’s drying time. Again, this difference in drying times between layers of paint increases the chance of cracking.
You can read more about the drying process of acrylic pour paintings here.
Prevent Cracking In Your Painting
Now that you understand what can cause cracking in your acrylic pours, how can we prevent it from happening? Try some of the steps below:
- Ensure your paint mixture has enough binder. Try thinning your paint with a medium with binders like Floetrol, PVA glue, or professional mediums, in addition to water.
- Make sure your paint is not to thick and not too thin.
- Add a retarder to slow the drying process.
- Adjust environmental variables detailed here under the Slowing Down Dry Times heading here.
- Use higher quality acrylic paints.
- Pour off more paint to keep from having too thick of a coat on your painting surface.
- Try layering multiple thin coats instead of doing one big thick coat if possible.
Fix Cracking In Your Painting
Now that you have a cracks in a painting you want to try and salvage, what are your options?
Fill with Paint
The easiest and most practical option to fix that cracking in your pour painting is to fill the cracks in with paint.
If you’ve saved paint from the original pour that is idea as it will match your pour perfectly. Use a small paintbrush, a spoon, a child’s plastic medication syringe, or a zip log back with a small corner cut out to insert paint directly into the crack. Be sure to add slightly more than the crack will take as it will shrink as it dries.
Another option, which I highly recommend trying at least once, is using a single color of paint. This can be one from the original painting or a new color, like a metallic or pearlescent. This can add some additional character to your painting and really make it pop out to the painting’s audience.
Leave it Be
Another viable option with a pour painting with cracks it is leave it be. Many famous paintings have cracks. Time, the elements, or simply moving the piece can create cracks. Many people that appreciate art, also appreciate the imperfection of the work.
Sometimes as an artist we want everything to be uniform and perfect. That isn’t always the best route to take. Get the opinion of those around you. This will help you disconnect yourself from what you “think” the painting should be and let you think more objectively about the beauty of what you actually have.
Scrap and Re-Pour
Another option you have is to just give up on the piece altogether. There is nothing wrong with this option. This is art people. There is no right or wrong answer.
One of the best parts about acrylic pour painting is that once a painting is dried and cured, you have the option to pour over the top of the piece to create something new. That way you get to enjoy the painting process TWICE for the same painting!
Related Questions
Why is craze cracking? When paint crazes, micro-cracks form and then are “healed”, or filled in, as the volatiles in paint mixture escape through these micro-cracks. Similar to a scar on skin, these crazes look slightly different than skin around them and will reflect light making them more noticeable.
What causes paint to craze? Crazing can be caused imperfections in the acrylic paint or paint medium, environmental variables, paint consistency, painting surface preparation, and many other factors. Crazes form during the drying process. Read more about the acrylic pour drying processes here.


Thank YOU! 🎨 (i dont know why this is in caps, i am not screaming lol)
You are very welcome!
Thank you. This was easy to read and understand as a beginner.
That is great to hear. I am glad it helped you out!
Yeah so I got a little overenthusiastic and globed ungodly amounts of gesso without the layers drying properly. (According to one youtuber, if the canvas is cold to the touch it’s not done drying.)
Your blog explained the process behind my mistake well. I’ve heard in some cases if you paint over cracks (even after it dries properly) they still might reappear? Wonder what the science is behind that.
Fun fact: I left my canvas on the floor while I was layering with gesso and the floorboards beneath the canvas were became very cold! The canvas cooling with evaporation made sense but I didn’t think it would also suck the heat from the space between the canvas and the floor, and the floor itself. Stuff is interesting. Fun fact 2: henna has the same effect when it’s drying on your skin, so wherever you draw patterns on yourself gets pretty cold, especially your hands. I should go to bed.
Acrylic paint is very finicky with heat for sure. I definitely wouldn’t lay a drying canvas on a surface that is cold. Wood doesn’t absorb temperature a ton but it can definitely affect it. Also with so little space between the canvas and the ground that area is going to be colder because the only “heat” source it has is above the canvas which has the drying gesso/paint on it.
Thanks so much for all advice. It’s totally increased my knowledge and also put my results in perspective. I was gutted to wake up this morning to see my best ever pour had cracked, when I’d been falling more in love with it each time I checked it the previous day. But I’ll just persevere and enjoy the process. I only took up painting a year ago at age 70 and it’s the highlight of my week! Thanks again .
You are most welcome. I am sorry to hear your painting is cracking. If you have mostly big cracks on only a few cracks you could try filling them in with a complementary color or a neutral color to give the piece some pizzazz. If you decide to paint over it make sure you fill in the gaps and let it dry first or it will causing odd mounding in the new painting.
I’m trying to use white house paint as my base and it’s cracked both times I’ve tried it. I though it was to thick the first time so I thinned it with water for the second time and possibly thinned to mich, I’m not sure. Any advice on using house paint successfully as my base?
I’ve had similar results with white house paint. Not sure what is it about white specifically. I normally use a bit of Liquitex pouring medium or glue-all when I mix whites to help keep this from happening. People like Elyse Fournier (YouTube) use house paint as their base coat with quite a lot of success, especially for pearl cells on the outside of their paintings. There is definitely a slight difference between latex house paint and acrylic artists paints and as a former house painter I can tell you that anything more than a tiny coat of latex paint is going to crack.
When you varnish or seal the paint will the presence of the cracks be eliminated? Or is it recommended to fill them before you seal the canvas?
Cracks will still show through finishes. A thick coat like resin will remove the texture of the crack because it is so thick but it will still be evident when you look inside at the painting. Very thin finishes like a varnish will let you see the texture and won’t fill in the cracks at all.
If you don’t like how they look, you’ll want to fill them in before you finish your painting.
Thanks for the article and all the information.
It’s been really helpful.
I personally like the cracks and think it adds character and depth to my paintings.
Not sure my client will agree though
So true. I have filled in some of my cracks with complementary colors and they really do create some awesome interest to the work.
Thank you
Your article helpful
Before was everything gone good, one time I shucked
Now I tried twice and the crack showed agin 🥺
Acrylic paint pouring is a two-edged sword. Amazing when it works, and heartbreaking when it doesn’t. Keep a journal of your paint ratios and mixes and adjust slightly each painting to help you narrow down what is causing the problems. You’ll get it, I am sure you will.
Thanks for your advice. I’m finding the cracks appear more in canvases that I’ve recoated? I’m guessing it’s the thickness of the paint and the paint underneath isn’t drying due to the layer of paint already on the canvas. Any further advice?
Cheers Wendy
That definitely happens. Surprisingly there is a lot of water still in the paint after it dries (2-3 days) but before it full cures (2-3 weeks). Colder temperatures can cause this also. The last thing is to make sure your paint isn’t too think on the canvas at the end. The deeper the paint the more likely to crack.
I was using good quality spray paint and cracking occurred. Why would this occur?
Spray paint is a tough one. I haven’t used it in my pour painting but I do have some friends that use it exclusively as their paint source. I know when you spray the paint you can get different levels of paint and the chemicals used to cause it to “spray” depending on how you position your can and how full the can is. Spray paint also would be affected by temperature, humidity, and thickness just like regular acrylic paint.
So grateful you are here!
I’ve just started pour painting and followed a recipe of 1x white paint 2x floetrol 3x Golden gac800. gorgeous painting dried fully cracked and crazed! Reading your wisdom, I did think the paint was really thin (I used a scale for precision ) but again I’m a newbie so just followed the directions.How would I thicken it? Add more paint? Could it have been the cheaper artists loft titanium white? Maybe the Gac800? LOL can’t wait to have experience in this. Can’t wait to try your fixes, thank you.
Artist’s Loft Titanium White has a reputation for cracking when not mixed correctly. I use it still but always with another type of white (Artist’s Loft Flow Acrylic White or another brand). Also, 5 times the medium to paint ratio seems excessive unless you are using a heavy body super pigmented paint.
My recommendation would be to start out at 1:2 paint to pouring medium ratio for student grade paints. Only add a slight bit of water. When you pull your stick out of the paint and it drips back in the cup make sure the “mound” it makes takes at least 1 – 2 seconds to disappear. Like warm honey is what you are looking for. Use that for your first few paintings then start experimenting with a bit thicker and a bit thinner. Every style of painting will be slightly different.
Also, make sure you are not leaving very much paint on the canvas/surface. You don’t very much left on the canvas. Try looking up my article on How Much Paint to Use for Acrylic Pours to give you an idea of how much paint normal canvases take.
Any lastly, keep painting. We all start out making tons of mistakes.
Thank you so much! You’ve really helped me.
You are very welcome. If you have any additional questions, please let us know.
Thanks so much for this – I’m a beginner so guessing I must have not added enough pouring medium… However, my (incredibly beautiful!) finished swipe also got extremely dark overnight. Like it went from a perfectly bright and plump shiny plum to an outrageously flat, dark and shriveled prune – ughhhhhh!
Any thoughts on that extreme shift? Thx
You probably have two problems there. First, pretty much all paints lose their brilliant wet look when they dry. This is just the fact of acrylic paint pouring. Putting a gloss or semi-gloss top coat will bring back some of the look. Using a more expensive pouring medium like Liquitex can help that a bit also since it dries more glossy than glue-all or Floetrol.
Second, if the colors really got darker you might have too much pouring medium or water and your transparent and semi-transparent colors are drying and you are seeing the darker colors through those colors. That’t not always the case but it has happens to me quite a few times over the years.
What pouring medium did you use and with what ratio to paint?
I just had this happen to one of my paintings I loved. I realized it was the pouring medium I used too much water and now my fix will be to add some crushed glass and Pebeo mirror leaves over the imperfections to add characters… Great article thanks!
That is an amazing idea for a save. I haven’t used many 3d objects or additives in my paintings but I definitely want to try more geodes and beach pours like that.
Thank you for this article. So very helpful. I just started pouring a couple of months ago. To save money, I’ve been practicing on thin sheets of wood my husband cut for me (pouring with RTP paints). I’m wondering if that may cause cracking because air is not able to penetrate the underside. Your thoughts?
Most likely it is exactly the opposite problem. I would assume it is cracking because the wood is pulling the water out really quickly and the binder doesn’t have time to dry evenly. Try putting on a very thin coat of paint and let it dry for a few days and then pour over that. You can also you a cheap gesso. Just make sure it dries completely first.
So my girls have started their own business and do mostly pour paint canvases. I didn’t notice the cracking until they started putting their paintings in the basement to dry. We have used the cheaper paint though to mix with Floetrel. I am wondering if the problem is the basement and the cheaper paint. You mentioned using a high quality paint, but I didn’t see any recommendations. What would you recommend?
This is interesting. The basement should slow the drying process if it is cooler than the rest of the house which should, in theory, reduce the potential for cracks and crazing. Are they leaving on a lot of paint on the canvas? Is the paint still moving quite rapidly when they finish? Generally with Floetrol you aren’t going to get the problem of the mixture being too thick just because the nature of the medium.
When you say cheap paints do you mean craft paints? Are you at a 1:1 ratio paint to pouring medium?
They have used a variety of paints like loft, apple barrell, craft smart etc.. I was wondering about switching them to winsor and newton paints. I heard those are great beginner paints.
They don’t really have a particular ratio. They start with just enough floetrel to cover the cup and then 2 tsp of paint maybe. Then they added a little more and more floetrel and lastly add water. Maybe they are adding too much water? Maybe we need to make sure we are doing more accurate amount of floetrel to paint?
Don’t worry about going to more expensive paint. Craft and Artist’s Loft will work just fine. Try doing a 1:1 ratio with paint to pouring medium. You should need little to no water with that ratio for craft paints and just a slight bit with a student quality like Artist’s Loft. When the paint runs of the stick you want it to create a mount and disappear after a two seconds (one second is a little too thin). That is a good middle of the road thickness.
Use about 1 oz of paint per 25 square inches of canvas. That way you don’t have too much paint to begin with.
We tried using less paint and water and doing a more 1:1 ratio. We will see how they turn out. The one we did today I thought had too much paint on it so since it was a swipe painting I just swiped some of the paint off in some areas. The one painting we have has some cracking on the very top on the white base. I took some paint/floetrel mixture to try and cover that up and put some on with a sponge brush, but as it dried I could still see the little bit of cracking. It’s not too bad, but should I have done something different like used my finger with just white paint?
I usually scrape some of the stuff that I tilted/swiped off and drizzle it on the low areas and then tilt a bit more to get the excess off again. A palette knife of a craft stick works great for that. Definitley let me know if that latest pour has issues.
FYI I have taken gold or other metallic paints (thinned slightly with water) and just dripped into into the cracks and let them dry. That is a quick and pretty way to save some of those paintings.
I love your explanations and find them super helpful. I am working with heavy-body acrylics and Golden Color Pouring Medium (matte.) the directions on the pouring medium bottle call for a 10:1 medium:paint ratio, but your instructions are 1:1. Is your 1:1 ratio for liquid acrylics?
(paint:medium) 1:1 is for craft paint. 1:2 is for student acrylics and 1:3-5 is for heavy body and fluid acrylics. 1:10 for a pouring medium probably won’t work as it makes the paint too runny. That would work for a paste type medium but not fluid.
I’d start out at 1:2 and then work your way up till the color starts to fade or the consistency is just right.
I’m not the writer but I now use creative inspirations brand as my go to student grade paint. Have never cracked using it. I often use that brands color “cover white” for backgrounds even when I paint with better paints. It is a huge step up from apple crate, folk art and the like but isn’t expensive like many other brands.
Good background on “why acrylics crack”. I haven’t tried it, but I wonder if you could add another clear finish layer over the painting? Would applying this layer fill the crack(s) and render these crack almost transparent?
Could you pour a clear epoxy resin on the painting and have resin seal the cracks?
A generous layer of resin absolutely would cover cracks. Many layers of triple thick or Gloss Varnish would also.
You may be able fill it with resin if the paint was thick. I filled one with colored resin. The after that dried put a clear coat on top of it.
I had one bad crack in the very center of a pour painting. I filled it with resin colored with alcohol ink in a contrast color. It was the first one of the group that sold. Sometimes the happy mistake really can attract a buyer.
That is awesome. I’ve had a few people that preferred the cracks/crazes when I’ve filled them in with other colors (gold, silver, white, black, etc.) That is the beauty of art.
Thank you so much for taking the time to explain why this happens in a simple manner. I figured my pouring paint was too thin from excessive water. I know how to fix it now!
I am so glad to hear this. So many of us struggled with the same thing. Just a part of the pouring journey.
Hi David,
I’ve been binge watching acrylic outs on YouTube for a while now and have a handful of favourite artists. I started to collect the bird and pieces necessary over time. I came across you a week or so ago and you really reawakened my enthusiasm to try pouring out. You are so clear and your advice and instructions are so helpful, so a big thank you to you!!
The one thing I want to know before I start is if you live in a “normal” house where you don’t have an art studio to leave your paintings to dry where is the best place to leave them while they’re drying? I worry about dust etc as I’ve read and heard over and over that they take fully weeks to properly dry. What kind of temperate/humidity should you try to have for the drying process along with where in the hell so you dry them. I imagine not wanting to stop at one lol so then space becomes a problem, I imagine. Can you stack them with a certain amount of air for in between them? Any other info on this party of the pouring price would be greatly appreciated.
Paintings dry to the touch in 24 – 72 hours. They don’t full cure (all the water has evaporated from the paint) for 2-3 weeks. If you keep your house at a normal temperature 60 – 80′ F they should be just fine. The more humid the longer they will take to dry.
Dust and pet dander can be a problem for drying paintings. When I first started I let them dry on my dining room table with a box over them to keep away the dust. Now I have a second shelf under my table where all my paintings dry.
Brilliant article, thanks.
I have only been paint pouring since Christmas and use Liquitex pouring medium with Amsterdam paints (basics). It is quite costly especially on larger canvas’s but up to my last 2 have had some ok results for a beginner.
Nice shiny, smooth finish at least, which I put down to the good PM. However, my last two have been a complete disaster, compleley crazed all over, very small cracks.
On the first one, to save a bit of money, plus loads of people do it successfully, used house paint as my base. It looked lovely when wet but over the following few days you could hardly make out the composition due to so much crazing!!!??? Put this down to the house paint. Went back to my trusty Liquitex PM but the same happened. My question being can PM possible be off. It was a new bottle only opened for these last two pours.
Guessing probably not and just had two really bad pours for the reasons you’ve already spoken about.
Thanks
Normally, pouring medium doesn’t have anything in it that can go bad unfortunately. Not that it can’t happen but it would be extremely rare. House paint is hit and miss for me. How thick are you leaving the house paint? Straight from the can?
Hello. Thank you for answering questions. It’s so valuable. You fixed my crazing. I was using Arteza ready to pour paint while I learned some techniques. Then I mixed some no name brand with a cheap pouring medium and had success. Feeling confident I moved to the regular Arteza paint and purchased the liquitex gloss medium and spent 2 hours mixing paint colors with the PM. I did a ring pour and let it sit for a few minutes looking at it. When I was ready to stretch it and started, it had a skin on it already and the paint underneath separated into pieces. I’ve never seen anything like it. Tried again next night and hurried. It was starting to get a skin too. I know this is a lot of info. I’m down a ton of PM and at a standstill for fear of wasting more. Do you have any ideas by chance?
I haven’t ever had Liquitex skin up like that and I have used over a gallon over the course of the last year. Is it very dry/hot where you are painting? If so, you might try putting a humidifier or diffuser in that room for a while before you pour so the ambient air is a little more humid.
Thanks for the reply. For some reason I didn’t get an email notification you had replied. I’ve since learned by watching other videos that liquitex dries really fast. I clearly waited too long. I’ve started mixing it 2 to 1 with floetrol. That’s helping!
Hi David, you are my favorite on YouTube. You bring things down to an understanding that anyone can read or listen to and follow. I had my first beautiful painting craze And Dimple I think what I did was used my torch too much at the top could that be the reason that it did that? If I add GAC 800 would that help in the future?
Thank you
It could very well be Lynn but unless you saw the paint start to burn or really create a skin I highly doubt it. The more likely causes are below:
A little bit of GAC 800 could if you used glue or floetrol as your medium. Maybe 10-25% max. You don’t need a lot.
Let me know if this helps Lynn.
Do you have any real life experience with the longevity of your paintings that use house paint and other non-traditional mediums, such as silicone oil, PVA glues etc? Everything I’ve read says NO to using house paint and also to using the other mentioned products…if you want your paintings to last. By “last,” I’d like to be able to assure any buyer that my paintings with remain viable for at least 10-20 years. I’ve read horror stories about the problems with adhesion to canvas, that the paint begins to simply lift right off the canvas because it has inadequate adhesion. Any thoughts on this would be appreciated! Thank you!
I’ve only been painting for about 3 years. I have some paintings from then that have no varnish and still look great. Most house paint is rated to last for 30 years and a high quality acrylic for centuries. Add a good replaceable UV varnish on top and not have the painting in direct sunlight and they will last decades if not lifetimes.
Question… would using a very fine water ‘mister’ (ie. a pump style spray bottle, aerosal can) on the top layer after a few hours of dry time, work to slow down the top drying too fast? I’m not thinking drops of water.. but a really fine mist.
Second question… have you done any research into how much pouring medium (liquitex, flotrol) a particular brand of paint can handle before breaking down? (paint 1:3-6, 10 etc. to medium) This would be alot of experimentation, I know.
By the way.. how can you tell if paint has too much medium in it?
Thanks for all the hard work you do to make it possible for other people to paint. Kelly from ontario
I wouldn’t spray water directly on to your painting. You are better off having a humidifier or something in the room to inhibit evaporation (since there will already be lots of water in the air and that will mean less gets pulled from the painting).
Technically paint can’t ever have too much medium. The paint is there for color. The medium is there to help make it less viscous (more runny). You can do 50:1 and it will still work. Your color will just be very light and it might be too thin depending on which medium you use.
General rule is about 1:1 with craft paints (paint:medium) and any medium. 1:2-5 with mediums student level acrylic. It really depends on how much brilliance you want in your color and the consistency you are looking for.
I am going to be doing a review of 12+ paint brands soon that will have some of this information in it.
Thank you! This was all very helpful information. I’m new to pouring & while it may disappoint me when cracks appear, I’m also of the mind that it IS abstract art, therefore WHATEVER it ends up looking like is literally the personality & attitude of the piece. The fact is, I have fun creating & enjoy my art however it ends up😁
This is exactly the attitude that will get you the best results with acrylic pouring. Every pour is a lesson and a joy all at the same time.
So, I just tried my first bloom last night, and binge watched YouTube to try to mimic what I’ve seen and it was BEAUTIFUL! But this morning, I found I have shallow cracks all over my canvas, I’m completely gutted. I don’t really know where I went wrong, I’ve always used apple barrel, and have never had this issue of cracking… so, my question is what did I do wrong?
Hey,David! Recently, I discovered how to control fluid propylene cracking! Different from the prevention and treatment of cracking, I’m studying the texture performance of fluid propylene, and you just helped me solve this doubt, but I’m using this cracking texture to find a lot of performance possibilities!
Awesome. Let me know if you come across some cool trick for acrylic pouring Zhou.
Hi David
A painting of mine cracked too, but the reason I think is different. Could you please tell me how can I fix it?
You see I made a painting, then varnished it with solvent based varnish. Two years later I forgot I had varnished it and painted on top to change some things as the light and the shadows, now two more years later the paint is cracking.
If I paint on top and then varnish again will this prevent it from cracking again?
You see, I sell my paintings, and now I don’t know if I can sell this one.
Thanks
Begoña True
That I am not sure. Having a varnish should make a fine painting surface for another layer. I don’t see why that would be the cause. The paint or how the pain dried seems to be the most likely cause.
Don’t get me wrong it could be the paint not sticking well to the varnish but that seems exteremely unlikely and if that were the case I would expect peeling on the edges not cracks in the middle.
This helped a ton. I had cracking for the first time today. After reading this I know exactly what I did wrong and how to avoid it next time. Thanks!
Excellent Seth. Glad to hear it.
Thank you so much. As a newbie, I am using the cheaper paints. I’ll try again, but will switch to the better brands after a little more practice. Also, I would like to commend you on your terrific videos on youtube. I have watched them several times over.
Thanks Jo Anna. Glad to help. Planning a few videos soon about which cheap paints to avoid and also how gloss/matte/satin craft paints change your pour.
I have some cracks that popped up in an X shape like little volcanoes where I think I got too hot with my lighter and dried out those bits of paint. As they are raised up, do u think I should sand or gently peel those bits off first before I go in to retouch with paint, or should I leave it?
My personal preference is to leave them and put an accent color inside the cracks. I like the relief off of the canvas usually.
I have been working with low quality paint for about 6 months. No cracking till recently when I add glass. It’s so sad to watch your beautiful art do this. Thank you for all the great advice. Any idea why this is happening after gloss?
Gloss as in a finish coat or you are adding gloss in to your medium/paint mixture?
So, I just tried my first bloom last night, and binge watched YouTube to try to mimic what I’ve seen and it was BEAUTIFUL! But this morning, I found I have shallow cracks all over my canvas, I’m completely gutted. I don’t really know where I went wrong, I’ve always used apple barrel, and have never had this issue of cracking… so, my question is what did I do wrong?
Could be a few things. 1) Base coat was too thick. 2) You used a low quality white which has a tendency to crack. 3) the paints on the top were just a tad too thick. It cold have also dried too fast but that is less likely in doors with air conditioning.
Hi David. Regarding the comment from Begoña True about painting over a solvent based varnish. I think he is correct on that. I’ve been a building contractor for 45 years (I’m old now) and it’s somewhat common knowledge that you should never paint acrylic paint over solvent (or oil) based paint. That is just one of the few things that acrylic paint will not adhere to properly. If you are unsure what the original coat was, you can likely put a primer on first and that will likely work. But never paint acrylic water paint over oil based paint. It will be a disaster. I have much first hand experience. Hope this helps.
Absolutely does. Thanks Philip.
Hi David, I am sure you have answered me somewhere, but I have not been able to find it. I am having the cracking problem. I bought the retarder, but it has not helped. So, I have ordered a humidifier to see if that might be my problem. Having read your article on cracking, it does seem like it is just the drying time with the paint. Thank you for such a detailed article on cracking. I am using other artist recipes like ‘Waterfall Acrylics’ and ‘The Painted Dreamer.’
Fingers crossed.
I have been painting in my basement. I live in New England and my basement gets cold. I have tried bringing them up stairs where it’s in the 60’s. Is temperature the cracking problem. I’ve been using flotrol as a medium. I have cracks everywhere. Thanks. Your videos are very helpful
That definitely could be the problem. I would try and make your paint as thin as possible when tilting and maybe use a space heater for the first few hours (if possible).