How long do acrylic pours take to dry?
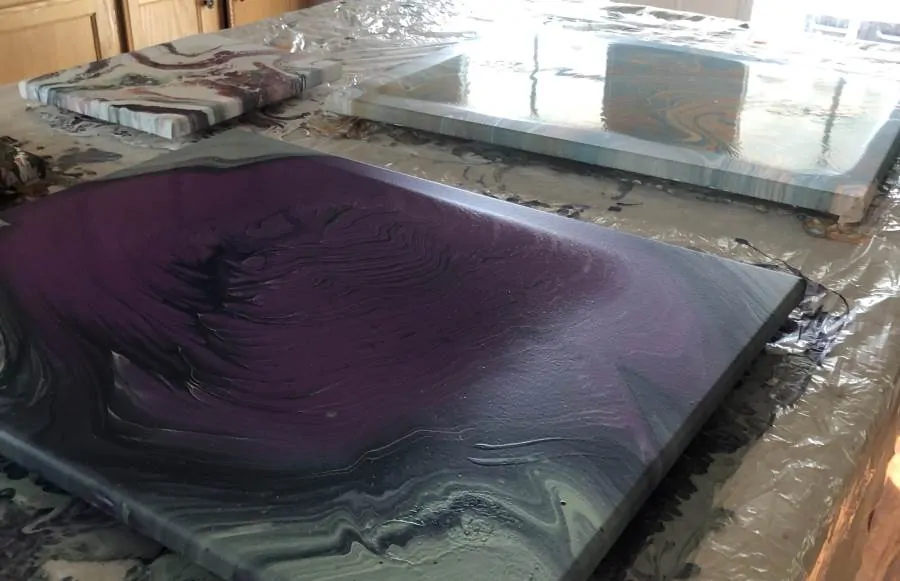
When I first started doing pour acrylics, I was always running into the problem of finding places to put my drying paintings. I was having so much fun painting that I was creating new pieces faster than the previous works were taking to dry.
Currently I paint on my kitchen table, and my paintings dry in our “multi-purpose room” aka. junk room. I only have about three square feet of floor space to use so I have to very careful how often I paint in order to have space for the paintings to try. That being said, drying process for my acrylic pours is very important to the amount of painting that I can create.
How long do acrylic pours take to dry? Most acrylic pour paintings take between 24 and 72 hours to dry and between 7 and 14 days to cure. Heat, humidity, airflow, materials used, painting surface, and other factors can both positively and negatively affect your drying times.
With so many important components to the drying process, it is important that you understand each. Whether you want to able to paint more often, sell your work, or simply display it at home, the drying process is an critical piece to a complete painting.
The Steps Acrylic Paints Take When Drying
When acrylic paint dries, whether poured or applied directly to a surface, they tend the follow a pattern of sorts. The steps in this pattern are meaningful to understand so that you doing unintentionally cause harm to your pouring projects.
Below is a quick summary of an amazingly detailed and technical article written by Mike Townsend from Golden Artist Colors about the drying process of Acrylics and Gels. If you want to dive into the nitty-gritty details, please review his article which can be found here.
One vitally important part of the process is the times each of these steps take for pour applications is much higher compared to straight painting application . The mediums used to create the fluid nature of acrylic pouring paint extends the first few steps of the drying process considerably.
Step 1 – Wet Paint
Paint in this format is right out the container. The paint is malleable and is easily moved around the painting surface. When exposed to the air, the water and solvents, or volatiles, rapidly start leave the paint. Note: The loss of these volatiles is how paint “dries”. For pour acrylics this stage can last anywhere from a few hours to a few days.
Step 2 – Skinned Over
Once the quickly escaping volatiles have completed their exit, the paint begins to form a skin on the outside of the painting. This areas with the most exposed surface areas like corners are going to see the skins form faster while the interior portions take longer the form. This will generally be evident on the edges after four to eight hours of dry time for an acrylic pour.
Step 3 – Touch Dry
For the Touch Dry stage, the skin on the painting has developed enough that touching the surface of the paint does not wrinkle or tear. Paint underneath this layer may still not be entirely dry yet. This is normally seen to happen on the outside of a painting first after the first 24 hours.
Step 4 – Dry to Handle/Solid State
At this stage, the paint on the painting surface appears to be dry. The skin mentioned in steps 2 and 3 is now thicker and harder. This is really the danger zone step where most artists believe their paint is dry and ready final preparation.
The paint has not had enough time to dry all the way through, and the bond between the painting surface and the paint is not fully formed. Excessive handing, rolling, or adding additional layers of sealers (like varnish, or resin) could cause the paint to pull away from the painting surface.
Step 5 Cured/Coalesced
The last step of the drying process for acrylic paints is the cured stage. The volatile water and solvents have almost completely evaporated. The acrylic paint molecules are all closely packed now (this is what causes the plastic skin like effect when drying). The painting should be ready for additional layers or for finishing at this point.
An acrylic pour painting can continue to “cure” for weeks after the 5 steps mentioned above, but the amount of volatile leaving the painting is minuscule compared to the first few days of the drying process.
Zonal Drying
As mentioned above, paint does not dry uniformly. The areas exposed to the air the most will tend to dry faster. On a canvas, for example, the paint will dry on the outside edges the fastest. The center of the painting might still be in step 2 while the outside of the painting is now in step 3. This is called zonal drying. For acrylic paint pouring projects, zonal drying will continue until the whole painting is the cured/coalesced stage.
How the Environment Affects Drying Times of Acrylic Pours?
The drying process can be affected by a number of different environmental concerns including temperature, humidity, and airflow. The water and solvents in the paint evaporate at different rates based on the combination of these variables.
Temperature
According to Golden Artist colors, the ideal temperatures for paints to dry are between “65-75° F (18-24°C) with Relative Humidity above 50%”. Paint will not dry unless the temperatures are above ~49° F, and the water in the paint will freeze at just under 32° F. Temperatures above 75° F can cause the surface of the painting to dry much faster than the underlying paint layers which can causing cracking and crazing.
Humidity
Humidity refers the amount of water in the air. The drying process of acrylic paints, especially acrylic paints mixed with a liquid-like medium, require that water and solvents dissipates out of the paint and into the air.
If the air is too humid outside of the paint, the water molecules will not evaporate as quickly as because there is less room for additional water in the air. In contrast, when the humidity is very low, the drying process will speed up as there is plenty of room in the air for additional water molecules.
Air Flow
The air flowing around a drying pour can cause the painting to dry out faster than it would with a more calm area. Essentially, this becomes of function of changing humidity.
Blowing on a surface causes the air around that surface to change. In the case of the drying painting, the air right near the surface is accumulating more water and solvents from evaporation. It takes time for these evaporated gases to move away from the painting as it equalizes over a larger area.
As was mentioned above, the more humid the air is around painting is the less quickly evaporation occurs. When an external force moves the air around the painting, that humid air is quickly replaced by less humid air, allowing the evaporation process to move more rapidly.
Elevation
The evaporation process will happen more quickly at higher elevations because of the reduced air pressure and reduced force on the water molecules inside your pouring paint.
In the case of paint drying, the more pressure on the water molecules inside your paint at lower altitudes, the more energy is required to cause evaporation.
While changing elevation to manipulate drying times is impractical, if you move from one elevation to another, your observed drying times will most likely change.
Painting Surface
The surface on which you paint can have an affect on how long your painting takes to dry. Finished hard surfaces, like wood panels, or surfaces that are well sealed do not have as much ability to absorb some of the water and solvents from the paint. This materials won’t change the drying time very much at all.
Painting surfaces such as canvas panels, stretch canvas, paper, and raw wood that can absorb more of the water and solvents will cause the painting to dry faster.
In the case of the hard, finished, or sealed surfaces, the paint can really only evaporate through the top and sides of a painting. With the more porous surfaces, like canvases, the water and solvents can leave though the painting surface material in addition to the top and sides of the painting thus speeding up drying times.
Slowing Down Dry Times
On occasion, your pour may be drying too fast which can cause crazing or cracking of the paint. Drying times can be slowed by adjusting the environmental variables or adding additional materials to the paint.
- Reduce the temperature of the drying area while keeping it in the recommended 65-75° F can slow the drying process.
- Dry your paintings in a room with a humidifier or difuser to increase the humidity in the room. If you hang dry clothing, doing so in the same room and you paintings can help raise the humidity. Be careful not to increase the humidity beyond ~75%.
- Reduce the airflow in the room. Close vents, windows, and doors to keep the movement of air to a minimum.
- Tent your painting – Tenting refers to building a tent, usually out of painters plastic or plastic sheeting. Ensure this plastic cannot come in contact with the painting and that there is little or no open ventilation into the tent. This helps keep the humidity higher under the tenting and reduces airflow as they paint dries.
- Add a retarder to your pouring mixture. A retarded is an additive that slows down the drying time of paints. Many are glycerin-based additives which slow down how fast water and solvents move through a mixture thus “retarding” or slowing down the evaporation process.
- Leave the paint slightly thicker on the painting surface for acrylic pours. This will increase the amount of time it takes for the paint to dry. It is not recommend to leave a layer of more than an 1/8″ and preferably closer to a 1/16″ on the painting surface. Thick application of pour paints are more prone to cracking and crazing.
- Use a finished hard painting surface or seal the surface before painting.
Speeding Up Dry Times
In some cases, it may also be helpful to speed up the drying time on your painting. As with slowing, speeding up requires that you change the environment in which the paint is drying or adding something to quicken the drying process.
- Increase the temperature of the drying area while keeping it in the recommended 65-75° F can help speed the drying process.
- Dry your paintings in a room with less humidity. Rooms with plans will be more humid that those without. Cooking and food preparation can also add additional moisture into the air. Showers, air drying clothes, and clothes washing machines can also add unwanted moisture into the air.
- Open the window slightly, ensure your heating or air conditioning vents are open, or add a fan to increase the airflow in the room. Be careful of dust and other airborne particles as they can stick to wet paint.
- Use a matte paint medium in place of a gel or gloss medium will also decrease the drying time of a painting.
- Allow less paint to sit on the painting surface. 1/16″ is a good thickness of paint that will cover well when dried, although this is subject to the type and color of paint and medium used. Stretched canvas tends to hold more paint in the center where there is more give in the canvas. Pull this excess paint to the sides or off the canvas to help decrease your drying times.
- Use a more porous unsealing painting surface like canvas, raw wood, cloth, or paper.
Conclusion
There are many factors that can affect the time it takes for your painting to dry. Humidity, temperature, additives, airflow, painting surface, and elevation are some of the more important variable to consider.
The final product of a pairing comes after the paint is dried. By understanding how the drying process works, you have the power to make the best possible decisions to ensure the success of your artistic efforts.
Related Questions
Does the size of the painting surface or canvas affect dry times? The size of a canvas or other painting surface has little affect on dry times for acrylic pours. A 1/16″ layer of paint on a 6″ X 6″ canvas will dry in almost the same time as a 1/16″ layer of paint on a 16″ X 20″ canvas. The factors detailed above will have more do do with the drying times than anything else.
Does the quality of the acrylic paint affect drying times? Acrylic paints are made from very similar materials and thus will dry at the same basic rate. The makeup of some color pigment may affect how slowly or quickly a paint dries although these different will tend to be almost imperceptible in most cases.
When can I seal my pour acrylic painting? Do not seal your painting for a least 7 days and preferably waiting 14 or more days. Sealing your paintings before they have dried and cured properly could allow the paint to pull itself off of the painting surface because the adhesion process is not complete.


This was a very informative article. Thank you. Do you have information in regards to if or how we should protect ourselves during the pouring painting process? Such as wearing respirators or masks? Are the vapors from heating the chemicals as well as pouring resin harmful to your health ( lungs, etc)? Is a well ventilated room enough? Thank you. Carole Irby-Gray
For acrylic pouring, no protective gear is necessary. Most paints have a notice on them saying they are non-toxic. Many people prefer to wear gloves so the paint doesn’t get in their nails which can be hard to clean out.
For resins, you definitely want to wear a respirator (not just a mask) so the fumes get filtered out. Only pour resins in a well ventilated area and make sure that ventilation goes outside and not back into the home or studio. Even the “safe” resins I have found have a powerful odor and causes you to feel lightheaded if inhaled for any nominal period of time.
For varnishes and spray additives I would make the same recommendations as those made about resins.
Very informative article- Thanks
You are very welcome. FYI I removed your email address from the comment (not from your user) just to make sure it doesn’t get read by BOTs and you start getting spam.
your article was very helpful, thank you for the research. Just getting started and totally hooked. I am finally getting some pics i like, and want to hang. I want to varnish, but, not sure how long i should wait. Your article helped. Thank You .
It is addicting isn’t it? I’ll have a few articles specific to varnishing in the next few weeks. Specifically for Polycrylic and Liquitex varnishes. Happy new year and keep the good work going!
What kind of retarder do you recommend?I have just started with pour painting and i love the videos. I watch.I am trying to doo the blow dryer technic but my second painting has cracking,and when I’m blow drying it looks kinda like gel.
Liquitex Slo-Dri or a little bit of GAC 800 will help cracking/crazing. Also, do not blow dry very much. If you dry out the top layer it will almost definitely crack. Two or three quick passes at the most on the lowest heat setting. You might also thin your paints slightly. If they are gel like they aren’t the right consistency for blown pour. When you drip them into your paint the blow color should make little or no mound but not look like it is being pulled under the surface.
thanks from another left brained artist 🙂
We’ve got to stick together. 8)
Looking for insight on two issues. First, I get beautiful round cells which become distorted during the first hours of drying. Like Tim burton distorted. The house heating system does come on periodically, but the air flow does not seem significant. I am not handling the canvas during this period. I don’t use silicone; do use Floetrol. Secondly, the paint on the sides of the canvases is often faint and thin compared to the top. I may be overthinning my pour paints, but am following the standard advice when preparing each color, about a drop disappearing into the surface and not creating a mound as it enters the body of paint. I gesso all my canvases and usually apply a base coat. Appreciate any thoughts. Thanks.
So if cells are distorting and you aren’t using silicone or any other additive, the paint is too thin. This is a two edge sword though. You thicken it and you will get less and smaller cells. I would say thicken it so it makes a slight mound then disappears immediately. Then heat the surface of your painting from very far away for a little longer than you normally would. Hopefully, that will coax out those nice cells but the paint will still be thick enough to maintain the shape.
On the sides of the canvas, that usually means you don’t have enough color, or you are using less quality paints like craft paints. Which brand of paint are you using and what is your ratio?
Several of the pour artists on you tube state that using Elmers Glue All in place of floetrol creates bigger cells where floetrol creates smaller ones. I’m going to experiment and see!
Floetrol creates small cells without any additives. Glue all does not create cells by default but if you add silicone oil you can get some beautifully big cells.
One other thing that just came to mind is how much paint is left on the canvas at the end. If the paint is still moving a lot when you stop pushing it off, you probably have to much paint and the weight of it is pulling it off, which can also cause cell distortion.
I think you are correct. I have been honing in on the right consistency for a while. Elusive. When preparing paints recently, I measured volumes carefully, as per the science nerd that I am. The calculated percent water to thin to what seemed like the proper consistency ( it varied from color to color), was between 32 and 37 %. My internet gurus say don’t exceed 30%. Back- tracking a bit, next pour. Will use your suggestion of the “ quickly disappearing mound” (qdm🤨). I am using liquitex basics primarily. Until my personal technique improves, I’ll stick with these. Regarding too much mass left on canvas, that is a possibility. Can’t seem to let it go. Many thanks for the feedback. P
I do everything very scientifically also. I haven’t learned to mix by feel yet and I don’t think I ever will trust myself with it either. With Liquitex Basics I do two parts Floetrol to one part paint with a little bit of water (depending on the color) as you mention.
Do you have a “formula” for how much paint to use per square inch? Or some guidance on how much to use. After reading this I think that’s my problem for why the edges dry exposing the canvas.
I do. Approximately 1 oz per 25 square inches of surface area. So an 8X10 canvas with 1/2 sides would have 98 square inches. 9 x 10 = 80 (main surface) + 8 + 10 (sides) = 98 square inches. If you search “how much paint” on the website you’ll see an article I wrote about the paint calculation and different things like paint consistency that affect how much paint to use.
Exposed canvas on the sides can be from a number of reasons.
1) too little paint
2)too much pouring medium where the paint pigment is diluted too much
3) silicone is notorious for causing this. Try painting your sides with your primary color before doing your pour
4) un-leveled paint surface where paint is running off over time
5) using a non-sticky pouring medium – adding a little glue to a mixture can help this as it is a bit more sticky than other mediums
Honestly, I have found that most people don’t mind the sides showing a little canvas. This actually makes a lot of people recognize that the painting is real and not a mass market duplication. You should ask around and see what people think. If you don’t like it, go ahead and try a few of the suggestions above.
Thanks for the questions. I hope you have extra time right now to enjoy painting. 8)
Help! I am having a problem with my varnish cracking as soon as it starts to dry. I am assuming this is because I am torching out the bubbles…?
What varnish? I assume it is polycrylic as I’ve had that happen a few times to me. Torching can definitely cause the top layer to dry faster than the bottom which causes cracking/crazing. It could also be too thick. Try popping bubbles with a toothpick instead.
Yes, polycrylic. I’ve tried everything you suggested. Most crack, a few don’t. Im perplexed! Some were cured for several weeks, some only a few days. Some torched, some not. Some thinner paint, done thicker. I’m at a loss. I live in the desert do very dry, but several fine in the same day and some ate fine. 🧐🤨😔
Should have checked that message before sending. I hope you get the point. Lol
I absolutely understand. Let me know if my answer was helpful.
This is a guess based on my past experience but that sounds like the problem is with the painting and not the polycrylic. If your painting isn’t 100% cured, which takes weeks after it is dry, the small residual evaporation that is happening can be a contributing factor to polycrylic and other varnish/sealers crazing and cracking.
I have been way too excited to finish a piece and done my top coat after only a week or two and that seems to be when this happens most often.
Hmmm. Makes sense. I’ll do some experimenting. So 3 to 4 weeks? I really appreciate you taking time to help me!
Yes. At least 3 weeks for small paintings and 4 or more for larger ones. I wish their was a better test for curing but there isn’t one that I know of without a high powered microscope. 8)
Ok, I have a 12×12 that was painted at least 6 weeks ago. I’ll try it over the weekend…
Thanks Again!
Whew! I think you solved it! Now do you wait a period of time to apply the second coat?
If it is polycrylic you only have to wait a few hours.
Thank you for smart teaching points shared and for willingness to share.We appreciate your effort and will put this information to good use
It’s my pleasure. If you do run into any other problems just let me know. I’ll answer what I can.
Thanks, I have just started to do acrylic pouring and the dried painting is always different to what it finished as. Is this normal? Sometimes the painting is changed completely and does not look as good, what do you think is the reason?
Without seeing the before and after it is hard to tell for sure but here are a few reasons I’ve seen in the past.
The paint is too thin which makes it continue to move and mix on the canvas.
Too much silicone will cause more movement as the paint dries.
Not using semi-contrasting colors and a mixture of opaque and transparent colors will give muddy odd looking results (most of the time).
Non level paint surface makes the paint move and drip off the cavas.
hello David,
thanks a lot for this useful article
want to ask you a question about the drying time of acrylic pourings on yupo paper, maybe you can help me
i had several of them, i stacked them – when dry – one on top of each other- with sheets of baking paper in between
after a couple of months, when taking them, i see that the backing paper has left ‘traces’ on top of each of them
do you know this phenomenen, apparently they call it ‘ferrotyping’, and do you know how i can stack these sheets of paper to prevent it?
feel free to answer here or on my email adress, thanks a lot for your help,
Phil
As I understand it baking paper has a coating that, over time, does tend to break down and will “stick” to things. Normally with my paper paintings I stack them upright to keep them from pressing down on one another. I also have baker’s paper in between each and I have a sealed plastic container they are in. I haven’t had this issue but I am also in the dry west so climate may affect that.
You state “The evaporation process will happen more quickly at higher elevations because of the additional air pressure”.
I think you got that the wrong way around. Air pressure decreases at higher elevations, essentially because there’s less of it pushing down on you. Much the same as divers experience increased pressure at greater depths because they have more water pushing down on them.
You’re right that drying is quicker but it is because of reduced, not increased, air pressure.
Don’t just take my word for it though; go ask a physics teacher. Or Google. Ask Google. 😉
You are the man. I always appreciate constructive criticism and definitely pointing out where I got facts wrong. I am getting this change right now.
I have been trying the Dutch Pour technique on canvas and have done several. However, I am finding some of them are drying as if they have little particles on the canvas and paint. They are in a room I use only for this purpose and no fans or direct air from the AC. Any ideas. Could it be the canvas or what? I’m completely baffled! The canvas I use are already framed and ready for painting.
So I am guessing here without knowing all of the details so bear with me. This most likely is the infamous crazing that happens with acrylic pouring. Are you using a recipe with just water and paint by chance? Both the amount of water being used an the quality of the paint being used can cause this. Craft paints that are thinned with water are notorious for crazing and cracking because they don’t have very high quality binders in it. If you dilute with an actual pouring medium it isn’t so bad. Academic or better quality paints usually can only go up to 30 or 40% water before the binders in them are diluted too much.
Those would by my first guesses. If that isn’t your problem, you can email me at the address on the contact info page along with a picture and the paint and pouring medium info on how you mixed them and I can try to give a better answer.
Question. You mention drying time for different surfaces but not curing time. How long does it take for paint to cure on ceramic tile? Is it the same as canvas or does the surface make it cure faster or slower?
The surface does make it cure faster or slower but not by a huge amount. Dry on most surfaces is 2 – 3 days. Cure is 2 – 3 weeks. I usually wait 4 weeks just cause the timing is easier to check by a month when you have a lot of paintings.
Every time I have a question, you have the answer! You could be my new best friend. Thank you so, so much. I have one more question, I’m sure you’ll ha either answer. I’m off to look. If not, I’ll find ya.
Appreciate you!
Any question you have is probably a good topic for an article so it’s a win-win for everyone.
Hello David – thanks for the good information. I am a jewelry maker who now loves poured painting. Since I am a novice, I am using Floetrol + tiny drops of water with my Liquidtex paints. I have added silicone which does beautiful cells. Two questions:
1. I am doing 20×24 large canvases and when I make either a titanium white base or mars black base, it appears very fluid and ready to go. Once poured, the paint just doesn’t want to move on my canvas. I have watched hundreds of videos and most use a low heat blow dryer to move everything around as I have tried. Any idea why the paint is not moving?
2. You talk about removing the silicone before varnishing? With just soap and water, how do we know if the silicone is removed and won’t water take off the paint (even if I let it dry for 2-3 weeks)?
Thanks so much.
The canvas is the problem as they are pre-gessoed. Gesso is made to have a tooth like fine grit sand paper which makes the paint not want to move. You can move your paint around manually or paint over your canvas and let it dry to get a more smooth surface before painting.
I use two or three methods to ensure there is no silicone left. Paper towels with 91% rubbing alcohol, make up removing towels, wash cloth with soap and water, or talc powder are the main ones depending on how much silicone there is. The silicone has some suspended paint in it so you’ll get a little off from that. If you are using glue you can pull it off months after it is dry so you just have to be very careful and not rub too much.
I just finished a large 24×36 stretched canvas commissioned piece last night. I did use silicone. It’s not dry by any means. Two questions…1.) How soon can I wipe this off to remove residual silicone, do I have some wiggle room with that if I use oil based clear (see next question lol)?
2.) I’ve actually used clear satin polyurethane (oil based) to clear coat a couple pieces and it works really good (I’m poor and it’s what I had on hand lol). Is this ok to do? I’m very familiar with this product having worked at the second largest coatings company in the world since 2016 so I know it can go over water based products as long as the paint is dry so it won’t drag, etc. Just wanna make sure this is dry and cured enough before I clean them (there’s actually two, different sizes) and apply clear so I don’t mess this up.
Thank you SO much!!!
1) I would wait at least a week if not two for that size of painting.
2) Oil over water shouldn’t be a problem once it is dry in my exerience.
Loved your article. Very informative. A picture would have helped me in certain areas of the article. Do you do demonstrations on You Tube often?
Every week. The channel name is leftbrainedartist also.
Hey there! My paint is splitting while drying….not always, but sometimes.
What am I doing wrong??
Thank you! Very helpful information!
Glad to hear Andromeda. Let me know if you have other questions.
Hi there! I want to try the layer technique. How long do you have to wait between layers? Also, how thin do the layers have to be? Almost consistency of water? Thanks
It depends on how you are doing your layers. Thing layers work if you are using transparent paint. If you are only covering sections and only overlapping a little bit on each pour you can do pretty much any consistency.
You want to wait at least a week for smaller paintings. If you don’t let it dry and mostly cure then you could get cracks on the subsequent layers of paint as those small amounts of water evaporate through the other half dry paints.
David,
Came upon your ‘site’ whilst looking for other things and have found all the info very good. I was after some guidance as when I could add another layer of paint to part of a canvas that appears too dark and your last comment covered the exact same topic. The canvas was done about 7 days ago and I’ve just been looking at it, trying to decide if that’s the way I want to go……….as they say…..nothing ventured, nothing gained 😁
Totally true. Experiments are what makes this artform fun for me. You get it my friend!
I am starting a painting on a 36”x36” canvas. I am only doing an acrylic pour on a portion of the painting (maybe 12”18???. The rest of the is hand painted asi I only want to do a pour for this one section. My question is how can I know true curing time? My pouring portion is being done early and after 72 hours I will proceed carefully with the rest of the painting (which I am masking off prior). I told my client two weeks but will I need longer?
That should be plenty of time. 3 days and it will be dry to the touch. Two weeks and it will be fully cured. Especially if you are in the summer now.
Thank you for all your information!
I am new to acrylic pouring. I like the looks of the painting when it’s dry but I can see the grains of the canvas (not the white color of it). I would think my paint is too thin but I believe I am measuring it and the floetrol correctly.
This happens all the time for mediums that dry very thin (glue, Floetrol, plus a bunch of others). Trust me when I say this. This bothers you WAY more than it would bother someone that bought your art or that you gave it to. If there is no white canvas showing through and only the texture you painting is just fine and only you will really notice that Laurie. 8) That is the painter’s curse.
Hi, can I hang my acrylic pour painting up on the wall 5 days after having it made? Or does it need to “cure” before hanging?
You can hang after it is dry to the touch Jazmin. I just wouldn’t finish/varnish until it is cured.
I came across your great site yesterday and am so pleased. Is it possible to subscribe to your channel? I have been pouring for 4 years now and am still learning. You write that paintings must be cured for 7-14 days but my paintings must cure for at least 4 weeks because I have poured over fails after only 2-3 weeks and the layer of the first pour started to soften and bubble up ruining everything. Thank you, David.
I finished a flip pour on large canvas and hav watched for weeks the paint move on canvas very slowly but pattern changes
And the vivid colored are fading slowly
Why and what can I do to preserve the color and pour. Thanks so much.
Acrylic paint is always duller when it dries than when it is wet. You can’t get around that. Adding a varnish can really bring a lot of the color back but it will never look like it does wet.
Also, as paints dry any transparent paints you have on your canvas will allow more of the colors behind them to show through and that makes the painting darker.
I had been watching pour painting videos for many weeks until the day you said something like “just do it” – was what I needed to be told – thank you so much!
I love your straight common sense approach, and the way you explain every detail.
Thank you for introducing me to this wonderful world which has taken over my life – and my house 😉
Greetings from southern Scotland,
Sarah
So glad you’ve joined us Sarah. I just got back from a British Isles cruise. It was beautiful.
Hello, this article was very helpful! I have a quick question, I just did an acrylic pour on a ash guitar body two days ago, I primed it before pouring.
Everything is looking great as it has been drying, I plan on doing a resin coat over it as well.
Should I wait a week for this type of situation to ensure curing?
Thanks
YES, wait at least a week. You don’t want to have any potential condensation happening between your pour and the resin layer.
Hi. I saw your video on doing your first pour. I am ready to do so, but I am worried about the drying process and the effect of heat and humidity will have on my pour. I live in Sydney and it is hot and humid in summer. My garage is like a sauna. I was thinking of buying a fan, but I don’t want dust getting on the painting. Please advise. Thanks
Hot and humid just means it will dry slower. Hot and dry and you’d get cracks. I’d try it and see how the first one dries. It can be your “test” pour.
Thanks for the great videos David. Question: My pour paintings on canvas panels curl up during the first day or two of drying. Is there a way to prevent this?
You have to complete seal the canvas panel before you pour so none of the moisture gets inside to the cardboard/hardboard. The higher quality the board the less it will bow also. I have a video on Youtube called “This is why your canvas panels are warping!”. I don’t allow links in the comments here because of spam or else I would give you the direct link.
Today I was very happy with piece I painted using dripping technique. I was so disappointed after I saw cracks appearing everywhere after it dried. Thanks for the tips, I plan to add retarder to my paint, more binder and keep temperature under control. Hopefully next time cracks won’t destroy my painting!
Sorry to hear that but glad you are taking the right steps to remediate.
Will making sure there is air flow above & below help to stop cracking?
I recently done a 60×50 but it cracked in some places. Not sure if it may have been due to airflow in the room.
You don’t really want any airlfow as that makes the outside (top or bottom) dry much faster than the inside. Usually though the amount of paint left on the canvas is the first place I would look for cracking. Then make sure all the paint mixtures are the same (if you use glue, or whatever medium, in one paint mix you use it in all, etc.)