Ways to Finish an Acrylic Pour?
About a month into my acrylic pouring journey, I was finally starting to think my paintings were worth saving. At that point, I had one of my paintings hanging in each of my children’s rooms and we had a larger piece on display in the family room. My siblings and in-laws were asking if I would pour a painting for them and just like that, I had an audience for my hobby. The only problem was, I didn’t know how to properly finish an acrylic pour painting. This blog post is the culmination of a fair amount of research and a lot of trial and error.
What are some of the ways to finish an acrylic pour? Acrylic pour paintings can be finished with oil-based, water-based, or resin finishes. A finish can add to the durability of the painting and protect them from environmental damage. The right finish can alter the look of a painting by making the colors seem brighter and more lustrous or they can mute the colors and give them a flatter appearance.
Acrylic pours don’t technically “need” to be finished as acrylic paint is a plastic derivative and dries into a durable hard substance. However, many artists choose to do so for a variety of reasons which will be explained in more detail below.
Why Finish an Acrylic Pour?
Fluid artists have a variety of reasons for practicing their art. Creative pursuits allow a person to experiment and learn using the five senses. Some artists shape their works as a form of self-help; to calm the soul, to provide an escape, or to compose mind and allow for reflection. Many share their art with others. In most cases, artists want their work to last.
Finishing an acrylic pour can greatly prolong the potential lifespan of a painting. Finishing provides protection from the environment, allows the artist to control the consistency and uniformity of the surface of the painting, and provides a way to more easily maintain and clean the artwork.
Protection from the Environment
Unless your painting is being displayed in The Louvre in Paris or The Metropolitan Museum of Art in New York City it will probably be moved, stored, dropped, and manhandled many times over the course of its life. Adding a protective coat(s) over the top of your painting can help it to maintain its original beauty from environmental damage that can come from normal use.
Sun and UV Protection
Ultraviolet rays (UV) from both direct and indirect sunlight is one of the most common issues that cause damage to acrylic pour paintings. These UV rays can react with the color pigments in the paint, with the paint mediums, and even with some protective coatings. These reactions can cause the pigment colors to fade or mediums and finishes to yellow over time.
By adding a protective coating that is a UV blocker you can help mitigate the amount of damage that UV light does to your painting. Keeping acrylic pour paintings out of direct sunlight and using paints with a high lightfastness rating (I/II) will also help blunt the harmful effects of UV rays.
Prevent Dings and Dents
Acrylic paint, when dried and cured, turns in to a solid plastic-like material. One of the benefits of using acrylics over oil paintings is that once cured acrylic paints still maintain a small bit of malleability, or the ability to stretch slightly. This malleability keeps acrylic paintings from forming microcracks when it flexes due to movement or changes in temperature.
As with anything, frequent handling, drops or being and flexing can still cause acrylic pour paintings to crack or to separate from their painting surfaces. Adding an additional protective layer over the top of the acrylic paint can reduce how much the actual paint is subjected to these types of forces.
Add Uniformity to the Painting Surface
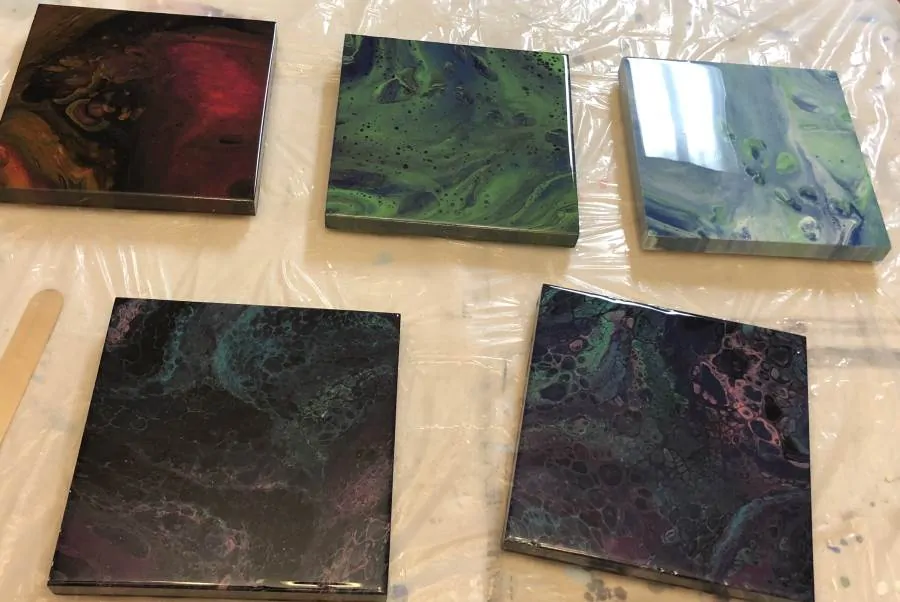
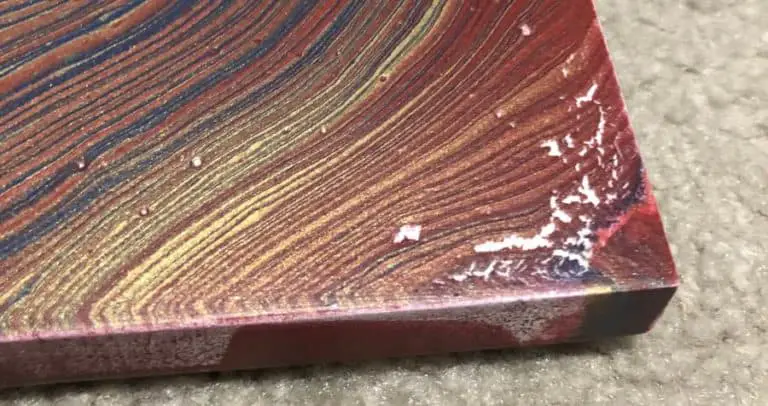
Another reason to add finishing to a painting is to change the surface of the artwork. Some acrylic pours dry uniformly flat across the whole painting surface. Others, especially those where additives are used, do no dry the same across the painting surface.
When the artist wants to keep the painting surface as authentic as possible, very thin layers(s) of protective coatings can be used. Spray coatings and very thin brushed-on coatings are ideal for this type of finish.
If an artist would like to flatten out the entire surface of the painting to make it more uniform, thicker coatings or multiple thin coatings are used. This thicker application of protectant allows the shallow areas, like bubble holes and dry paint density differences, to be leveled out. Thicker substances like gels or resins are ideal for making the surface of an acrylic pour uniform.
Allow for Easier Maintenance
As acrylic paint dries and the water and solvent in the paint evaporate, small pinholes can form. These pinholes will gradually accumulate dust and grime. Adding even a thin layer of a finishing material helps fill in these small imperfections and prevent this buildup.
A finish coat also protects the surface of the painting from direct contact when the artwork is being cleaned. This could be a rag or a dusting cloth that may have water or other cleaning substances on it. In the case of a very high-quality finish procedure, the whole top coat of the finishing product can be removed and reapplied as necessary.
Brighten or Dull Colors
When acrylic paints dry, their color changes slightly. This color change can be affected by the type of paints and the pouring mediums that were used.
In most cases, acrylic paints dry slightly duller than they appear when they are first poured and still wet. This happens because light reflects much better off of the surface of a wet material as opposed to a dry one. Even high gloss acrylics can dry less brilliant than they initially appear.
By adding a finish or varnish you can alter the look of your fluid painting. Finishes generally come in flat, eggshell, satin, semi-gloss, and high-gloss effects.
Flat, eggshell, and satin finishes will be slightly obscure and will dry with a grainy surface. This dull surface reduces the amount of light that penetrates the finish. This keeps the paint from reflecting as much light making the colors seem subdued.
A semi-gloss and high-gloss finish can help bring the “wet-paint” glossy look back to your painting. These help light penetrate the top clear coat and reflect off the painting thus making the colors seem more vibrant and alive.
Different Types of Fluid Acrylic Finishes
There are literally hundreds of different ways to finish an acrylic pour painting. Every artist has their preferred methods. These finishing methods can vary greatly based on the painting surface used, the type of acrylics in the pour painting, where the paintings will be displayed, etc. The most common types of finishes are water-based, oil-based (solvent-based), and resin finishes.
Water-Based Finishes
Water-based finishes are by far the most commonly used top coats for acrylic pour paintings. Because they are water-based, there are very few harsh chemicals in the solution. They are easy to apply, a cinch to cleanup, and have little or no odor as water is the only thing evaporating into the air during the drying process.
Pros
- Easy to use
- Easy to clean
- Quick dry time
- Low odor
- Remains clear with time
Cons
- Thinner coats
- Slightly less durable
- Can’t be removed later
- Humidity can cause drying problems
- More susceptible to heat and humidity
- Short workable time-frame
Oil-Based Finishes (Solvent-Based)
Finishes that use a solvent or oil-base have been used to protect and seal paintings for hundreds of years. Oil-based finishes have their polymers suspended in solvents or oils which is where they get their name. Oil-based finishes tend to change colors to an amber hue over time.
When oil-based finishes dry, they emit toxic fumes that are very harmful if inhaled. They also have an unpleasant odor. To clean these solutions, you must use another harsh chemical like turpentine or paint-thinner.
Some oil-based finishes are called varnishes. These have more solids as part of the mixture and therefore dry as a more thick, durable finish. Many varnishes can safely be removed if there is an isolating layer below. An isolation layer will be explained in more detail later in this article.
Pros
- Slightly more durable
- Tried and tested
- Some can be removed and replaced
- Thicker coats
- Longer workable timeframe
Cons
- Slow drying time
- Toxic odors
- Requires solvent to clean
- Gets an amber hue over time
Resin Finishes
The last of the popular finishes are the resins. Resins generally consist of two parts; a resin and a hardener. When mixed together they create a chemical reaction that causes the mixture to solidify and cure.
Many resins have a noxious odor to them, albeit not as bad as oil-based finishes. They are quite thick, self-leveling, and provide the most durable top coat compared to the other.
Resins provide a very glossy and smooth surface. Some resins are also food-grade and can be used on serving plates and other kitchen and dining room items.
Pros
- Very durable
- Self-leveling
- Beautiful glossy surface
- Thick coat
- Longer workable timeframe
Cons
- Slow drying time
- Some toxic odors
- Requires solvent to clean
- More difficult to master
- Painting surface must be 100% free of oils
- Expensive
Why Use an Isolation Layer?
An isolation layer is a non-removable coating that is put onto the painting before the final varnish coat is added. This allows the varnish top-coat to be removed and re-applied as necessary. Without this non-removable isolation layer, the underlying painting may be damaged during the varnish removal process.
The most common isolation layer we found for acrylic paintings is a 2 to 1 ratio mixture of a gloss or gel medium and water. The water thins the mixture to help you get a nice even coating on your painting.
Do not use more than a 2 to 1 ratio of water or you will dilute the binder in the medium too much and the isolation layer will not dry as a solid unbroken layer over your painting.
Only use gloss mediums as an isolation layer. The matting agent additive that make a finish non-gloss can separate when they dry giving a slightly hazy look to the isolation layer. Gloss mediums slightly thinned with water will create best isolation layer and will dry the clearest of options when dry.
Preparing an Acrylic Pour Painting for Finishing
After you have completed your fluid art painting, there are a few important steps you need to do before you can apply your chosen finish.
Allow Proper Drying Time
Allowing your acrylic pour painting to dry and to cure appropriately is probably the most important part to preparing your painting for finishing.
A painting that isn’t dried and cured can cause the top coat layers not to bond correctly to the painting surface. Excess fluids in the painting that haven’t dried prior to finished will percolate up through the acrylic. This causes cloudiness or separation to happen in between the acrylic and the finish layers.
More information about the importance of allowing a acrylic pour painting can be found in my post on How Long do Acrylic Pours Take to Dry.
Clean the Surface of Oils and Undesirables
One of the most frustrating issue with finishing an acrylic pour is finding imperfections AFTER the finish is applied. Things like dust and debris left over on the surface of the painting or excess oil or additives used to create effects can cause havoc on finish coats.
Remove Dust and Debris
Acrylic paint, when dry, is essential semi-hard plastic. There is very little you can do to damage painting while cleaning unless you use harsh chemicals or a very course cleaning instrument.
I recommend using a mild cleanser like a window cleaner or a heavily diluted dish soap and water mixture to clean your acrylic pour before finishing. I also recommend using a soft bristly brush to help you get into the pinholes that seems to be in every one of my acrylic pours.
Do not use very much liquid to clean your painting. Excessive liquids are unnecessary and could potentially cause damage to the painting surface, especially wood and canvas where liquids can be readily absorbed.
Some other alternatives for removing dust and debris from your acrylic pour are a slightly damp microfiber cloth or paper towel, wet wipes, or a light spray of compressed air. The compressed air I use for cleaning my paintings can be found here at Amazon.
Clean Oils and Additives
Many acrylic pouring artists use treadmill oil, silicone, alcohol, and various other additives to add character and effects to their artwork. These oils and additives can be a major issue when applying a finish and should be completely removed prior to adding a top coat.
Removing oils from the surface of a painting properly requires a bit of elbow grease and some patience. There are multiple ways to remove oil from a fluid acrylic painting. I recommend trying a few of the different methods below till you find one that works for you.
In all cases, when applying a detergent or wiping off the excess water, do so in slow circular motions taking care to touch every surface of the painting multiple times. I recommend repeating your cleaning at least twice to guarantee there is no oil left on the painting.
- Put a few drops of dish soap with 8 to 10 oz. of water. Gently agitate so the dish soap is mixed into the water. Use a cloth or paper tower to rub the dish soap mixture into the painting. Let this sit a few minutes on the painting (do not use enough liquid to cause pooling). Finally repeat this process with clean water.
- Spray on a cleaner that contains ammonia (glass or household cleaners work) and let it sit for a few minutes. Gently rub the glass cleaner into the painting. Let sit for another few minutes. Take a slightly damp cloth or paper towel and wipe off the excess powder. Ammonia helps pull out the grease and let you wipe it away more easily.
- Clean the painting with a damp cloth and let dry. Gently rub a small amount of talcum powder, baby powder, or corn starch into the painting. A very soft blush makeup brush can be used to work the powder into the painting. Let sit 5 minutes. Use a damp cloth of paper tower to remove the powder. Talcum powder, baby powder, and corn starch will soak up the oil and allow you to remove it more easily.
- Mix four parts water and one part rubbing alcohol into a container. Follow the same directions from step 1 and use the alcohol mixture in place of the dish soap mixture. Be careful not to leave the mixture on the painting for more than a few minutes. Do not let the mixture pool on the painting anywhere.
NOTE: Do not use an excessive amount of detergent or water while cleaning your painting. This can cause damage to the painting surface, especially wood and canvas.
PRO TIP: Some paint may get suspended in the oil and therefore will not dry normally. This suspension will clean off along with the oils thus tinting your cleaning cloth or paper towels. This should not be a significant amount of paint. If you get a lot of wet looking paint coming off while cleaning, leave your painting for at least a few more days to dry (assuming it isn’t ruined already).
Apply the Finish
The last step of the process is to apply the finish. There are so many ways to do this that I am going to cover them in separate blog post. As those are completed, we will link to articles here.
If you are unsure of how to apply any finish, follow the instructions included with the product.
Finishing the Back of a Painting
In addition to finishing the top and sides of an acrylic pour, many painters also finish the back of their fluid art. Finishing the bottom of an acrylic pour painting usually refers to making it look pretty and not necessarily “finishing” the painting like the top has been finished.
Finishing the back of a painting could include painting the underside to cover any dripping or unwanted paint marks. This can be done with black, white, or a complimentary color to the acrylic pour.
Doing any maintenance work on the back of a painting can be tricky as you will need to be done either before or after the top is finished including drying and curing time.
Special care should be taken to ensure that the front of the painting is not damaged while finishing the back. This includes damage from scratching or from excess finish materials getting on the other surfaces of the painting.
Related Questions
How long do acrylic paintings last? Acrylic paintings, when properly dried, cured, and finished, can last hundreds of years. Environmental variables in the location the paintings are displayed and/or stored can also affect the life span of your acrylic art.
How to seal acrylic pour paintings? Acrylic paint by its very nature seals itself when allowed to dry and cure correctly. In some cases, you may want to add an additional finish to give a more even coating and to ensure the entire surface of the painting is sealed.

Thank you so much fOr the trouble you have taken to share aLl your VALUABLE knowledge with us beginner pourers. I hoPe you will not be offeNded if i point out a coupLe of bloopers . I know how easy it is to miss these with intuitive typing .
Do not use very much liquid to clean your painting. Excessive liquids are necessary and could potentially cause damage.
I think you meant unnecessary.
Also blog posts not poTs.
Again many thanks.
You are very welcome. I still consider myself to be a beginner but thought I would chronicle all the things I’ve learned as I go. I’ll be adding videos and some other material in the next few weeks so check back if you have other questions.
Ive been binging on your videos! Thank you for taking the time to do them. One question – how long should you wait before you use the resin?
You want the painting fully cured. At least two weeks for smaller paintings and 3+ for larger ones. Assuming they are in a place around 75′ that doesn’t have a lot of humidity.
And look at the mess i made of typing lol
You and me both. The offending mistakes have been remedied. Thank you for pointing them out.
An area of poured paint was left on a varnished table top. It is dry and hard. Can it be removed and how!
Thank you, Kathy
I use a hard plastic spatula so I don’t scratch the table surface. If you used Glue-All as you medium you can use soap and water too. A credit card will also work.
If it is a finish, it depends on the finish. Many have solvents that make it very difficult without removing your finish on your table.
Thank you David, this is very helpful for a beginner
You are welcome. Just let me know if you have more questions.
Can I use the golden pouring medium as a varnish?
A newbie who appreciates your detailed work. Thank you
Technically, yes you can. And in a lot of cases it will work just fine. However, the varnishes have other additives to help them preserve paintings more effectively. UV protection is the big additive I can think of.
I have sprayed my canvas acrylic pour paintings 4 times with Krylon triple coat clear gloss allowing them to dry completely in between coats. They still are not shiny. Do you have any clue why this is happening?
Are they still clear? Just not glossy? Are you spraying them in a warm location and letting them dry without getting too cold?
Pretty! This was an incredibly wonderful post. Many thanks for providing these details.
Thanks again David for yet another super informative post! I had watched one of your videos on the subject but this has a lot more info.
A couple of quick questions to make sure I understand:
After using Windex or another window cleanser, do you rinse afterwards with water? How long do you need to wait before applying your varnish?
Also if I paint the back of my canvas, when exactly can I do that? Is it ok to do it once it has already been varnished?
I just found out that a new local art gallery will carry some of my work so I’m super excited! Now I have to varnish them to prepare them for sale, hence all the fuss. 😉
Oh, and I was wondering whether you have already done a post or video about how to price fluid artwork. Any tips would be most helpful!
Blessings and thanks from Canada
This is amazing and helpful! I have a 48×60 pour on canvas. The black had silicone, so I will clean it once cured. I need to varnish it as it is going in a showroom. I love a smooth glossy finish. I want one that I do not have to use a brush with because I don’t want any brush marks. What do you think of Liquitex gloss vanish or Art Deco gloss varnish? Is there one that is thin enough to pour off all the ends and dry?
Lately I have been using a 50% water and 50% Liquitex varnish mix and rubbing it on in 3 or 4 coats with a lint free cloth. I have a YouTube video about this on my YouTube channel. I don’t allow links in my comments to keep spammers away but if you search YouTube for “Acrylic pour finish with NO BRUSH MARKS” you’ll find it.
You are awesome and very informative. You are one of my favorite artists to watch and learn from because you explain things ‘in plain English’, if you will. Keep up the great work. Just wanted to express my sincere appreciation.
Thanks Marquita. I really appreciate hearing this and glad my journey is helping you with yours. Happy pouring my friend!
Sigh, why didn’t I read this BEFORE I probably ruined two paintings. I thought I had cleaned the surface,but no apparently not. I used Art Resin and I have blank spots ( mostly on the edges) and so I tried putting a second coat on, same issue.
Any ideas? Do I really clean the black areas correctly and try pouring a third coat, or just learn from this mistake?
Clean and resin again. Why waste a good painting? Now you know exactly where the clean. 8)
How do finishe the sides and back of the canvas to make it ook professional?
I varnish the sides and leave as is. I don’t do anything to the back. Paint fingers and splatters are all left there. I have never had a complaint from anyone buying my paintings.
Brand new to acrylic pouring and decided to make the jump with a school auction class project 😬😬 So each kindergartener will be helping with a 1.5 x 4.5 piece of primed wood that will all fit together in the end.
Using craft paint and glue all. But I’m confused about what I should use to seal it. Any insight? ☺️
That sounds like a sweet chaos” project Tara. Once everything is dry you can seal with any varnish really. I would recommend a can of the cheap spray on varnish from Walmart. It is easy, gives a pretty good coat for that type of project and is very forgiving. Just make sure you leave your project for at least a full week if not two or three before sealing so it has fully cured.
Polycrylic from the local Home Depot or Lowes would work great too.
Perfect!! Thank you so much! I’m going to go out and buy exactly what you suggest! You really have a great site for pouring information! I got all 20 kids to do their pours yesterday so we will have awhile before sealing. Wish me luck!!
Can you pour resin over a painting that already has a cheaper type of seal (like spray-on varnish or polycrylic) or do you only get one shot?
I may want to resin in the future, should I hold off varnishing or polycrylic first? What would happen if you did resin later after a spray varnish or polycrylic?
I am wondering the same thing
I have done it many times and it works just fine Margaret. Just make usre you still clean your surface well before adding resin.
You absolutely can. I have resined over normal varnish a few times when the sheen just wasn’t as glass like as I wanted.
How do you store paintings after they are finished? I think you may have answered this before, but I cannot find it
After a painting is finished I either stand them up like books (but only back to back and front to front) or if they are small I stack them like a pile of papers. Like books is best and a sheet of parchment paper or a stick (think bamboo dish drying rack) can help protect each painting from itself.
I am another beginner,.located in Italy.
Thank you for all your great content!
I have used glossy resin spray for a nice dutch pour. But I don’t like it because it highlights the unevennesses (don’t know how to say) plus being slightly sticky.
What would do better?
Plus, can I go over it with another finish?
Thank you so much and be well.
You can absolutely put another finish over the top. If you want a glass top finish the only real option is resin. HOWEVER, as a fellow artist I can 100% guarantee you that the “uneveness” that you mention doesn’t not bother anyone but you. 8) We as artists want everything to look perfect but the imperfections make our art more unique as it is a visual indicator that this was hand made and not mass manufatures. Of all the paintings I have ever made not 1 person has given me feedback that they don’t like the slight relief created by the paints on the canvas after they have dried.