How Much Paint to Use for an Acrylic Pour?
I can’t tell you how many times I’ve gotten to the end of my pour and found that I either have way too much paint or not nearly enough. As a beginner, this was very frustrating, and I wished I had an easier way to help me gauge how much paint I needed.
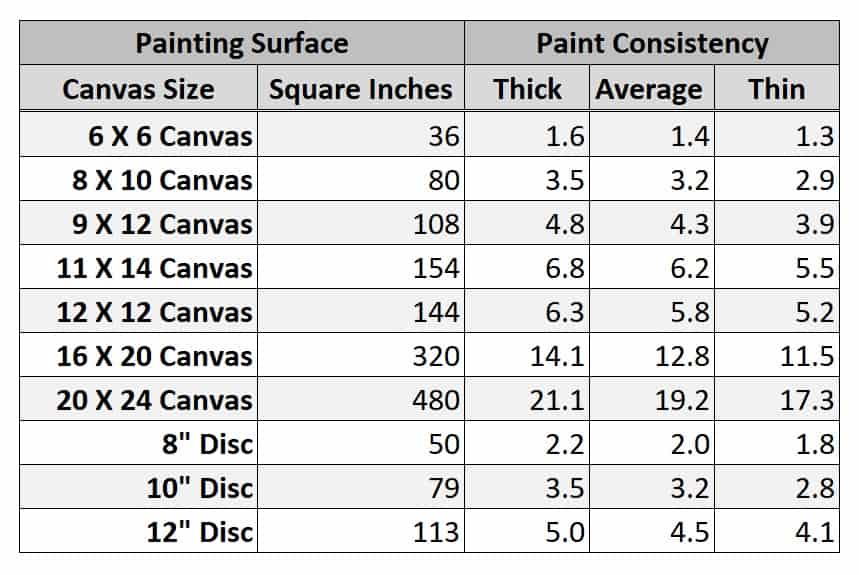
So how much paint do you need for an acrylic pour? In general, it takes approximately 1 ounce of paint per 25 square inches of surface area. In metric measurements, this would be just over 1 milliliter per ~ 4 square centimeters. “Surface area” should include any area that will be painted, which usually includes the sides of the object, which most people forget.
This calculation can vary slightly depending on the size and shape of the object you are painting, the surface roughness, the consistency of the paint, and the painting materials being used. In this blog post, you’ll learn about how these considerations impact that amount of paint you’ll need. Understanding these concepts should allow you to better estimate your paint requirements in the future.
In the mean time, u
Measuring the Size and Shape of the Painting Surface
Before you start a paint pouring project, it is important to understand where you want your paint to end up. This first step to doing this is to review the surface you plan on painting.
Use a ruler or measuring tape to calculate the area you are looking to cover with paint. Measure every surface that you expect to be painted including the top and sides of the piece. If an area is not regular in shape, decide which type of shape it most resembles and calculate the surface area from there.
Use the following information for common surface area calculations.
- Rectangle = Base × Height
- Square = Base × Height
- Triangle = ½(Base × Height)
- Oval = π × radius1 × redius2
- Circle = π(radius)2 = πr2
- Hexagon = π(radius)2 = πr2 (approximately same as circle)
By measuring the entire painting surface before mixing any of your paints and using the chart above to better estimate your needs, you’ll find that you don’t miscalculate the amount of paint you need nearly as often.
Surface area is by far the most important factor in determining paint needs, but it is definitely not the only consideration. Continue reading to learn some of the other common reasons painters might experience paint estimation issues.
Subscribe to the Pouring Nation Newsletter and get this free How Much Paint Acrylic Pour Cheat Sheet.
Why Surface Roughness Matters
Imagine pouring a cup of paint on a kitchen table. Now imagine pouring the same amount of paint on the carpet in your living room. In this example, the paint will spread out on the kitchen table on a much wider area than it will on the carpet floor.
Why does this happen? Think about the actual surfaces that the paint is coming in contact with. The kitchen table is smooth and there is nothing that keepsthe paint from moving around.
With the carpet, the paint has to go over and around the roughness of the carpet as it settles. That means there is more surface area that the paint ultimately has to cover per square in of carpet.
While carpet is a little more extreme example of this phenomenon, it is important to note that even doing an acrylic pour on the roughness of a brand new canvas can increase the amount of paint needed for coverage when compared to doing the same paint pour on a gessoed or prepared canvas.
Of the common materials used in pour acrylic painting, wood art panels and other well-sanded and prepared surfaces will take the least amount of paint. Rough cut wood sections and other unfinished wood products will usually require the most paint. Stretched canvases sit somewhere in the middle.
Paint Consistency
Another consideration to take into account when planning how much paint to use for a pouring project is the consistency of paint. In general, the thicker the paint is, the more it will take to cover a similar area when compared to a thinner paint.
Lets take a look at why this happens. To illustrate, imagine pouring a cup of honey and a cup of water out at the same time. Which cup will empty faster? The water will, of course. There might be the same amount of each, but they are not behaving in the same way.
Without going into too much chemical theory, this is a property of the viscosity of liquid. The thicker a liquid, the less room the molecules in the liquid have to move around each other.
Those “fat” molecules also don’t move around each other very well. Because of this, those molecules are said to have a higher friction level. Thinner liquids, like water, have very low friction levels so they flow and move much more readily.
In addition, the more room the molecules have, the faster they will move around. Increased movement in molecules provides less viscosity, and thus improves how the paint flows. Changing the state of the liquid by pressurizing it or adding heat can also decrease viscosity. I do not recommend pressurizing your paint.
Now that you understand how viscosity works, how does that affect how much paint you’ll be using on an acrylic pour? Thicker paints will tend to stay thicker when sitting on a surface. This is because the paint is less likely to “move” unless some other force acts on the paint.
You can easily test this theory by using the same example of the honey and the water. Once the honey and water are poured on the table, which makes the bigger puddle? The water does. The honey will always create a thicker layer than the water.
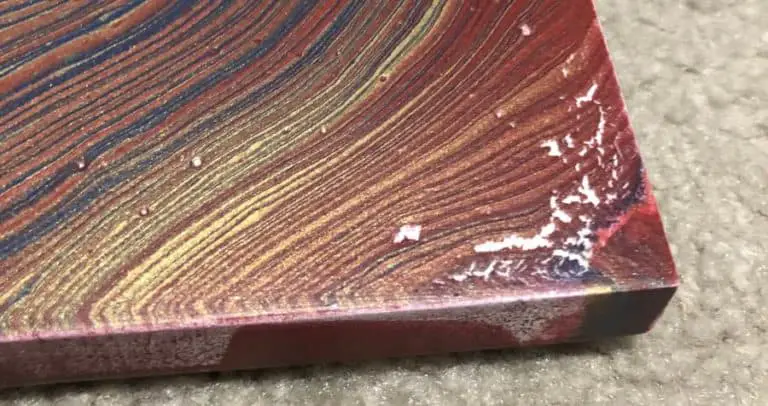
Covering a canvas with a thicker consistency paint will always require more than doing so with a thinner paint because of these factors. A coat of paint that is too thick can cause crazing and cracking. Thin paint will cover a canvas more easily; however, it can also leave too little paint on some parts of the surface, causing the colors to be muddled or showing the underlying surface through the paint.
Painting Materials
The last contributing factor to estimating the amount of paint you’ll need for an acrylic pour is the materials that are used in your paint mixture.
Every paint is not created equal. Some paints are plant based, some are chemical based, and some are even metal based. Each one has it’s own unique properties and behaviors.
Metal paints tend to be heavier. This causes the paint to be affected by gravity a little more than other more lightweight paints. Heavier paints generally have higher friction levels and, therefore, don’t move a rapidly as other types of paints. Heavy paints are also made up of bulkier molecules compared to many other paints, which contributes to the paint being more viscous than other paint.
The opposite is true of some chemical and plant based paints. Their “weight” is much less compared to most metal based paints, and their molecular structure is less dense. As you learned before, this makes the viscosity of the paint less. Less viscous paint will flow better and move more readily on a painting surface.
Each paint is unique. Some more expensive paints will show the relative weight of the paint on the container. With less expensive paint, you will need to do some testing on your own to get a feel for the different properties of the different colors.
Conclusion
If it wasn’t apparent already, you should now realize that gauging the amount of paint needed for an acrylic pour project is not an exact science. Surface area, the roughness of the painting surface, viscosity, and the materials used in the paint all have an impact on how the paint flows and how well it covers the canvas.
Start your base paint needs calculation with 1 ounce of paint per 25 square inches of surface area. Then adjust for contributing factors mentioned in this article, and you should be able to better gauge your paint needs. With additional practice, you will be able to do this without thinking.
Related Questions
Why don’t I use the same amount of paint every time? Every painting is different. The number of paints used, the consistency of each, the air temperature and humidity, how much you tilt, the thickness of the paint left on the canvas, and many more factors all contribute to the amount of paint used during a pour.
What if i don’t have enough paint? If you don’t have enough paint to cover your canvas, just add more. Some of my favorite pieces have come from adding more paint to my project when I underestimated the amount of paint that I needed. Try adding a new color or mix them slightly differently to give some variation to your piece.


THIS IS AWESOME!!! Finally something to help me really gauge how much material I should be using when I am attempting a pour! I loved the part on viscosity of the material. One of the major issues I have had when doing acrylic pours is when I am done shifting the paint, my surface looks amazing, but then over the next several hours the paint continues to run off. Is this a viscosity issue? or do I have another problem? I look forward to seeing more articles like this!
Generally you have one of three problems. 1) Your surface isn’t level, 2) you have too much paint on the canvas still, or 3) your paint is too thin.
Try scraping the edge with a pallette knife or popsicle stick all around the lower edge of the canvas. This will stop the dripping unless you have way too much paint on the surface.
Excellent tip Charine. This definitely keeps the sides from continuing to drip which pulls paint from the top.
Ken,
If you scrape the paint where it drips off the bottom of the canvas this will slow or stop the pulling of the paint. This is one way that I read about and saw that you could do in order to stop your painting from changing.
When you talk about the amount of paint needed, it sounds like you’re talking about the amount of paint+”adulterants” needed. So for 25 square inches you’ll need an ounce of what you’ve mixed up (paint + floetrol, or paint + glue, or whatever) rather than an ounce of paint which you then mix with other stuff. Am I correct in my interpretation?
Absolutely. I do often refer to paint as the combination of the medium and the actual acrylic paint. Thanks for pointing that out.
Very useful chart. Thanks for that. Please clarify…by ounces, do you mean liquid volume or weight? Because I was trying to measure with a digital scale (weight) and nothing ever worked out right. I saw someone on YouTube measure with a kitchen scale. But then everyone else I’ve seen on YouTube just refers to the term “ounces” but they do not actually say or show how they are measuring. So are you saying to measure with a liquid measurement tool, like a graduated measuring cup? Thanks in advance!
Thanks for the question. I measure with a kitchen scale.
Maybe one of my next experiments on our YouTube channel I will tackle this question specifically. They shouldn’t be too different with a liquid but some of the paints do have very heavy pigments, albeit in small quantities, and that might throw off the ratios.
Liquid volume, so use a measuring cup or a graduated mixing cup that shows the ounces on it.
I do weight becasue there is less cleanup. You can do volume but you need to be consistent.
I bought a paint pouring cup from hobby lobby. It has the ounces on it.
That is handy for sure Annie.
After doing a painting with lots of paint still on the canvas, the only way to get rid of it is to pour it off and possibly lose the desired result…correct? This happens to me a lot when I paint the background or do a swipe…..any suggestions to avoid this?
Yeah, this is a difficult balancing act.
My first recommendation would be to use less paint up front. If you are doing a base coat, include the amount you use in your overall paint calculation (eg. 1 oz of base coat on an 8×10 canvas means you only need another two ounces or so of paint to “cover” the canvas — 8 * 10 = 80 / 25 = approximately 3 oz of paint total–).
After you tilt, but before you cover your whole canvas, take a minute to decide what you want to keep. The first or second direction you tilt will usually stay more than later tilts so try tilting toward what you want to keep first.
Unfortunately this is an experience thing and as you keep doing it you’ll get a better idea of what works and what doesn’t.
Hi, when you are giving out measurements is there anyway you could possibly give it out in MLS and grams my scales in Australia are mls and grams only…I would be so grateful 🙂
My calculator in the tools section of the website gives those measurements where you can change to grams or ounces. Easy math is 30g = 1oz too.
“just over 1 milliliter per square millimeter.” A little 4″ (approx 100mm) square canvas has an area of 10000 sq mm, so it should take just over 10000 ml of paint. That’s 10 litres, or a bit over 2 and a half gallons. Methinks you should have written “just over 1ml per square cm.”
Yeah, that was a big of a typo for sure. Thanks for pointing it out to me. I’ll get it fixed ASAP.
Hi, when you are giving out measurements is there anyway you could possibly give it out in MLS and grams my scales in Australia are mls and grams only…I would be so grateful 🙂
Thanks for posting this. For measuring the paint mixture, it is easier to think of it this way. If you want to use approximately 1 ounce of paint mixture for 25 square inches, it works out to .04 ounces per 1 square inch. Just find your total square inches, multiply by .04 and arrive at your fluid ounces.
Eg. 8×12 inch surface is 96 square inches, times .04 is 3.84 ounces of paint mixture.
If you are using square centimetres and millilitres, it is 0.19 millilitres per square centimetres. (A very small measurement as 1 millilitre is 1/8 of a teaspoon!)
Eg. Same size as example above but in centimetres: 20.32×30.48 centimetres is 620 squared centimetres multiplied by 0.19 is 117.8 millilitres. There are 30 millilitres in 1 ounce so 117.8 divided by 30 is 3.9 ounces of paint. (There is some rounding of numbers).
Of course, you start getting 3.8 or 3.9 ounces, you’re going to be looking at 4 ounces of paint mixture to work with. This is TOTAL paint for the surface. However, you’ll be dealing with a number of different paint colors. So, let’s say four different paint colors. Four ounces divided by four colors is one ounce of each color mixture. 120 ml divided by 4 is 30 ml of each color mixture.
We can thank my husband for the clarification. You can use .04 per square inch and get your ounces, or .19 per square centimetre and get your millilitres. (Dividing the millilitres figure by 30 will get you into ounces.)
Also, I suggest whatever measuring containers you buy, to compare the measurements to what you have in your kitchen cupboards to ensure they are accurate. I bought some measuring cups with a few wrong millilitres on them but I know the cup is still a cup (8 ounces or 250 ml). Measurements in ‘cups’ and higher volumes vary considerably. A US cup is 8 ounces, Imperial cup (England) is 10 ounces.
Hope this missive helps. Excuse me, I want to do a pour.
Excellent information. TY Heather!
Thank you so much. No matter how I changed my question around on google, I could not get this answer. Thank you again
You are very welcome. We’ll have a paint pouring calculator and a one page PDF on this topic out shortly also. I’ll try and let you know when they are available.
Oh I cannot wait for this! I am new and this is one of my hardest walls to deal with. Thank you so much for making this post.
Glad to help Jodi. This was definitely something I struggled with for a long time.
Awesome information except for the teaspoon part. 1 teaspoon equals 5 ml. So 1 ml is equal to 1/5 teaspoon.
Correct. Or 1gram = 1/4 teaspoon. I do everything by weight as it is WAY easier to weight then to use containers to measure.
Just opened the box containing my beginners NicPro pour kit. The info you provided on the measurements of total paint mix was the most valuable ive seen. Tomorrow I am going to try my first pour on a 6×6 canvas. Seems the amount of paint I will need is very small.
Thanks Gary! Enjoy the ride. It is totally addicting. I should have a form up soon where you can ask questions if you have any in the future or you can leave a comment on one of the posts also.
We are attempting a VERY large pour. Do your calculations still apply?
It absolutely will for coverage. That problem you have withe larger pours is that you are more likely to tilt off more paint than normal. So you can either try and catch the paint at the corners so not as much paint gets tilted off or you can plan for a little extra to compensate.
Fifth paragraph under Paint Consistency has a sentence which should read something like “Increased movement between molecules decreases [not increases] viscosity [resistance to flow] and thus improves how the paint flows”, right? Good info, thanks.
Yup. Thanks for pointing that out.
I am a total beginner and only tried three projects. Thank you for giving out your paint ratio and I will be using this in future. My last attempt I started with lovely cells but lost them when I started to tilt. I don’t thinks I used enough paint and overdid it with the tilting eager to cover the canvas.
The other two things to check are too much silicone and too thin of paint. Both can cause cells to distort as you tilt. Good look on your future projects!
Thanks so much for this really helpful and informative article. I am a beginner and I am finding that my results are completely random in terms of success. Some pours turn out beautifully but more often than not, they are either downright muddy or just plain uninspiring. I suppose thats down to all of the factors that you discuss. However, I have one particular question. ..
Recently I was pouring my various colours into a cup and most of them were layering perfectly well. However, when I added one of my colours, the paint sank straight through to the bottom of the cup immediately. The subsequent colours then followed suit until I poured more white into the cup. All my paint appeared to be of a similar consistency. Why would this happen?
Paint pouring is definitely a interesting medium to get just right. The paint has a mind of it’s own sometimes. For the mixing of colors the first thing I would recommend is let your paint stay a bit thicker than you normally would.
For the other issue with paint sinking, the pigment in the paint is much heavier than the other pigments I would imagine. This is actually one of the ways you can force the creation of cells. I’d recommend searching my website for my article on acrylic pour cells. It explains this whole phenomenon.
Measuring my paint what is my biggest problem so thank you
You are very welcome!
About to start this hobby and this is a big help Thank you. I am thinking of using a big piece of wood for the base of a board game table where the game board would be set. I am going to try and use them comes of one of my favorite games and covert it with a glass top do it does through. But before that happens I have to not suck at this. Also it had been great to hear a legal brained talk about this, lol. Thanks!
That sounds very interesting. It does take a bit to get a handle on but a few practice pours should get you most of the way to where you want to be. Good luck!
If I have just purchased $300 worth of PRE-prepared paints especially FOR pouring from a very reputable company and gesso pre-treated canvases (and allll of the other supplies too)… do I still need to put more gesso on the pretreated canvases or r they good to go as is? Also, should the paints be good to go as well? And lastly, I saw a video on using isopropyl alcohol to create cells, would u please tell me more about this method?
No, you don’t need additional gesso. Depending on the technique you may need a base coat of paint but you definitely don’t need more gesso.
Paints should be fine as long as they are the right consistency for the technique you are trying to use.
Alcohol has some definite uses for creating cells (generally small cells or lacing) but silicone oil is much easier to use with better consistent results. You might check out my article on cells (search “cells” on the home page) and you can get some more details on using alcohol for cells.
Hi David
Firstly I love your website it is really informative.
Im not very mathematical mined. What is the calculation for paint for a 75cm x 88 cm canvas?
This is my first big project. I’m going to be preparing the canvas with white paint mixed with floetrol
Medium and am very ambitious as I haven’t been doing paint pouring for very long.
Thank you in advance.
Kym
Hi David
I love your website
Im not very mathematical minded.
Could you please tell me how much paint is required for a 75cm x 88 cm canvas?
It will be prepared with white paint using floetrol medium.
This is my first large canvas as I haven’t been paint pouring for very long.
Thanks in advance
Kym
That is approximately 30 x 35 inches. So 30 * 35 / 25 is approximately 40 ounces total of paint and pouring medium. If you are putting a full white base coat down you can cut that down by 5 ounces or so but I usually just go with the full 40 and let is spill over a little to make sure I cover everything.
I am math illiterate. For example the oval calculation…is that pi (3.14) x the radius? But what does radius1 and radius2 mean? I’m very very very bad at math! Also, If I put down my base paint using calculations from your chart, do I have to do additional (separate)calculations for the color paints? If not, how do you then determine how much of those ozs are base paint and how much color I need to mix up for each color? (let’s say I have 5 colors on a 12×12 canvas with a base of white) Thank you in advance!
Radius 1 is the width (small side of oval) and radius 2 is the height (large side of oval).
The amount in the calculation is the total mixed paint (paint and medium) for the whole painting. You need to decide how you want to break down the different colors. For example and 8X10 canvas that is 1/2 thick needs approximately 4 ounces of paint mixture. You might do 1 ounce of blue, one ounce of red, and 2 ounces of white to make up that 4 ounces.
Hello, I am trying to pour on a 15×23 IKEA tray like this
https://www.ikea.com/us/en/p/klack-tray-rubberwood-06410406/
I have two questions, should I treat the smooth surface in any way before pouring or pour directly. Also, since there won’t be any runoff, should I use less or the same amount as mentioned above. Thank you for your advice
You definitely want to use less paint. Maybe 20% less because you don’t have any edges and you aren’t tilting anything off like you mention.
If you are going to resin over the top you don’t need to prepare the surface. If you aren’t going to resi,n you may think about a very very thin coat of gesso on the bottom surface just to make sure the paint doesn’t peel right off when it is dry. A light sand and painting straight over the top would work also.
Dear David,
have been watching quite a lot of your very interesting videos. Thanks for all the helpful information you are sharing especially for me as beginner! I have a little request/wish. Is it possible to give your measurements also in metric sizes? As I am from Germany/Europe I always need a calculator to convert.
Thanks!
I should have a pouring calculator page that does metric and imperial here in the next little while. Thanks for commenting Elfi. I love getting feedback.
Hi David,
I am essentially a left-brainer, so it was amazing when I stumbled onto your You Tube videos. While I appreciate the work of many other artists,, I keep returning to your website and videos simply because you speak my language. I have to research and study before I “risk” dabbling in anything creative. You have given me all of the tools and information I need to take the plunge into paint pouring.
Paint pouring container ready … check
Blank canvas (multiple sizes) … check
Acrylic Craft Paint… check
You get the idea…..
First pour… tomorrow… check
Thank you so very much!!!!!
Definitely get started soon. It is SO FUN. I think you’ll love it.
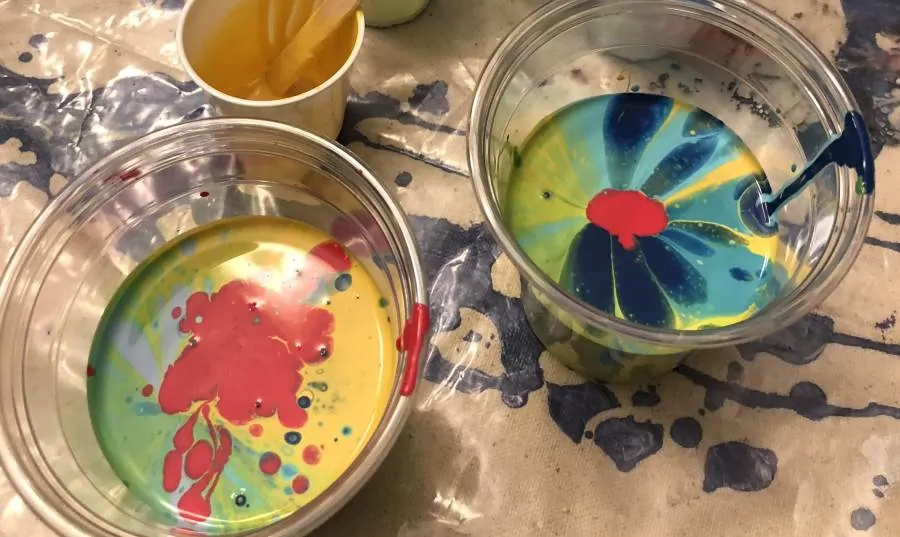
Great advice on so many topics! I love your photo with the two cups of paint because it looks like it’s already active with cells. And big cells is my goal. What do you use for big cells? Are they the same as “super cells”? And what is your recipe if you don’t mind sharing that? Thanks!
For big cells you have a few options. Use silicone (or one of the other oils like hair serum or WD 40) and slightly torch after you pour but before you tilt. The tilting will stretch the cells more. If you want medium sized cells you torch after doing half your tilting. Smaller ones you torch after tilting. I usually go with the middle.
You can use a paint that helps create cloud cells. That is kind of a trial and error. I have a few videos on my YouTube channel about that too.
I have been working on tiny 3”x3” canvas panels as practice. So by the calculation 3×3=9/25=0.36 I only need less than half an ounce of the paint & medium mixture right?
Correct. If you use canvases don’t forget to include the sides but since panels don’t have sides your calculation is right. If your paint is thicker you might add another 20% or so.
I have a suggestion after watching several of your videos and other artist on YouTube. I have to keep rewinding between all the different shots of consistency. If there was a side by side video of how it comes off the craft stick that would sooooooo help people like me who need specifics. I know you like spacifics as well.
Sure thing. I can totally do that. That’s a really good suggestion. Thanks lisa!
does this include the base color or just the decorative colors?
The paint amount is all paint including both the base coat and the rest of the paint.
I had reached out to you a few weeks ago wanting to show you my attempt at making the American flag. My blue had run into the whites and the red stripes were super bubbly so I used too much silicone on that but I didn’t know if there was a possible way to adjust the blue or just leave it as an abstract I wanted to send you a picture of it to give beautiful picture of what mine turned out like. Any advice would be greatly appreciated thanks so much.
Use my Contact Us link in from the menu and you can send me a picture Vicki.
In your table, would the oz measurements needed for good coverage include laying down a base coat for smooth flow over a (no longer) dry canvas? I’m trying so hard to get the hang of this but I’m either too thick or too thin, too little paint or not enough! I’ll get there, but I’m hopeful that an answer from you might make getting there easier. Tyia!
The paint amount in the table and the calculator is the total amount of paint you need including whatever base you use. For a normal pour I use about 30% of the total amount as the base coat and then the remaining 70% in whatever technique I am doing. Dutch pours are more like 50:50 or even 70:30 the opposite way depending on how much color you want and how much negative space.
What are the best size plastic cups with lids to buy on Amazon that you suggest using for your mixed paints so they can be covered and used repeatedly? I am looking for a size that would work for the majority of paintings although very large canvases will obviously require more paint and larger cups(containers really). Is Glue-All your go to activator or do you also use the Behr Paint and polyurethane mixture or the Aussie Floetrol and silicone mixture? Thanks so much
it sounds like you are making the Sheleeart blooms. Those require a special mix of paint that doesn’t really get used with other methods. The 3 ounce reusable Tupperware with attached lids work great for that. For other methods you might consider using the 24 ounce squeeze bottles. Paint that has been mixed with distilled water should last weeks or even months in those.
Glue-all doesn’t work as an activator for blooms very well. You need to use floetrol and a high quality dense paint (that’s why the black and white from Amsterdam are so nice). Currently I use the cheap ColorPlace paint from Walmart for these but I haven’t mastered those yet so not sure how other bases work.
Just starting out and have done three attempts on watercolor paper. Your Youtube videos have been very helpful. What I’m still not sure of is how much paint left on the canvas (paper) is not too thick or too thin. I may be striving to get too much off due to being worried about puddles so I’m stretching everything too much. Considering that I’m using the correct amount of paint and each one I’ve done is the same paint/consistency I need to know how to gauge what amount of paint can be left on the canvas and not cause issues with drying, cracking, etc.
You can try using slightly thicker paint so you can tell when it really stops moving and then quite. That will give you the best idea of where you should be. As you go thinner use slightly less paint (10% less for thin (no mound) vs regular (slight mound).
Hello,
I love watching your YouTube channel. You have been helping me understand SO much better than all of the artists I have watched ( a lot). You explain things very well and in a way that my brain seems to comprehend more lol. I am a beginner and getting frustrated with many of the basics.
I have seen a video on your page for this following topic. Can you please do a video about canvas board (or direct me to one if you have)? As most of us know, this is a very expensive hobby, and with learning and wasting so much in the process, I have been using the cheap canvas boards. These somehow seem to soak up so much paint (not sure how with the boards being so thin)..it’s like it vanishes. They also get very waterlogged and start to warp. I am just curious if that has happened to you. Can you please make a video about how your creations look on canvas board? Thank you so much for all that you do! Stay well!
I don’t generally use canvas boards because of this but I have thought of some ways to get around the board soaking up so much paint so I’ll see what I can figure out and definitely make a video about it since I’ve been asked this a lot recently Ashley.
Correction: have not** seen a video about painting on canvas boards.
I don’t know if my previous comment posted. Thank you SO much for helping me understand more clearly! I have watched sooo many videos from other artists, but am not comprehending very well. Your videos are awesome in the way you explain things and your experiments. It is so nice that you show your trails and errors and how you got there. So many channels just show everything coming out seemingly perfect which is not possible.
I haven’t seen a video on this following topic. Can you please do a video about painting pouring on canvas board? I use these since they are cheap while I am learning. I am still struggling with the basics but am very glad I stumbled across your channel and website. My canvas board somehow holds sooo much paint and water and then gets waterlogged and warps. It’s like the paint vanishes..and it is so thin I don’t understand. I just want to see if your paintings turn out similar as the ones I’m creating. And maybe an experiment of the differences outcomes of canvas board versus stretched canvas. Thank you for all that you do! Stay well!
Just started watching your videos, I want
To measure my floetrol and Amsterdam white and water together using ounces.
So for a canvas measuring 16x20x.05
Question is what are my measurements for each product, how much floetrol how much white paint how much water. I can’t
Rap my brain around it. Please help
By putting that in to the calculator (see menu on my website) you need 14.2 ounces. The mix depends on which type of paint you are using. If you are using craft paint (Folkart, Craftsmart, Walmart paint) you use one part paint and one part floetrol plus water to consistency. each paint will be different.
Just as an example if you have 3 colors you want to use you divide 14.2 by 3 and get 4.75 ounces. So that would be about 2.2 ounces of craft paint and 2.2 ounces of floetrol and about .35 ounces of water (do water little at a time till the right consistency). Again, that is for 3 colors and craft paint.
For student artist paint you do 2 parts floetrol to 1 part paint. So for 3 colors you do around 1.5 ounces of paint and 3 ounces of floetrol and then water to consistency (about .25 ounces in the end).
Hi! I’m Karine, I follow you on Youtube and I had a question for you regarding a product that I found and actually bought from Amazon and I was wondering if you ever tried it and if so, what were your thoughts on it?
https://www.amazon.ca/gp/product/B088M2JS8P/ref=ppx_yo_dt_b_asin_title_o02_s00?ie=UTF8&language=en_CA&psc=1
Please keep doing those awesome videos, I bow down to the master 😀
Thank you and have a great day!
I haven’t tried that brand but I assume it would be similar to Floetrol/Owatrol in consistency. You’d have to test it to see if it has the same celling effects.
Do you use regular semi-gloss house paint for your white with an acrylic pour? Especially the “wet” coat that goes over the gesso’d canvas, under the acrylic pour. And, so then do you mix it with the Floetrol just as you do the acrylic paint? I am on my 4th pour. First canvas turned very muddy (greens and greenish blues used), with a very bright, thick splashes of red. The yellow all but disappeared. The 2nd two turned out a little better, thank goodness.
SO.. if I dont like the way a picture looks (muddy, color, etc..) can it be painted over again? is there something you have to do to the canvas first?
Thanks for all your great info,….
Generally not. I only use house paints for specific types of pours like SheleeArt blooms, some pear cell recipes, and the Sarah Taylor type of painting. I find that the different texture of house paint and acrylic paint causes too many different things like one paint showing through on the corners or cracking and crazing cause the house paint is too thick.
Why do you use a torch?
What’s the purpose?
Why do you use a torch?
What’s the purpose?
So paint mixed with glue and water ?
the torch breaks the surface tension allowing heaving paints to sink and lighter paints to rise. Same thing with silicone. it heats the silicone causing it to rise. In both cases that creates cells.
You are excellent at explaining acrylic pouring! You are so appreciated, thank you. I have a another question about paint mixture calculation separately for the base color mixture and the colors to be porn over that. According to the chart, a 16 x 20 canvas would need 12.8 oz of paint mixture. Since there is normally a base coat poured on the entire canvas first, before the colors, would 12.8 oz be made for the base color alone to coat the canvas? Then, divide that 12.8 oz among the number of color mixtures for the canvas. For example, four colors divided into 12.8 would be 3.2 oz of each color? So, there would be 12.8 oz of base color (often white) and 3.2oz of each of the four color mixtures? Thank you for your time!
12.8 is the total paint. You might use 6oz of paint for the base and then pour the other 6.8 on top.
David, like you, I’m Left Brained (not qualified to call myself any kind of artist); UNlike you, my brain is
l a z zzzzzzzzz (snort) What? Sorry , I must’ve dozed off. Anyway, I find it much easier to multiply by .04 than divide by 25 – you just have to remember where to place the decimal. I thought others might appreciate this approach. Any comments?
I love your innovation. Whatever makes your brain work Jamie.
Love your teaching method, I learned things I’ve] never heard before!
Thank you!!
Kathryn
Thanks for reading and watching Kathryn. Glad I can help.
Hello David, a newbie to this craft & loving your videos.. I have only completed one Acrylic pour which doesn’t look too bad.. I used PVA ..water .. paint & a drop of silicone oil all on a stretched canvas.. however I notice in many comments Floetrol is added.. is this an essential product to use for better results ?
I would appreciate your view & comments.
No it is not. It would replace your glue if you used it. It has a tendency to make cells on it’s own that are very small. Just different in how interacts with the paint and pours on the canvas.
Hi David, My problem is that with every attempt I’ve made to create a beautiful piece of art, I end up getting more mud than beautiful colors. My paints want to mingle with each other and they do it often before tilting. I have tried to vary the consistency of the paint, but it seems I am cursed. Please tell me what I can do to keep my colors separated better. Thanks so much! Love all the tips!!
Just guessing here but here are my generic suggestions. Don’t use craft paint, use student or better paint (no apple barrel, craftsmart, decoart, etc). When you stack your paint, do so with paints that are semi close on the color wheel together (eg. no red and green together as they make brown). Keep your paint thicker to being with (mount upon a mount). Pour slower out of the container and tilt slower which will cause less mixing.
Hi David …thank you for all the tips,,i started pouring last month ,and yes i’m addicted to it now ,you have helped so much with the paint calculator . once again ,thank you for sharing
Always a pleasure to help a fellow artist Paul.
Hey David! I haven’t tried a pour yet. Still collecting supplies. How do you figure a pillow for the colored paint? And do I still need to base coat the canvas? So much to learn! Especially at my age! ☺️
If you haven’t started pouring yet then don’t mess with a pillow paint. Start with an easy technique like the stright pour or tree ring pour or master that. Then you can move on to a move advanced one like the bloom technique (which uses a pillow).
Hello, David. I just finished my first pour on a 6×6 canvas with wood frame. It looks…. Interesting. And drippy. Soon I’ll be doing this craft with my 7-year-old granddaughter, whom I’ve been teaching crafts for years. Being on a tight budget, I’m using the craft paints we have: WalMart, CraftSmart, etc., and I used Elmers Glue-All for this first trial. I added some clear glitter to parts of the surface before it dried, because a 2nd-grader can’t have too much glitter. My colors were an off-white, a turquoise, and a seafoam green. I have a 16-oz bottle of Crayola Portfolio Series Acrylic Pearlescent Mixing Medium, which I haven’t used yet.
• Would the Crayola medium work better than the Elmer’s?
• Any suggestions on making this process more kid-friendly? I will stick with the 6×6 size of canvas.
• What color combinations would you suggest? She loves pinks, purples, and turquoise.
• Also, what is the least expensive method of getting cells [of any shape] to show up? I do have a heat gun.
Thank you for all your help!
I haven’t tried crayola medium. Generally I don’t only use iridescent medium but I mix 50/50 with my normal pouring medium.
Kids love making a mess and mixing colors. Small is best initially so it doesn’t get everywhere.
Those one you mentioned would work great. Beware of any of the whites from craft paint. They will make your paintings crack when they dry.
Silicone oil is the most effective. Keep your painints a little thicker and don’t mix more than 50% craft paint to 50% medium (combined if you use both as mentioned above).
Hi David, I’m new to all this but ive started doing a few ringtree pours for making my wooden clocks and coasters, but would love to so a few canvases also. My question is, when my canvas painting is fully dry, what do you recommend to seal it and get a semi gloss sheen. Also if using silicone oil does it sit on the surface of the painting when dry, how do I remove it if so. Thankyou for all your help to us all.
Liquitex Varnish – Rubbed on. If you search you YouTube channel for “varnish” you’ll see my videos about this.
Yes you have to clean it off. Makeup removal wipes, windex, very diluted soap on a barely wet towel are all good ways to remove silicone.
Just a terrific post, David! Thanks very much for such useful, clear information.
Glad to help Gin.
Very educational , impressive!!!
Thanks so much Sara. Glad to help.
I’m an absolute beginner in the art of pouring. So far I have several of them but the results were surely not impressing. I have one question. Very basic, but well, as I said: I at the starting point. Here we go: what consistency should the paint for the base coat have? Same consistency as the paint you are going to use for the pour? I have tried with a very thin paint for base coat, but I guess it was TOO thin…..
99% of the time you want the exact same consistency as the rest of the pour. Same mixture also. There are some exceptions to that rule though; pearl cells, sheleeart blooms, and the paitnig style Sarah Taylor does or some of the few that come to mind.
Thank you for your answer. Greetings from a Dane in Spain.
This is a very important factor for beginners to know. As a beginner myself, I have been researching as much info as I can get and this is not very well communicated in the existing paint pouring community. I point blank asked for help from a paint pouring group that I joined on explaining the background paint/pillow and was told I should take a class. I’m not opposed to taking a class but I’m not a stupid person and am artistic and like you I can self teach myself, if not a class would be a good option. I was extremely confused and you cleared this up for me. Thank you David.
Glad to help. Keep in mind that some techniques like this dutch pour actually use slightly less paint because you really aren’t “tilting” anything off and you are generally careful about laying on the base coat without losing too much off the edge either.
What is the ratio of paint to medium for a medium consistency? I was going to do 1 to 1??
I don’t do ratios for consistency. I do ratios based on type of paint. I use water at the end to get the right consistency.
Craft paint 1:1 (paint:medium)
Student level 1:2
Artist grade 1:3-5+
Hi David, thanks for the amazing info! I am just starting and have a somewhat silly question… but to me it is important so I can decide how to mix the paint.
Windsor&Newton galeria acrilic paint, how would you categorize that? Is it craft paint? Student level? Or Artist grade?
High level student bordering on artist. 2 parts medium to one part paint to start. You could probably get away with a little more medium but the color will dilute a little.
David, can you give some suggestions about estimating the amount of paint for vases, Christmas ornaments, etc.
There are a few website that will give you the surface area of a globe or a cylinder. You can take the height and width of your vase and calcault from there. Then add about 25 more for the weird way paint runs off of 3d objects.
Honestly, I just put a canvas underneath my ornaments or vase and calculate the same way and let it drip on to the canvas so I am not wasting paint.
I will be trying a pour this afternoon. I do have a question.. when it dries do you put some type of varnish or protection on the painting? I am sure it will take me some time to get down the measuring of my paints.. I am using glue-all for now as my medium. Very excited to get started and thank you so much for all you do to teach the beginners how to do this.
Yes. I always add a varnish or resin (rarely) to my paintings. That way they are UV protected in additional to having a sealant on them.
I’m new to fluid art and I’m having trouble with consistency. I’ve watched all your videos. However, when I test my paint by putting a drop on paper then adding another color on top to see how they interact with one another the second color “bleeds” forming like a water ring around the drop, like a cell with a nucleus. I want the colors to stay more defined. I’ve done run tests and I can’t tell which paint color is the problem or maybe they’re all too thin. Desperately looking for answers.
1. All colors need to be the same consistency. I like the blob drip test to compare paints against each other. The thin one will drip much faster than the rest.
2. If any paint starts to halo they are too thin for the type of solid color pour you are talking about. You want a mount upon a mound consistency (think poop emoji when drizzling back in to the cup).
3. Metallics and pearlescent paints always look thicker than they actually are. In my experience this or white are ususally the culprits.
I love how you show different brands, mixed with with or without silicon, to Flo/ not to Flotrol or glue etc…I have a question I haven’t seen asked, when doing a Tree Swipe( or others), can you use like the Ready Pour? Along side of colors you mixed yourself? Will that make a difference since your diy is made up differently then premixed.
Thank you for your knowledge
Some colors mix fine but some don’t really work together. It is kind of trial an errors. As long as they are the same consistency you will have the best luck though.
I am quite certain I am making this harder than it should be, but I am confused on the pouring medium versus paint ratios.
For example, let’s say I’m using a 9×12″ paper = 108/25 = 4.32 oz of paint (which includes the pouring medium). I got that part down.
I get confused on how much pouring medium I need to use per color. Let’s say I use four colors, so I need ~ 1 oz per color. If that 1 oz includes the pouring medium, is that plus the 1 oz of paint or do I use less paint to account for the pouring medium? If the latter, then how do I calculate that?
So normally you have to take your ratio 1:1 or 2:1 and add them together (2 or 3). Then divide the total paint you need of that color (1 ounce) by the 2 (1:1) or 3 (2:1). Then multiple that back in the medium:color (1:1, 2:1). So 1 / 2 (1:1) or 1 / 3 (2:1) which makes .5 or 1/3. So 1:1 is .5 ounces of paint and .5 ounces of medium. For 2:1 you have 2/3 ounce medium and 1/3 ounce paint.
I am working on upgrading my paint pouring calculator to help you with this. https://leftbrainedartist.com/calculator watch for changes soon to include this math.
Hi yall!! I wanna move to using a scale instead of tick marks on a cup. I hope it will help me with consistency.
Anyone recommend a good one for all we need for? I wanna grab Cyber Monday deal 😉
Thanks in advance!!
David, I am also left-brained but seem to be struggling more than you do with art. Nevertheless, I don’t know if you can help me but if you would be so kind as to watch my video at https://www.youtube.com/watch?v=D-Sc1SLQKUE and tell me what you think went wrong. Do you think it could be the matt base since the paint cracked through all layers and peeled? To me, that seems like the most logical answer but I don’t know why it should matter whether the paint is matt or satin or gloss. At least google doesn’t seem to indicate that it would matter.
Thank you in advance
Vicki
Thank you so much for asking. Love helping people out.
I believe two things happened. First there was way too much paint left on the canvas. Too much paint means the top layer dries faster than the bottom. Especially since this had been painting before and so it wasn’t drying “through” the canvas. 2 the professional pouring medium on top of house paint just exacerbated the drying problem. Professional paints dry much faster than house paint in my experience. So you got the top of the paint drying and the tension on the surface as that layer is different than the drying house paint below. As the bottom dried it contracts but the top is already dry so eventually it rips the dried crust on top.
This works on the sheleeart blooms because they spin or tilt off a lot of the paint so you have a very small layer of house paint and a very small layer of color paints on top. Even with that technique you’ll see people that get cracking when they leave too much paint on the canvas.
okay, thank you. Learning the hard way is a hard way to learn but you remember it.
How much medium do I mix with the new Pearl paints?
I am not sure what the new pearl paints are you are referencing but normally for medium body (amsterdam, liquitex, etc.) 2 to 3 parts medium to 1 part paint. Craft paints, even pearl craft paints, are 1 to 1 and if you are talking pigments it depends on how thick you want them and how vibrant.
Considering the thoroughness of your post, this may seem a redundant question, but I’m brand new. Does the ounce per 25 in.², include the puddle/ first wet coat on the canvas, or is that just the color pour in the cup?
That is a great question Theresa. This value includes both. So if I want a base coat I might use 60% of my paint total paint for the base coat and then 40% of my other paints for the colors. This is a great place to start and once you get a feel for your paints you’ll understand better how much paint you need.